There are different reasons why you may want to disable Windows Search Index. You may have noticed that your computer is consuming more RAM than usual. The memory issues you’re experiencing need a fix immediately. You also want to do things such as reduce processes and background tasks and feel more secure by turning off local and cloud indexing. The performance issues are something that users with lower-end computers may want to do to help overall performance.
Contents
What is Windows Search Indexing
You get an idea of what Windows Search Indexing is by the name but may still wonder what more there is to it. This feature gives you a customized database of your computer’s content. The Windows Search Indexing will go through pictures, files, drives, emails, system files, etc. You can find all these files by searching for them, and they all will be in one place for the fastest search results. It runs in the background, and you get it quickly when you look for something in Windows search.
How to Switch Between Classic and Advanced Indexing on Windows 11
Maybe you want to limit where the feature looks for indexing to save computer resources. You can do this by accessing the Searching Windows option. To access it press the Windows + I keys to access Settings. Once in Settings, click Privacy and Security, Searching Windows, followed by the Classic or Enhanced options.
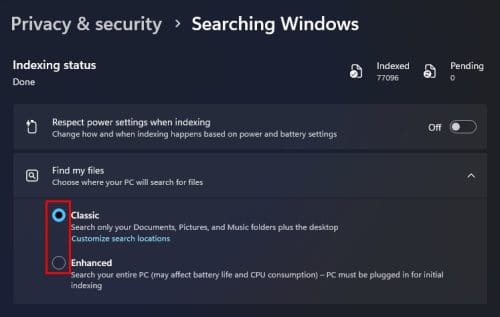
The classic option explains that the search feature will look through your documents, pictures, music folders, and the desktop. But if you choose the Enhanced option, the indexing feature will look through your entire computer, resulting in affected battery life, and your CPU will work harder.
But you can exclude a folder by clicking the Add an Excluded folder option under the Exclude folders from the enhanced search section. Click on the folder, followed by the Select Folder button. All the folders not included in the Enhanced search will be listed in the Excluded folders from enhanced search section. If you change your mind and want to include a folder, click on the dots to the right of the folder and choose to remove.

You may want to see how things work out by choosing the classic version and not disabling it altogether. By default, you’re going to find the Classic version enabled. But you can do more than that by removing a drive from the indexing process; here are the steps to follow.
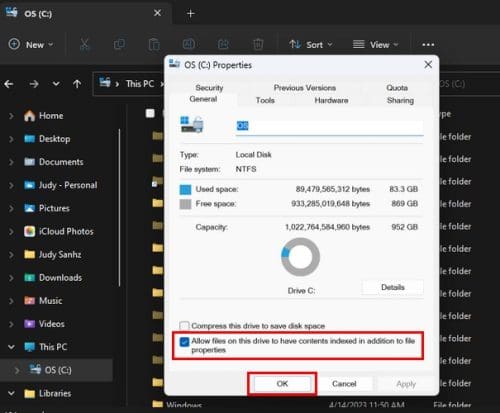
How to Remove a Specific Drive from Windows Search Index
To remove a specific drive from the Windows Search Index, open File Explorer by pressing the Windows +E keys. When it opens, select and right-click on the drive you want to exclude and choose Properties. At the bottom-left, uncheck the option that says Allow files on this drive to have contents indexed in addition to file properties. Click OK, and a Confirm Attribute Changes window will appear. Choose an option and click OK. That’s all there is to it. This specific drive will not be included the next time you use Windows Search Index.
You can also go to Settings (Win + I), followed by Privacy and Security. Click on Searching Windows > Advanced indexing options. You can also type indexing options in the search field. Click on the Modify button at the bottom left, and at the top, check the boxes for what you want to include in the Windows Search Index. At the bottom, you’ll see what will be included in the indexing. It’ll appear at the bottom when you click on one at the top. Once you’re done, click OK, followed by the Done button.
How to Turn off Windows Search Index Using Services
Another option you can go with to turn off Windows Search Index is through Services. Press the Windows +R keys and enter services.msc. When the new window opens, use the sidebar to go to Windows Search. You can double-click on the option, or right-click and go to Properties to end up at the same place. For the dropdown menu for the Startup type, choose disabled. And, under Service status, it’ll say Running by default but click the stop button to change that. Click OK. If you ever want to enable it follow the same steps, but in the Startup type, choose Automatic (Delayed Start), and in Services status, click the Start button.

How to Stop Windows Search Using the Command Prompt
If you like to use Command Prompt more than any other option, it’s possible to turn off the Windows Search using it. To open the Command Prompt as an administrator, type command prompt in the search field. When it comes up in the search results, choose the option to open it as an administrator. Once it’s open, type the following command
REG UPDATE HKLM\SYSTEM\CurrentControlSet\Services\WSearch\Start=3
Press enter and now enter this other command
net.exe stop “Windows Search”
That’s all there is to it. You’ll need to restart your computer. But if you want to turn it back, open the Command Prompt and enter the following commands.
REG UPDATE HKLM\SYSTEM\CurrentControlSet\Services\WSearch\Start=1
Press enter and enter this other command.
net.exe start “Windows Search”
Further Reading
Some reading material you might be interested in might be how you can search pot posts and people on Mastodon. if not, you can also read about how you can turn off/on visual search on Microsoft Edge. Or, if you’re looking to do some deep web searches, here are 10 of the best search engines. Also, if you want to see how you can remove Bing Search from Windows 11, here are the tips to follow.
Conclusion
Windows Search Index is a helpful tool, but it may do more harm than good if you’re struggling with your computer’s performance. That’s why a lot of Windows users may decide to disable it. The good news is that if you turn it off, you can always enable it again if you change your mind. You can choose the method that works best for you. So, why are you disabling Windows Search Index? Share your thoughts in the comments below, and don’t forget to share the article with others on social media.