Skip to content
LogoTechnipages
LogoTechnipages
  • Topics
        • Android
        • Browsers
        • Gaming
        • Hardware
        • Internet
        • iPhone
        • Linux
        • macOS
        • Office
        • Reviews
        • Software
        • Windows
        • Definitions
        • All Recent Posts
  • Product Reviews
  • About

Slack: How To View a List of Admins and Owners of a Slack Workspace

Mel HawthorneFebruary 7, 2021 Comments (0)

Every user in a Slack workspace has a role, which is part of one of two categories, administrative and non-administrative. Most users will be in one of the three non-administrative roles: full member, guest, or invited member. Full members are permanent members of the workspace, depending on the workspace settings they may have access to some administrative functions. Guest users are only available in paid workspaces and can either be single- or multi-channel guests. Invited members are members who have been specifically invited by email address, but have not yet joined the workspace. Invited members can still be mentioned, added to channels, and be sent direct messages, even though they haven’t properly joined the workspace.

Administrators have access to administrative functions of the workspace, again there are three administrator categories: workspace primary owner, workspace owners, and workspace admins. There can only be one primary owner per workspace although the primary ownership can be transferred to another user. Workspace owners have almost all of the same permissions as the workspace primary owner, apart from the fact that they can’t delete the entire workspace or transfer ownership. Workspace admins can are primarily intended for member management but also have access to administrative functions and tasks.

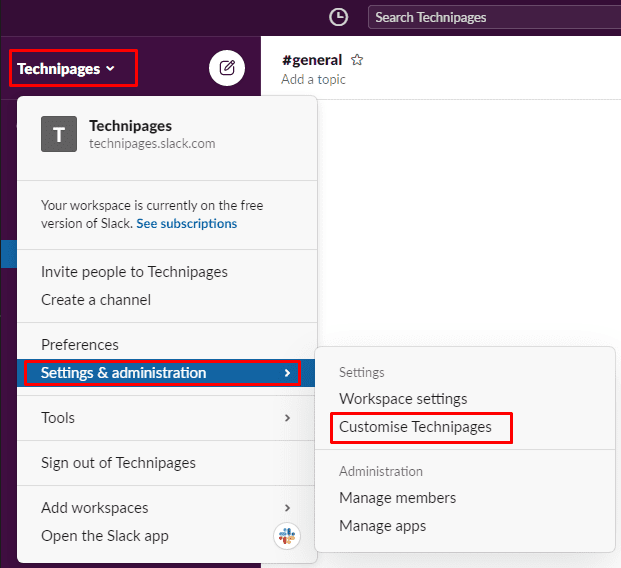
To be able to view the full list of admins and owners of a Slack workspace, you need to browse to the “about this workspace” page. To do so, need to first click on the workspace name in the top-right corner. Next, in the dropdown menu, select “Settings & administration”, then “Customise <workspace name>” to open the workspace customisation settings in a new tab.

To get to the workspace customisations settings, click on the workspace name in the sidebar, then select “Settings & administration” and “Customise ”.

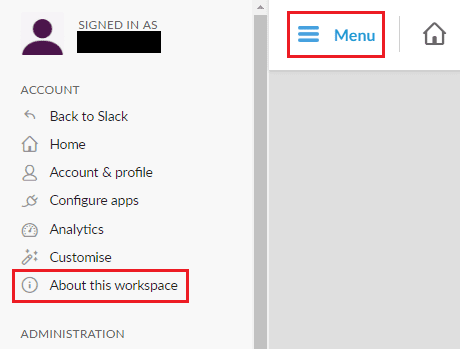
Once you’re in the workspace customisation settings, click on the “Menu” burger menu icon in the top-left corner, then click on “About this workspace”.

Click on the “Menu” burger menu in the top-left corner, then click on “About this workspace”.

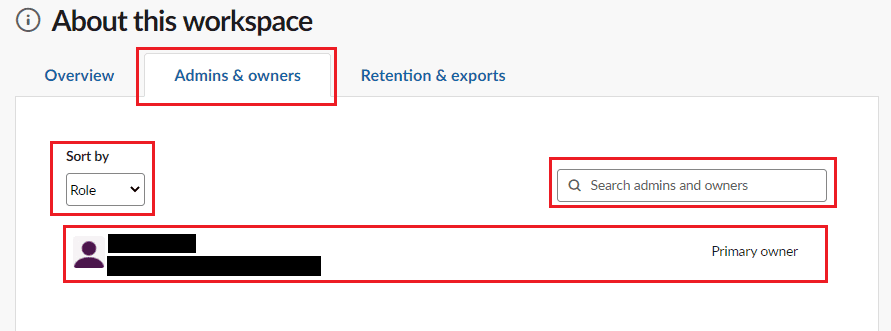
In the information about the workspace, switch to the “Admins & owners” tab to see the list of workspace owners and admins. You can choose to order the list by role or name with the “Sort by” dropdown box to the top-left of the list. You can also search by name using the search box to the top-right of the list.

Switch to the “Admins & owners” tab to view the list of workspace owners and administrators.

A workspace can have many users with administrative permissions, if you want to find a specific one it may be easiest to open the list of workspace admins and owners. By following the steps in this guide, you can view and search the full list of workspace owners and admins.

Categories: Internet | Software

Author Mel Hawthorne

You Might Also Like

  • How to Add a Friend in Discord

    Mel HawthorneInternet
  • Google Duo: How To Create a Group Chat

    Mel HawthorneInternet
  • Dropbox: How To Transfer a Large File To Friends

    Mel HawthorneInternet
  • Dropbox: How To Review Your Security Settings

    Mel HawthorneInternet

Leave a Reply

Your email address will not be published. Required fields are marked *

  • browser screen goes black

    Browser Screen Goes Black Intermittently 

  • computer heating up in hyper v

    Computer Heating Up When Using Hyper-V – How to Fix 

  • clipchamp unexpected application error

    Clipchamp Unexpected Application Error: Here’s the Solution 

  • winload.efi file missing error

    Winload.EFI File Missing Error on Boot – How to Fix

  • fix error 0x9cfc7550

    How to Fix Error 0x9cfc7550 (We Couldn’t Create a New Partition) in Windows 

profile pic

The Experts Behind Technipages

My name is Mitch Bartlett. I've been working in technology for over 20 years in a wide range of tech jobs from Tech Support to Software Testing. I started this site as a technical guide for myself and it has grown into what I hope is a useful reference for all.

Learn More

technipages logo white
linkedin icon

Technipages is part of Guiding Tech Media, a leading digital media publisher focused on helping people figure out technology. Learn more about our mission and team here.

© 2025 Guiding Tech Media All Rights Reserved

  • About Us
  • Contact
  • Terms of Use
  • Privacy Policy

© 2025 Guiding Tech Media All Rights Reserved

Information from your device can be used to personalize your ad experience.
Do not sell my personal information.

Last Updated on February 7, 2021 by Mitch Bartlett