

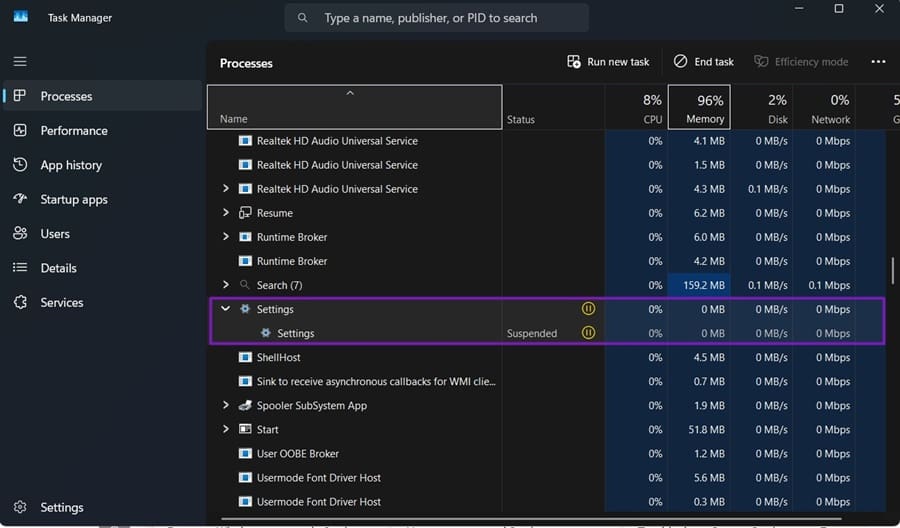
If you see “systemsettings.exe suspended,” Windows 11 Task Manager will usually display a message that “This UWP process is suspended to improve system performance,” with UWP an acronym for Universal Windows Platform. While this shouldn’t impact your work, it can result in some shortcuts taking longer to resolve. Here’s what to do to possibly prevent systemsettings suspended on your device.
Why Is systemsettings.exe Suspended in Windows 11 and Does It Matter?
Systemsettings.exe is the “formal” name of the Settings application (the successor to the old Control Panel). It manages pretty much all settings that can be accessed without using the Registry Editor.
It’s a UWP, which allows the operating system to manage it automatically and is the first option to “cull” when trying to conserve resources like RAM. If your RAM usage approaches the high 80s and 90s, you might see the “Suspended” icon over a few UWPs like Settings, Windows Shell Host, and Lock Screen Manager (since you don’t need the lock screen when actively working).
Having Settings suspended usually doesn’t matter in active work. The only main issue you might experience is that the Settings app will take longer to load the first time. However, as soon as you power it up, the process should become unsuspended and work fine.
Beyond this, there are a few fixes you can try to prevent the suspended state.
Fix 1 – Prevent systemsettings.exe Suspended Windows 11 by Managing Background Apps and Services
Since the process is suspended to conserve memory and CPU usage, you can turn off other background apps and processes in its place.
Step 1. Open the Task Manager and go to the “Startup apps” section.
Step 2. For each of the entries, right-click on it and choose “Disable.”

You might want to keep the “msedge.exe” app, since it allows background internet connections with the system, so it’s also one of the more vital options. The “updater.exe” is responsible for checking for Windows Updates in the background. The rest are up to you.
Step 3. Hit “Win + R” to enter the Run utility. In there, type in “msconfig” and hit “Enter.”
Step 4. In the System Configuration window, go to the “Services” tab, check “Hide all Microsoft services,” then hit “Disable all.”
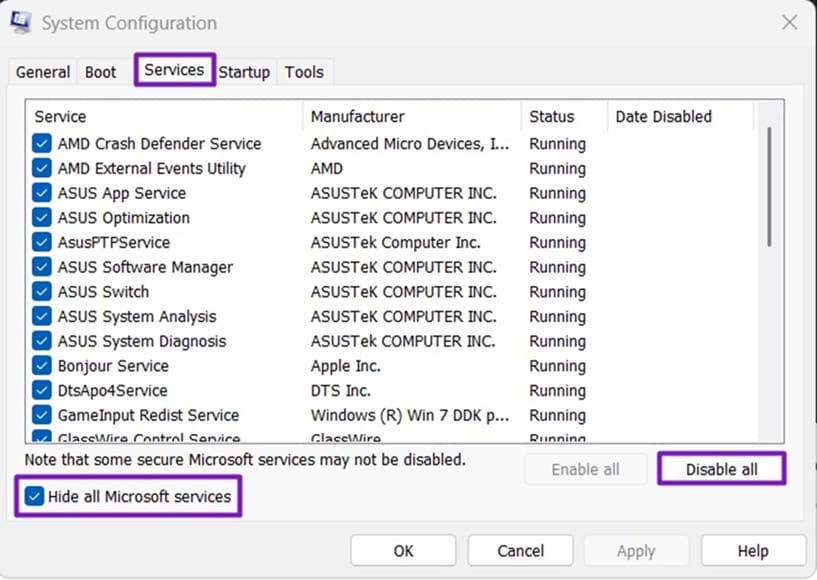
Step 5. Restart the PC.
This disables all non-essential services, which can drastically reduce your RAM usage and CPU load. It can also improve boot time.
Step 6. Keep the system running and open your usual apps to see if the systemsettings.exe process gets suspended.
If it doesn’t, you can go back to the System Configuration utility and enable services as you need them. Most commonly, processes that run updaters in the background, antivirus, or RGB managers for hardware take up most resources.
Fix 2 – Registry Edit to Prevent systemsettings.exe From Suspending Windows 11
You can force the system to keep the process running by modifying the registry that allows it to go dormant in the first place. Make sure to create a backup of the Registry first when doing this. Note that this is an advanced workaround and not officially documented by Microsoft.
Step 1. Open the Registry Editor as an administrator (available in search with “regedit”).
Step 2. Copy the following address, then drag it over the address in the navigation bar at the top and paste:
HKEY_LOCAL_MACHINE\SOFTWARE\Microsoft\Windows NT\CurrentVersion\BackgroundModel\Policy
Step 3. If the “Policy” key (folder) doesn’t exist, make one by right-clicking on “BackgroundModel” and selecting “New” and “Key.”
Step 4. Right-click on the right-hand panel and make a new “DWORD 32-bit value.”
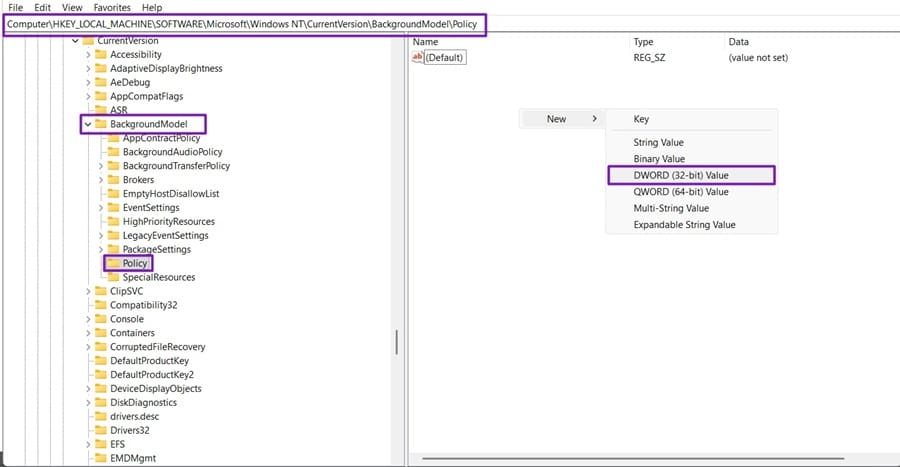
Step 5. Name it “GlobalUserDisabled.”
Step 6. Double-click on the value and set it to “1.”
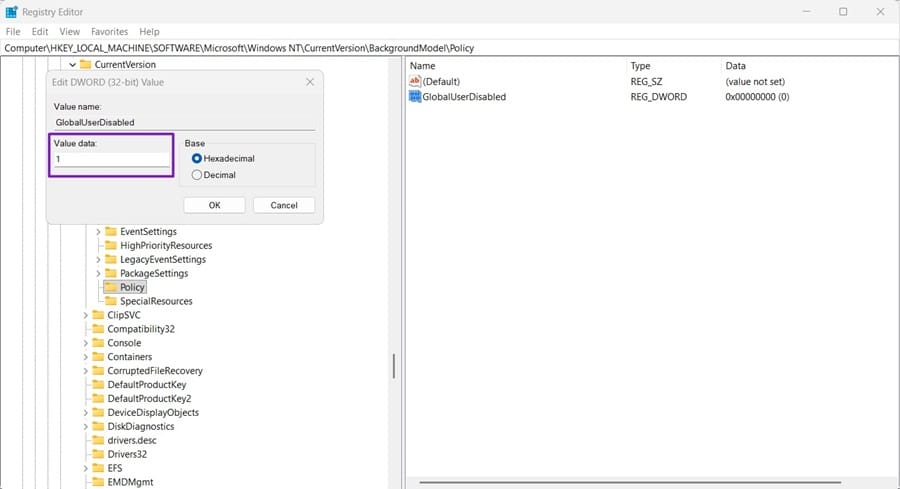
Step 7. Close the Registry Editor (it automatically saves) and restart the PC.
Note that this Registry change prevents all UWP processes from being suspended. On a device with low maximum RAM (8GB and below), this might cause some issues when you run particularly demanding tasks or have a lot of tabs open. However, most machines should be able to work well.
Fix 3 – Force Settings to Recheck via PowerShell
If your Settings process doesn’t turn on after you try to access it, you might not be able to change any Windows settings. You can try to use the old Control Panel as a workaround or force Windows to re-register settings.
Step 1. Right-click on the Start icon and select “Terminal (Admin),” then confirm the User Account Control prompt.
Step 2. Enter the following command and hit “Enter.”
Get-AppXPackage -AllUsers -Name windows.immersivecontrolpanel | Foreach {Add-AppxPackage -DisableDevelopmentMode -Register “$($_.InstallLocation)\AppXManifest.xml” -Verbose}
Step 3. Re-open Settings to see if it works.
Fix 4 – Use Another Account or Reset the PC
If you can’t access Settings at all, you have the following three options in terms of severity:
1. Make a new account and try to access Settings through there. If you can, your old account might have picked up too many corrupted settings or files to be usable. You can transfer data between the accounts and close the old one.
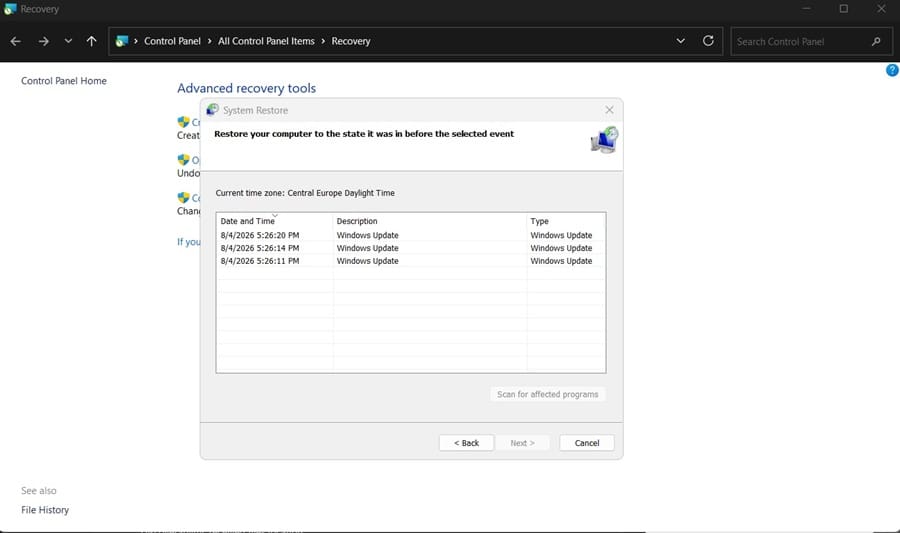
2. Re-roll the previous update or return the PC to an old System Restore point using the Control Panel. Note that System Restore is disabled by default, so unless you manually activated it, it won’t work. It may still save a few points from major updates.
3. Backup all your files elsewhere and reset the PC to factory settings. Note that the new “Restore” option that saves your files is only available if you can get to “Settings.”