An audio jack not working on Windows 11 might be caused by one of three issues:
- Windows is outputting sound somewhere else.
- The driver for the audio device is missing or broken.
- The port itself is dirty or damaged.
The troubleshooting steps below should take care of all these possibilities.
Fix 1 – Audio Jack Not Working on Windows 11 PC Because It Is Using Another Output
Plugging in headphones doesn’t always switch the audio to the new device if the PC is currently outputting audio. This is usually because there’s an HDMI monitor with built-in speakers as the priority device (even if it shouldn’t output sound).
Step 1. Click the speaker icon on the taskbar, then click the arrow next to the volume slider to open “Select a sound output.”
Step 2. Choose your headphones from the list and raise the volume slider.
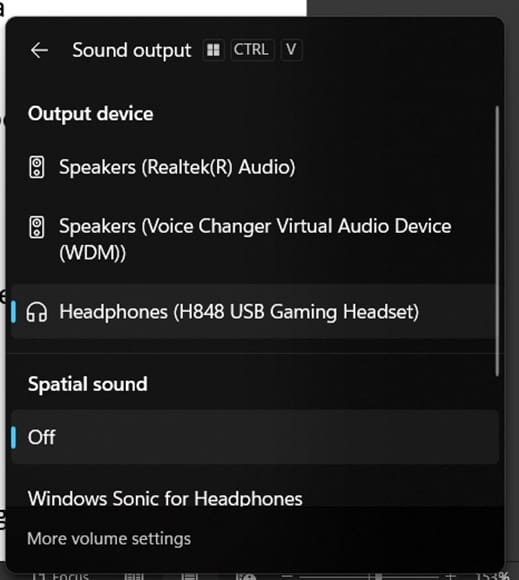
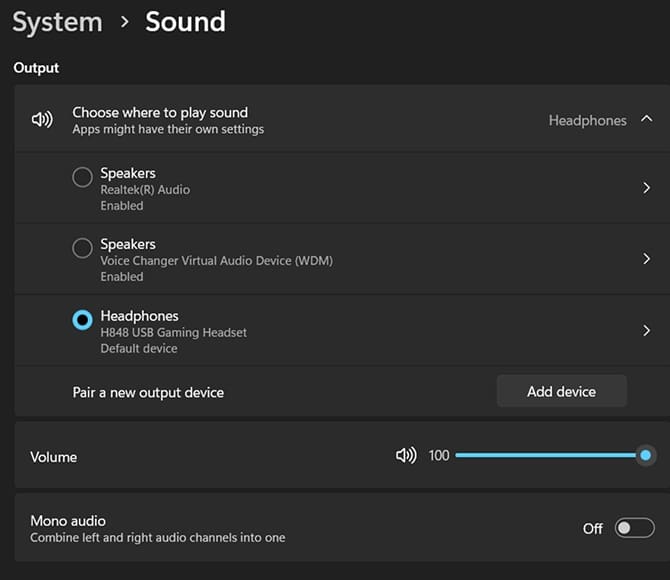
Step 3. If that doesn’t work, open Settings, then go to “System” and then to “Sound.” Select the device under “Output.”
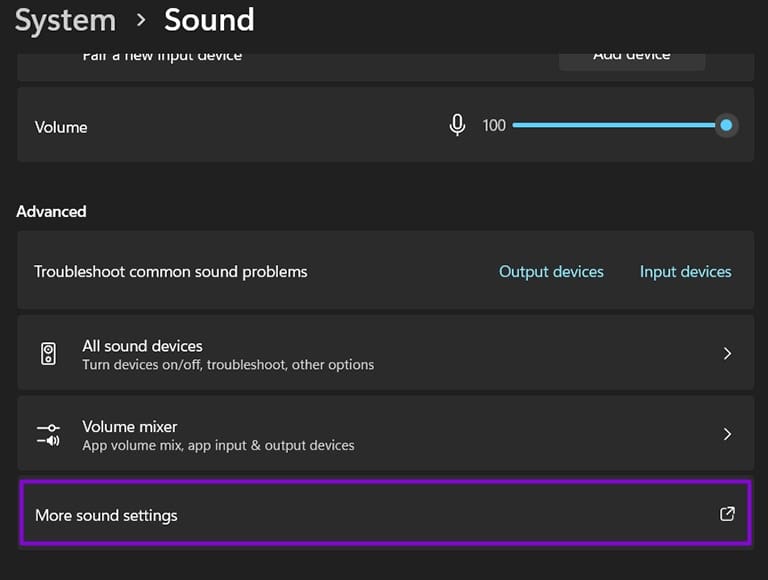
Step 4. Go to “More sound settings,” then to the “Playback” tab. Choose the device and hit the “Set Default” button below.
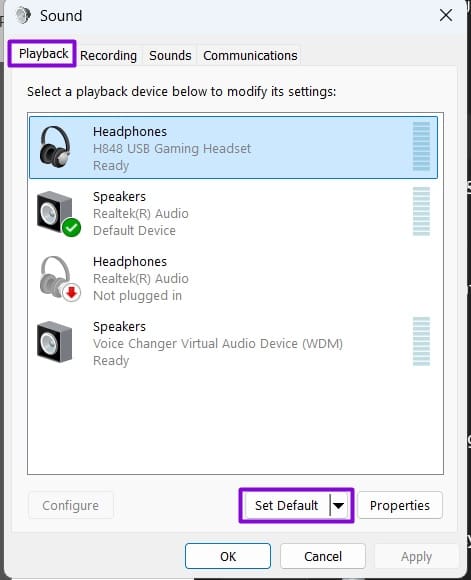
Step 5. If the device is listed but greyed out, right-click it, open “Properties,” and set “Device usage” to “Use this device (enable).”
Fix 2 – Check the Plug and Clean the Port
A 3.5 mm port will inevitably gather dirt or grime, and this means the plug won’t fit right or the PC might not detect anything in it. That produces all the same symptoms that are blamed on drivers.
Step 1. Turn off and unplug the PC (this prevents accidental short-circuits).
Step 2. Shine a light into the jack and look for lint, dirt, bent contacts, or greenish corrosion.
Step 3. Gently remove any dirt with a wooden toothpick or a plastic dental pick. Don’t use a paperclip, needle, or anything metal.
Step 4. You can use short bursts from a can of compressed air held upright and a little away from the port.
Step 5. Reconnect the device and make sure that the plug goes all the way in the port.
If you need a liquid cleaner, you can use a small amount of alcohol on a cotton swab to clean the rim.
Fix 3 – Run the Windows 11 Audio Troubleshooter
The troubleshooter is generally helpful when you need to set up an audio device for the first time.
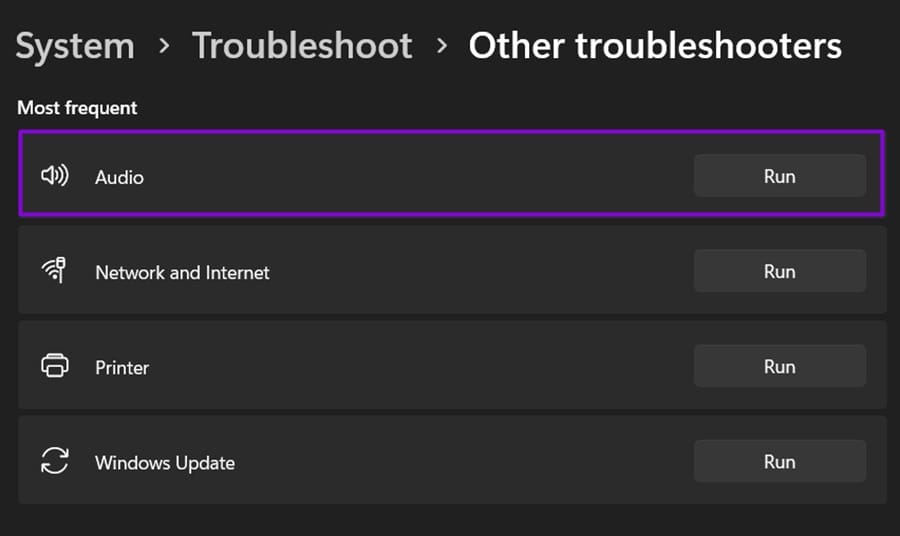
Step 1. Open Settings, then go to “System” and choose “Troubleshoot.”
Step 2. Select “Other troubleshooters.”
Step 3. Under “Audio,” click “Run,” then follow the prompts.
Fix 4 – Update, Roll Back, or Reinstall the Audio Driver
The audio driver may be updated to the wrong version or overwritten by third-party programs, making it unusable. You’ll need to re-download it.
Step 1. Right-click on the “Start” button and select “Device Manager,” then expand “Sound, video and game controllers.”
Step 2. Right-click on your main audio device (usually named “Realtek(R) Audio” or “Intel Smart Sound Technology”) and choose “Update driver.” Use the option “Search automatically for drivers” and follow the prompts.
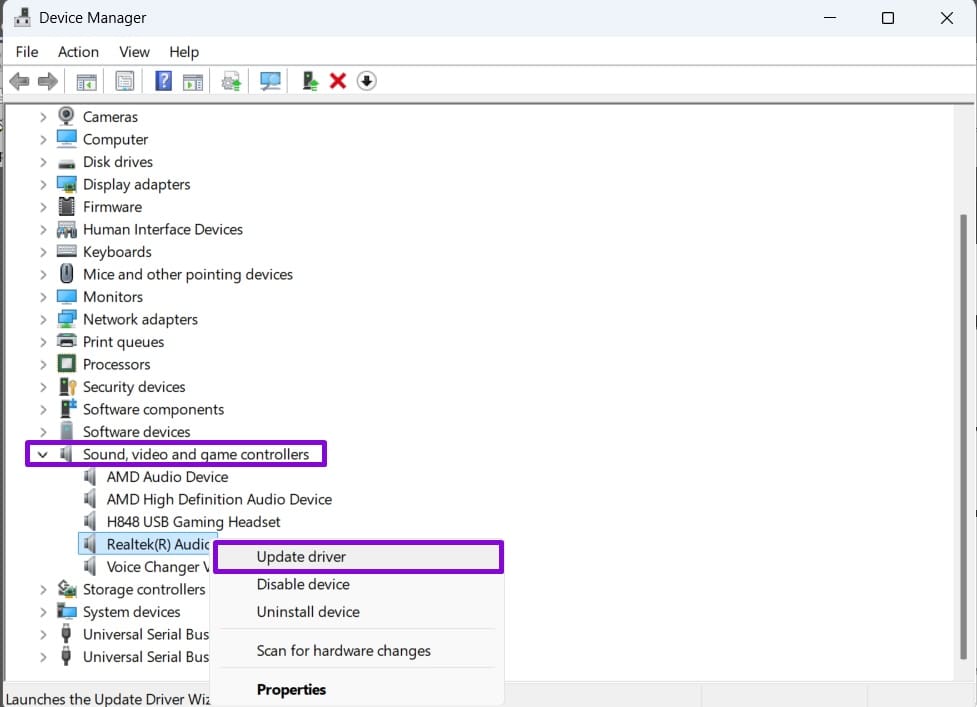
If the jack stopped working after a Windows update, it’s likely downloaded a wrong driver version. In the Device Manager for the device, go to “Properties,” then use “Roll Back Driver” in the “Driver” tab.
Fix 5 – Audio Jack Not Working After a Clean Install of Windows 11
This is usually caused by Windows failing to install the driver on setup. Without it, it might not recognize the jack.
Step 1. In Device Manager, go to “View” and enable “Show hidden devices,” then use the “Action” option on the top and select “Scan for hardware changes.”
Step 2. Restart the PC and load the BIOS or UEFI (via prompts), then confirm the “HD Audio Controller” (under Integrated Peripherals or Onboard Devices) is set to “Enabled.” Save settings.
Step 3. Download the driver from the manufacturer’s page rather than a generic Realtek package. You can find the motherboard’s model as “BaseBoard” in “System Information” (which you can search for directly).
Step 4. Run the installer, restart the PC, and check Device Manager again.
Step 5. If the driver installs but you don’t get a sound control panel, find “Realtek Audio Console” in the Microsoft Store and run it to get it.
Fix 6 – Restart the Windows Audio Services
If the endpoint has stopped responding, the two services behind it can be restarted without a reboot.
Step 1. Hit “Win + R” to enter the Run utility, type in “services.msc,” and hit “Enter.”
Step 2. Find “Windows Audio,” right-click on it, and select “Restart.”
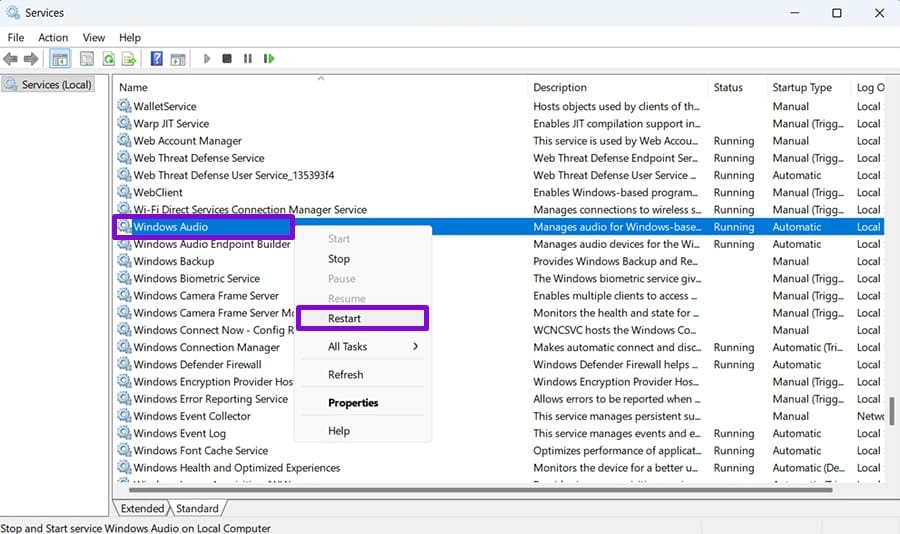
Step 3. Repeat for “Windows Audio Endpoint Builder.”
Step 4. Check the “Startup type” on both. They should be set to “Automatic.”
Fix 7 – Physically Damaged Jacks
With desktop cases, if the rear jacks work and only the front ones are silent, this could be down to a wiring issue. In there, the front panel connects to a header on the motherboard labelled HD AUDIO, and its connection may come loose over time if you open the case for cleaning or changing hardware.
Open the case and recheck the connector to make sure it is correctly attached to the motherboard. If you’re unsure, ask for professional assistance.
If the jack is damaged, this depends on the device you have. For desktops, you can try to get a new one online and replace it. But most laptops have a soldered jack, which makes replacing it a professional’s job.