
One of the many places where you share a lot of pictures is Facebook. If you never backed up those pictures elsewhere, you may run the risk of losing them. Who hasn’t erased pictures thinking there was a backup, right?
Facebook gives you the option to transfer your information to another service. That way, if you close your Facebook account for some reason, you know you have those videos and pictures elsewhere. Also, there’s no need to use a third-party app to do this since there’s an integrated feature that helps you do this.
Contents
How to Transfer Your Pictures and Video from Facebook to Google Photos
It’s always a good idea to have a backup of the pictures and videos you upload to Facebook. Weird things can happen and all of a sudden not be able to find a video you’re sure you uploaded. By saving to Google Photos, for example, you’ll have easy access to that video.
If you’re on your computer, sign in to your Facebook account and click on the arrow pointing down at the top right. Go to Settings and Privacy.

Now click on Your Facebook Information. The option to transfer a copy of your information will be the second one down. Click on this option, and the following window is where you’ll need to choose the destination of your files. There will be four steps to follow:
- Choose destination
- Choose what you want to transfer
- Connect
- Start Transfer
In the Choose Destination option, you’ll see a dropdown menu that will include various options. Google Photos is one of them, but if you change your mind and want to transfer your files elsewhere, you can choose from options such as:

- Google Docs
- Koofr
- Dropbox
- WordPress
- Google Photos
- Bloguero
- Google Calendar
- PhotoBucket
- Backblaze B2
Since the tutorial is about transferring your file to Google Photos, I’ll continue with that option. When you click on Google Photos, you’ll need to make some more decisions. For example, you’ll need to decide if you want to transfer all of your pictures and videos or some of them.
You’ll see options to choose a date range or a specific album. If you only want to transfer videos, make sure to select the None option for photos or vice versa.

You’ll also need to sign in to the Google account you want to transfer the files to. Facebook will also ask for permission to access that Google Account. The on-screen instructions will be easy to follow regardless of you’re doing the file transferring on your computer or Android device.
Android
To get started on your Android device, you’ll need to:
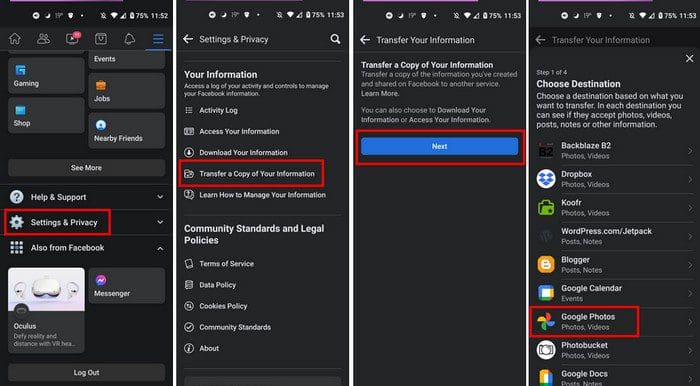
- Tap on the three-lined menu at the top right
- Swipe all the way down and tap on Settings and Privacy
- Settings
- Swipe down to the Your Information section
- Tap on Transfer a copy of your information
- Tap on the blue Next button
- Choose Google Photos
- Choose what files you want to transfer
- Connect with Google Photos by tapping on the blue Connect button
- Sign in to your Google Account
Conclusion
Depending on how many pictures and videos you need to transfer will determine how long the process will take. If you’re like me and take a picture of just about everything, then the process will take a moment. As you can see, the file transfer process is easy, so even if you’re in a hurry, it’s something you can do. Do you have a lot of files to transfer? Let me know in the comments below, and don’t forget to share the article with others on social media.