
If you’re struggling to send bulk emails or mails to clients and customers by personalizing the content of each document, mail merge can help. For mail merge, the best combination is Excel and Word. Find here how to mail merge from Excel to Word in two easy methods.
Mail merge is the most affordable form of office work automation on desktop and laptop computers. You just need to configure the Microsoft Word app to fetch data for placeholder texts from a database like an Excel file for one document.
Once set, you can create personalized letters, envelopes, emails, directories, address labels, and so on in a single click. If you learn how to do a mail merge from Excel to Word, you can create invoices, monthly bills, subscription details, and many other official documents for hundreds and thousands of customers in a few clicks.
By learning how to do a mail merge in Word from Excel, you can create data-rich emails and mails and avoid human errors that come as a risk when creating such documents manually. So let’s get started with the methods to do a mail merge from Excel to Word.
Contents
How to Mail Merge From Excel to Word: Manual Method
There are two ways to do a mail merge from Excel to Word. The first one is the manual method where you add the placeholder texts yourself for one document and Word does the rest for the remainder of mails or emails. Learn the steps for manual mail merge here:
Create the Data Source on an Excel Worksheet
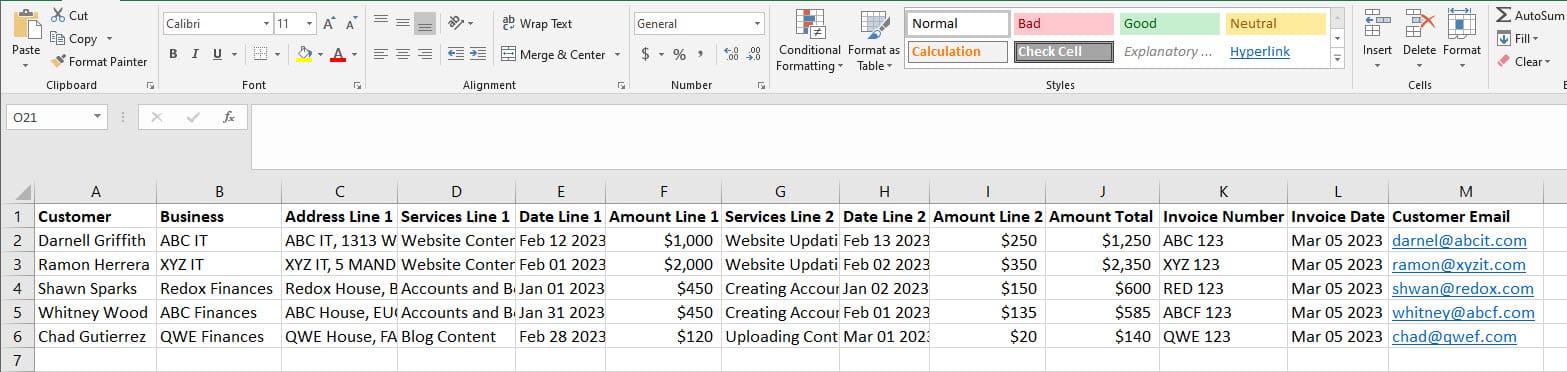
First off, you need to create a database from which MS Word will fetch data into Mail Merge Fields within the template email, mail, invoice, etc. You must create the Excel database in such a way that all the data related to one recipient are available in a single row.
You can separate various data in a single row under different column headers. These column headers will work as the counterpart for Mail Merge Fields in Word. You can create the column header as you please now. But later, you must make minor edits in column headers to match fields in Word.
Find below the basic steps to create a database for mail merge in Excel. This tutorial will create an invoice for a small or home business where you can send bulk invoices and monthly bills to thousands of customers affordably without relying on costly online solutions or third-party agencies:
- Create a blank Excel file and rename the sheet name to Invoices.
- You must populate all the data for mail merge in this worksheet.
- Now create the items you want to include in the mail merge document as column headers. These will function as Mail Merge Fields in Word.
- Type a customer name and all other related information under the respective column header in the same row. If you change rows for the same customer, Word won’t be able to populate the correct information on the merged document.
- As your client base increases, you can start adding new customer names under the Customer column header.
- Also, you can add new data for existing or new customers under the specific column headers.
- Each time you update this database, Word mail merge will automatically create a new customer document for added customers, omit clients if you delete some, and also update the figures in the document as per information from the Excel database.
- Word mail merge won’t import the number formatting from Excel. To keep number formatting elements, like decimals, currency symbols, etc., you need to insert a short code in specific Mail Merge Fields. I’ll mention the code and trick to use it later in this tutorial.
That’s it! You’ve successfully created the Excel database for the mail merge project. Great job! Let’s get started creating the mail merge template in Microsoft Word.
Create an Email or Mail for Your Customer
First, you need to draft the invoice email or mail you want to send to your clients and customers. The letter must contain some basic information about you as shown below. These are static for all emails and mails.

- Your name
- Your business name
- Your business address
- Company logo (if any)
- A signature line
Do Mail Merge From Excel to Word
Now that you created the Word template on which you’ll add mail merge fields, let’s see the steps below:
- Click the Mailings tab on the Word ribbon and then select Start Mail Merge.

- From the drop-down list, choose the type of document you want to make. Let’s select E-mail Messages.
- Now, again click Mailings but this time choose Select Recipients.
- Since you want to perform a mail merge from Excel to Word, select the Use an Existing List option.
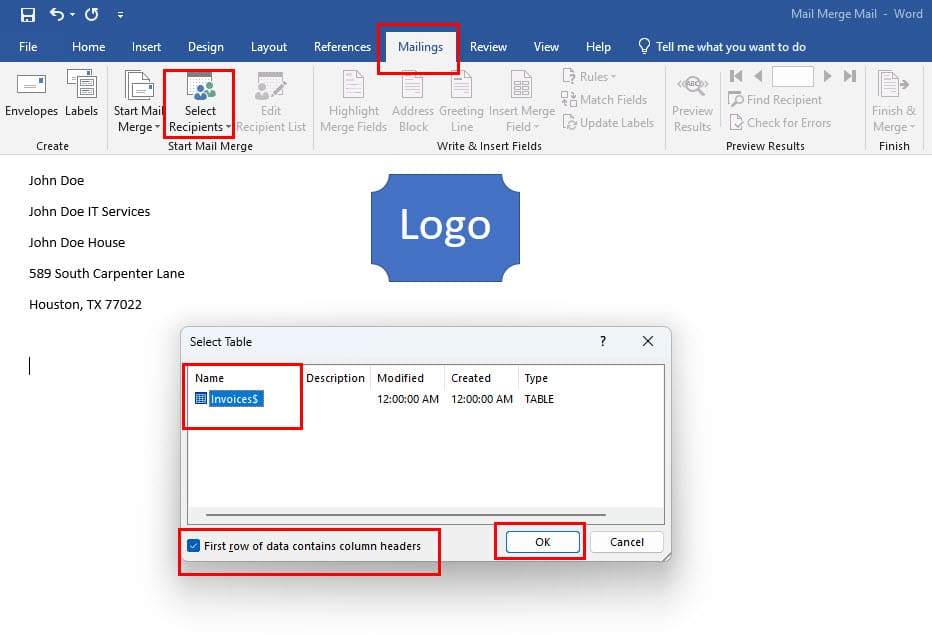
- Now, locate the mail merge database created earlier on Excel and select the Invoices worksheet in the Select Table dialog box.
- Now, you should see that the Write & Insert Fields command group becomes activated on the Word ribbon menu > Mailings.
So far, you connected the Excel database for mail merge to Word. Next, we’ll learn how to populate the required fields in the mail merge template document below:
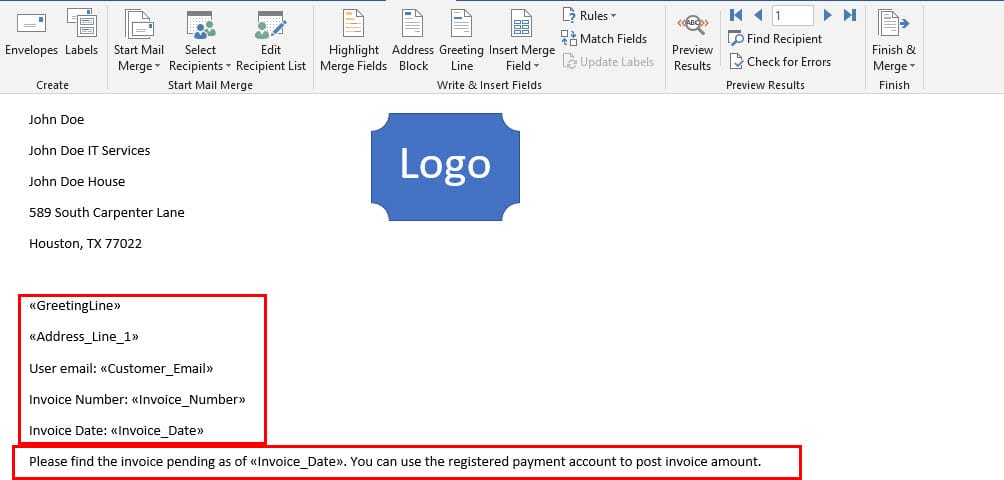
- Click the Greetings Line option on the Mailings tab and create the greeting line you want to add. The «GreetingLine» placeholder text will show up.

- Now, you can write a statement mentioning the invoice payment. This will be a static statement that’ll go to all the recipients.
- Below the greeting line, you can add other mail merge fields like User email «Customer_Email»; Invoice Number: «Invoice_Number»; Invoice Date: «Invoice_Date», etc.
- Then, click the Insert Merge Field option to start adding the dynamic components of the mail merge project.
- The Insert Merge Field command will show all the column headers available in the Excel database you added to the mail merge document. Take your time to add the fields you want.
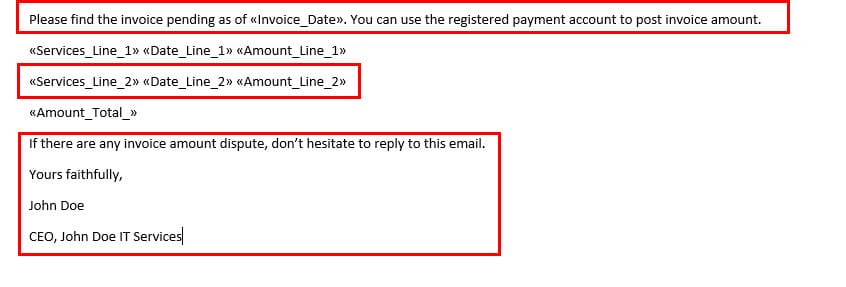
- For instance, you can add these merge fields: «Services_Line_1»; «Date_Line_1»; «Amount_Line_1»; «Services_Line_2»; «Date_Line_2»; «Amount_Line_2»; «Amount_Total_».
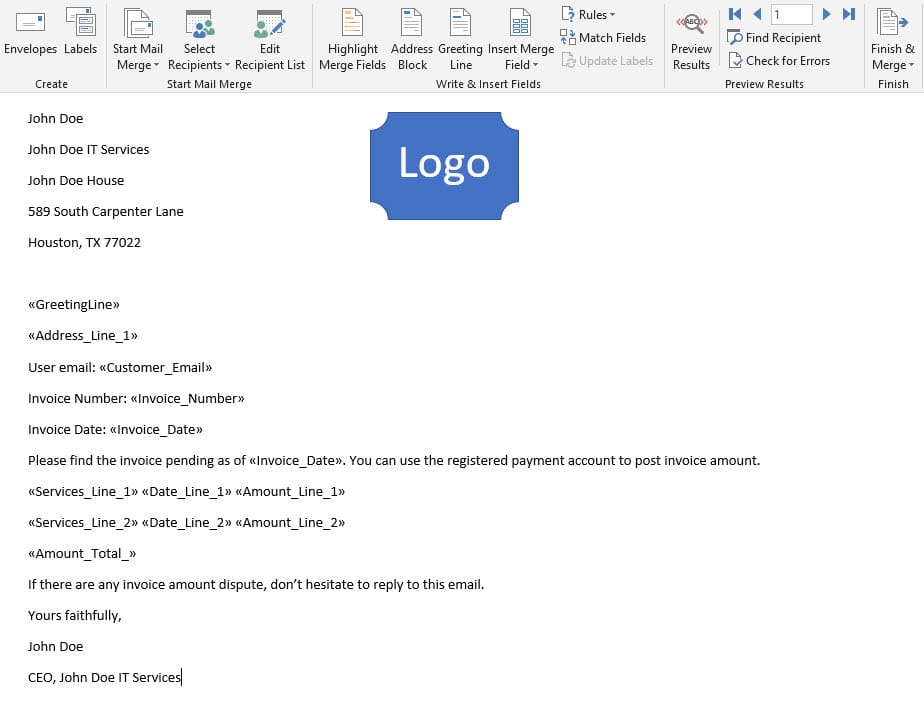
- Now that you added all the dynamic fields, you can close your email by adding a closing remark and signature line. Again, this would be a static component.
- You can now click the Preview Results button under the Mailings tab to view the first merged document.
As you can see in the preview that the invoice amount doesn’t show the currency or decimal points. To resolve this, follow the steps outlined here:
- Right-click the «Amount_Line_1» mail merge field and click Toggle Field Codes.
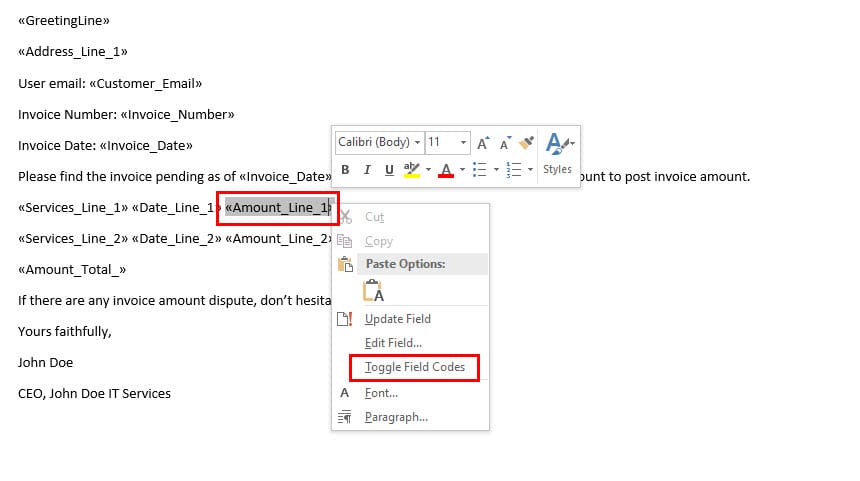
- Now, you should see MERGEFIELD and then the field.
- Enter the following code as shown in the image above:
#$0.00
- Now, select the field again, right-click, and Toggle Field Codes.

- Then, see the preview to confirm if mail merge is importing the number formatting or not.
- You can now enter the above code in other mail merge fields with numbers like «Amount_Line_2» and «Amount_Total_».
You can highlight important data in the email template now. Word mail merge will carry the formatting in all other documents that you create in this mail merge project.

Once ready, click Finish & Merge > Edit Individual Documents > All in the Merge records dialog box. Click OK to create all merged documents for each customer in the Excel database.
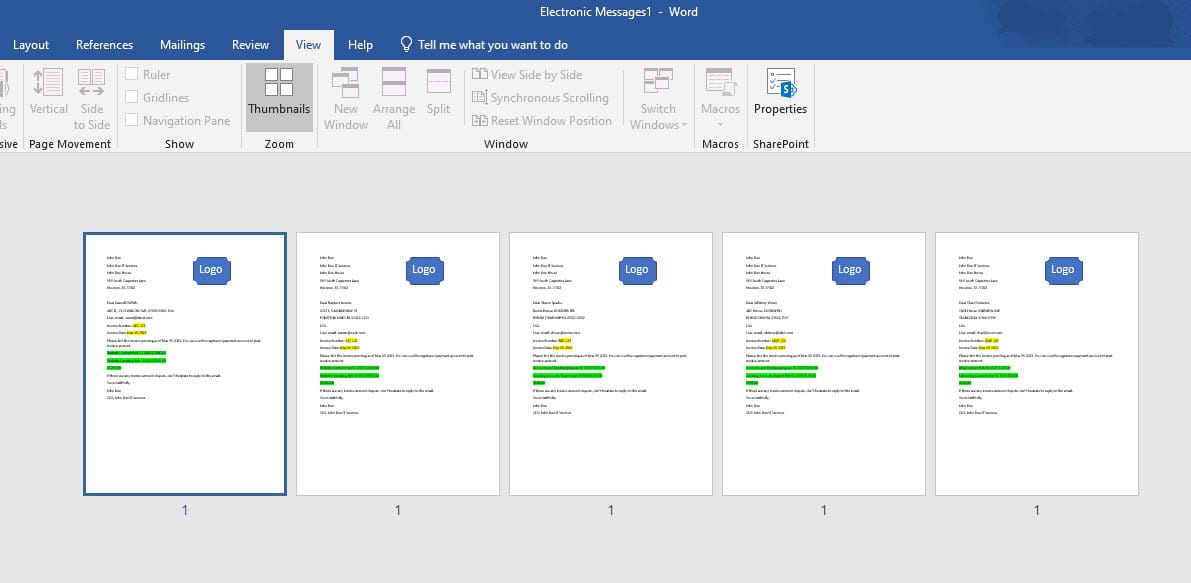
Word mail merge will create a new document with the merged emails. So, you must save the file separately or send emails right away.
How to Mail Merge From Excel to Word: Mail Merge Wizard
The second way to do a mail merge is by using the Mail Merge wizard of Microsoft Word. However, this is a tricky method. You must modify the source database in Excel according to the available Mail Merge Fields in Word. Here’s what you need to do to try out the automatic mail merge in Word:
- Create the template Word document and then click Mailings > Start Mail Merge > the type of document you want to produce.

- Then, click Start Mail Merge again and then select Step-by-Step Mail Merge Wizard.
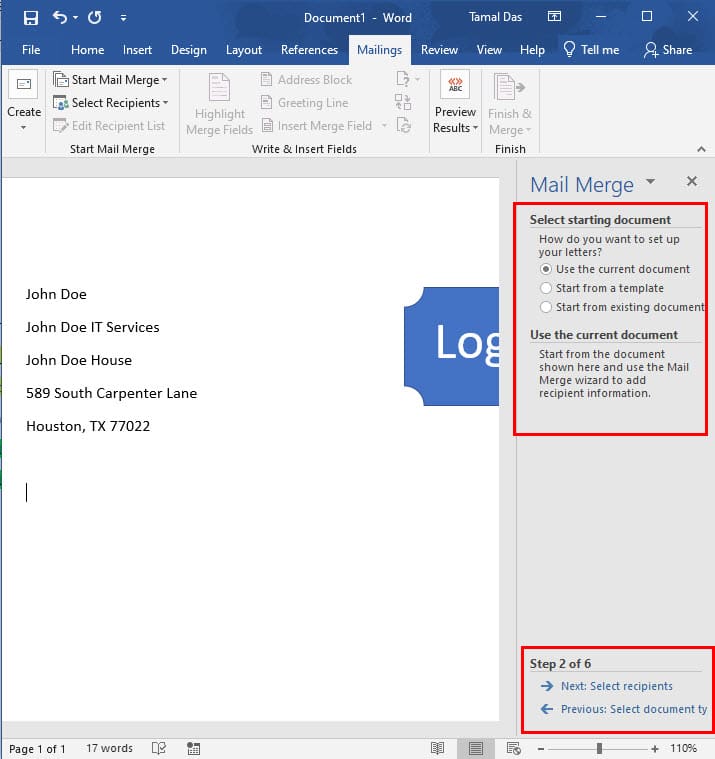
- The instructions will show up in six steps on the right-side navigation pane of Word.
- You need to perform the task shown in the first step and then click Next: Starting document to follow the wizard.
How to Mail Merge From Excel to Word: FAQs
How Do I Automatically Merge Data From Excel to Word?
You can merge data to Word from Excel automatically by using the Word mail merge feature. For this, you must have the Excel file with you. Then, create a new Word document and start writing your email or mail. In the places where you need to import values from Excel, click the Insert Mail Merge field and add the required value.
Before doing this, you must add the Excel database by going to Mailings > Select Recipients > Use an Existing List and choose the Excel file. Once you create the template document manually, finalize the mail merge and Word will create all other emails or mails automatically for the respective recipients.
How Do I Create a Mail Merge From Excel Data?
You can create a mail merge from Excel data as you usually do for a new list of contacts or contacts from Outlook. But, to utilize data from an Excel worksheet, follow these steps:
- Save the Excel file and Word mail merge template on the local storage.
- Open the Word file and click Mailings.
- Now, choose the Select Recipients option and click Use an Existing List.
- Now navigate to the drive where the Excel file exists, select it, and then click Open.
- That’s it! You’ve successfully linked the Excel file for mail merge.
What Are the Six Steps of Mail Merge?
According to the Step-by-Step Mail Merge Wizard, the following are the six steps for mail merge in Word:
- Select the document type like letters, envelopes, directories, etc.
- Select starting document like the current document or existing document
- Select recipients from an existing list (Excel), Outlook contacts, or a new list
- Write your letter
- Preview your letters
- Complete the merge
Conclusion
Now you know how to mail merge from Excel to Word by following either the manual method or the Word Mail Merge wizard. Give any of the methods a try depending on your mail merge document, database, and the degree of personalization you need.
Don’t forget to comment below if you know of any other effortless methods on how to do a mail merge in Word from Excel. You may also like to know how to print labels from Excel using MS Word mail merge and merge comments and changes from multiple documents.