
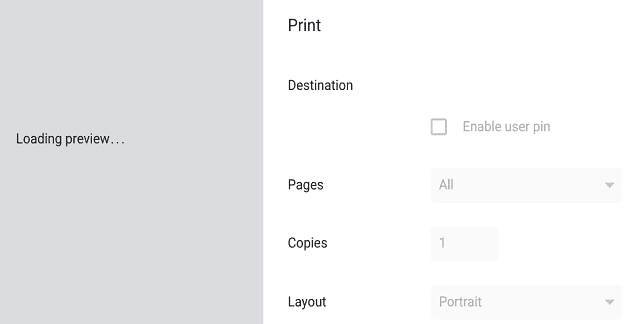
Chromebook users may occasionally need to perform some troubleshooting steps to print out their files. For example, you may get various errors when setting up the printer. After you set up the device, ChromeOS may fail to load the print preview, and you can’t click on Print. Oftentimes, your laptop can’t find the printer and hangs on the “Destination” picklist. Well, if you’re looking for a solution to fix your print preview issues on ChromeOS, follow the troubleshooting steps below.
Contents
Why Is My Printing Preview Not Loading on Chromebook?
Reboot Your Laptop and Printer
Simply rebooting your Chromebook and printer works wonders. First, reboot your laptop and then your printer several times in a row. If the print preview still won’t load, shut down your Chromebook and printer and wait for 30 seconds. Meanwhile, reboot your router as well. Then, power up all of your devices and check if this method solved the problem.
Some users said you should follow these steps in this specific order (apparently, the order of the steps matters a lot):
- Turn off your printer.
- Turn off your Chromebook.
- Then turn off your wireless router.
- Wait for two minutes.
- After that, power up your Wi-Fi router and wait until it fully boots up.
- Turn on your Chromebook and wait until it connects to the network.
- Then, turn on your printer and wait for another minute.
- Go to Settings, check if you can select the printer properly. Try to print the problematic file again.
Make sure your printer is working on the correct network. As a quick reminder, your Chromebook and printer need to be connected to the same network.
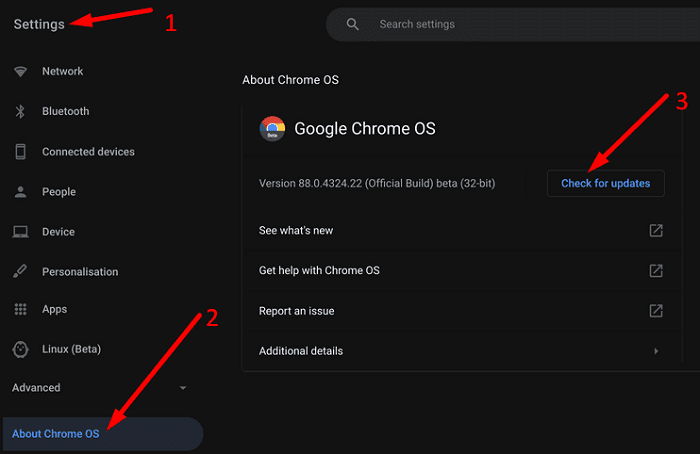
Additionally, check for updates and install the latest ChromeOS version on your device. Go to Settings, select About ChromeOS and check for updates.
Check Your Printer Settings
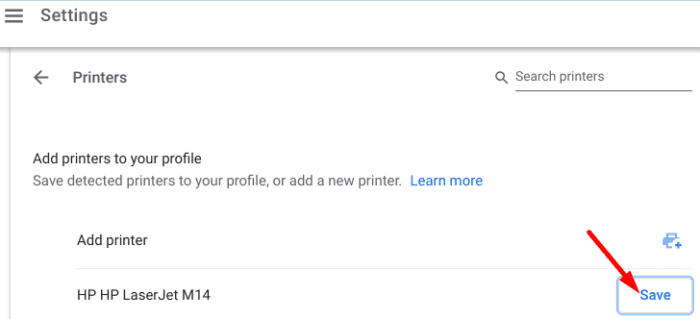
Add the printer you want to use to your list of Saved printers.
- Click on the time icon, and go to Settings.
- Select Printers under Print and scan.
- Go to Available printers to save, and click the Save button next to your printer.

- Make sure your printer is visible under Saved printers.
Alternatively, remove your printer and wait for 30 seconds for ChromeOS to fully remove the device. Go back to Printers and add your printer back in.
Set Up Your Printer Manually
If the printer is already available under Saved printers, select More options and hit the Remove option. Restart your Chromebook, and set up the printer again but this time, set it up manually.
- Click on the time icon, and go to Settings.
- Navigate to Advanced, and select Printers.
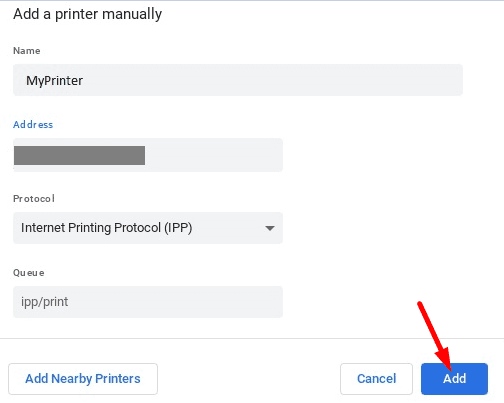
- Click on Add printer and enter your printer information manually.
- Name: Enter any name you want; it really doesn’t matter.
- Address: Enter your printer’s IP address. Double-check the address to make sure there are no typos.
- Protocol: Most printers support the IPP protocol.
- Queue: Enter ipp/print.
If the problem persists, go to your printer manufacturer’s website and download the latest printer firmware.
Check Your Browser
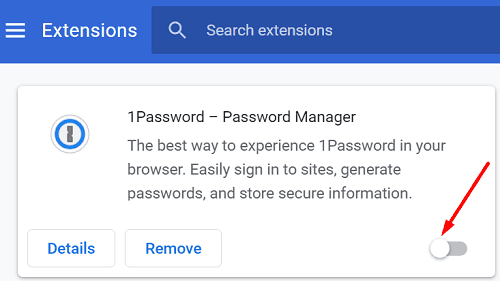
Your browsing cache might be interfering with the printing process. The same is valid for your extensions. Go ahead and clear your Chrome cache and cookies. Then, disable all of your extensions and refresh the browser. Click on More options, go to More tools, and select Extensions. Check if the issue is gone.
Additional Steps
- Try printing in Incognito Mode.
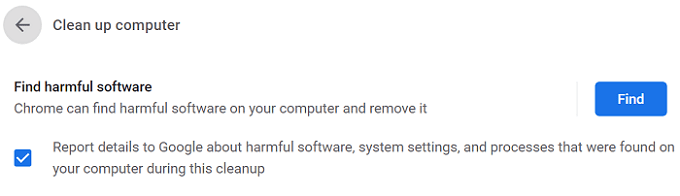
- Run Chrome’s Clean Up Tool to remove any unwanted code that might be causing this printing issue.
- Go to Settings, scroll down to Advanced, and then scroll down to Clean up computer.

- Go to Settings, scroll down to Advanced, and then scroll down to Clean up computer.
- Sign out of your Google account, restart Chrome and sign back in.
- Use the WiFi printer driver for Chromebooks extension. It should work with most printers out there. Make sure the extension is running, and try to print from Chrome again.
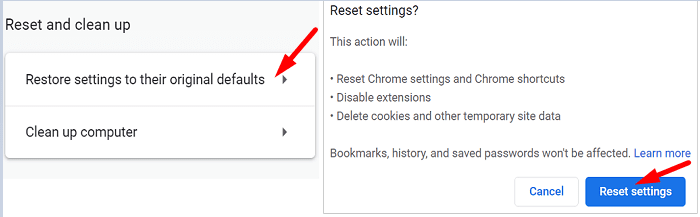
If the problem persists, restore your browser settings to the original defaults. Go to More options, select Settings, and scroll down to Advanced. Scroll down again to Reset and clean up and select Restore settings to their original defaults.
Powerwash Your Device
If nothing’s working, try power washing your device. Many users confirmed that power washing their Chromebooks solved the print preview issue when nothing else worked. Keep in mind that performing a powerwash will remove all local data. Back up your data in case you want to restore it later on.
- Shut down your Chromebook.
- Press and hold the Power button to turn on the laptop.
- Press the Ctrl + Shift + Alt + R keys simultaneously while on the sign-in screen.
Conclusion
If your Chromebook can’t load the print preview, restart your laptop, printer, and router. Additionally, remove and set up the printer again. If the issue persists, clear your Chrome cache, and disable your extensions. You can also reset your browser to default settings. Which of these solutions worked for you? Share your feedback in the comments below.


None of them…unfortunately. This is a managed Dell 3100 Chromebook. A handful of our devices (8 /200) are experiencing this issue. When I deprovisioned it and powerwashed it, signed on as a “regular” user, it worked fine. As soon as I provisioned it again, the issue returned.
Disabling extensions cured my “Not loading print preview” problem