
Creating rules in Outlook is the easiest way to keep your inbox under control, since the app can move, flag, forward, or delete emails for you as soon as they arrive. Each rule gets a condition, such as the sender or a word in the subject, and an action that Outlook performs when a message matches it. The steps differ slightly depending on whether you use new Outlook, classic Outlook, Outlook on the web, or Outlook.com. Note that the exact rule options vary depending on your version of Outlook and the type of email account you use.
Create a Rule From an Email
This is the quickest method, and it works best for simple rules based on a single sender.
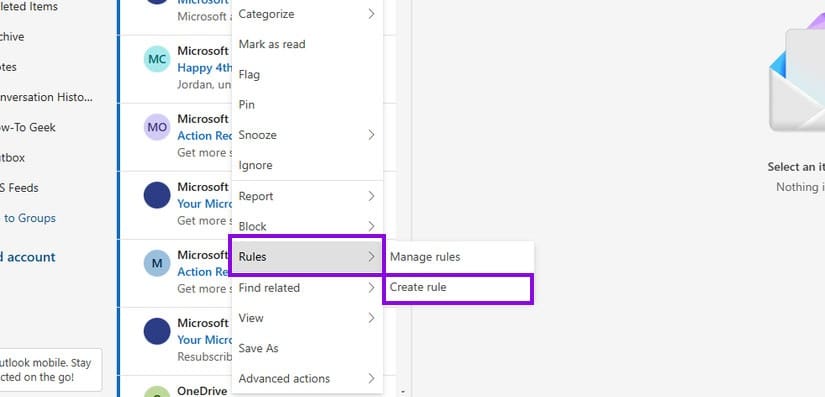
Step 1. Right-click on an email from the sender you want to filter.
Step 2. Go to “Rules” and select “Create rule.”
Step 3. Pick the folder where Outlook should move the sender’s messages.
Step 4. Click “OK” to save the rule. If you want to add more conditions or a different action, click “More options” instead.
In classic Outlook, the option is called “Create Rule,” and you’ll need to check the conditions you want in the pop-up window before choosing the folder.
Create Rules in Outlook from Settings
If you need more control over what the rule does, you can build it from scratch. These steps to creating rules in Outlook apply to the new Outlook and Outlook on the web.
Step 1. Click on the gear icon in the top-right corner to open Settings.
Step 2. Go to “Mail” and select “Rules.”
Step 3. Click “Add new rule” and type in a name for it.
Step 4. Under “Add a condition,” choose what triggers the rule, such as “From” or “Subject includes.”
Step 5. Under “Add an action,” choose what Outlook should do, such as “Move to,” “Mark as read,” or “Forward to.”
Step 6. If some emails should skip the rule, click “Add an exception.”
Step 7. Click on “Save.”
It’s safer to start with a rule that moves emails rather than one that deletes them, since you can always check the folder later.
Create a Rule in Classic Outlook
Classic Outlook uses the Rules Wizard, which has more options but can also involve more steps.
Step 1. Open the “Home” tab, click “Rules,” and select “Manage Rules & Alerts.”
Step 2. Click “New Rule.”
Step 3. Pick a template or start from a blank rule, then click “Next.”
Step 4. Select the conditions, actions, and exceptions, clicking “Next” after each one.
Step 5. Name the rule and click “Finish.”
Note that some classic Outlook rules are client-side and only work while classic Outlook is running on your computer.

Manage and Reorder Your Rules
Outlook runs your rules from top to bottom, and a single email can trigger more than one. That’s why you should keep specific rules above the broad ones.
Step 1. Go to “Rules” in Settings.
Step 2. Use the arrows next to a rule to move it up or down.
Step 3. Click on the pencil icon to edit a rule or the trash icon to delete it. You can also use the toggle to turn a rule off without removing it.
Step 4. To apply a rule to emails you already have, click “Run rule now” next to it.
If you want Outlook to ignore the remaining rules after one of them runs, check “Stop processing more rules” when editing it.
Keep in mind that rules in the new Outlook won’t work for third-party accounts like Gmail, Yahoo, or iCloud. You’ll need to set those up with the email provider instead.