In a drive for greater energy efficiency, PC Ethernet settings are often overlooked. They shouldn’t be. Ethernet adapters can use power while active, and Windows 11 supports Energy Efficient Ethernet (EEE) on compatible network adapters to save power during periods of low activity. There are a few ways to cut down on this usage.
In this article, we’ll be looking at energy efficient ethernet setting Windows 11 and how to control it.
An Energy-Efficient Ethernet – Setting Windows 11 to Save Power
Here are two ways to configure Windows energy-efficient Ethernet.
Enable Power Saving via Device Manager
EEE is supported by some Ethernet adapters, but the option isn’t available on every model. The exact setting name and available values can also vary by adapter and driver.
Now let’s start with adjusting power settings directly through Device Manager. Here’s what you need to do:
Step 1. Open the Run Dialog (Win + R) and type “devmgmt.msc” before hitting (Ctrl + Shift + Enter) to run as Admin.
Step 2. In Device Manager, scroll down to “Network adapters” and click it to expand.

Step 3. Find your particular Ethernet adapter and double-click it.
Step 4. In the window that pops up, click the “Advanced” tab.
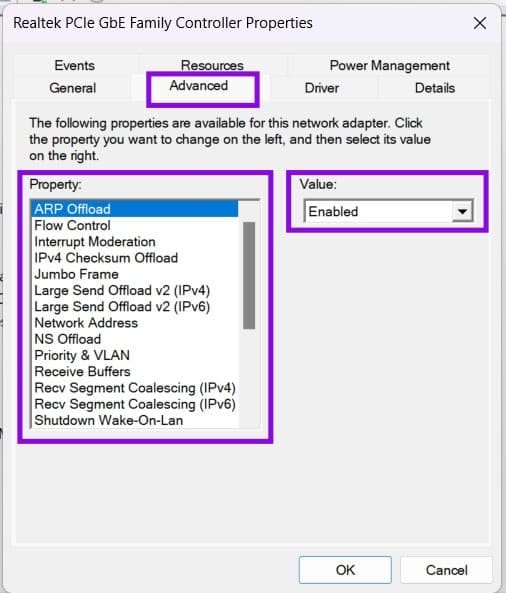
Step 5. Find the option that mentions energy efficiency (this varies for different adapters) and ensure that the “Value” is set to “Enabled.”
Step 6. Click “OK” to finalize.
If you cannot find Energy Efficient Ethernet (EEE), then it might be that your adapter doesn’t have it or it goes by a different name. Some major ones include:
- Advanced EEE
- Energy-Efficient Ethernet
- Green Ethernet
- Power Saving Mode
Activate via PowerShell
If you prefer command lines to multiple windows and menus, you can also use PowerShell to activate things. The caveat here is that you need to know the name of your Ethernet adapter for the commands to work properly. If you have it, here’s what to do:
Step 1. Open the Run Dialog (Win + R) and type “powershell” before hitting (Ctrl + Shift + Enter) to run as Admin.
Step 2. In PowerShell, identify the advanced properties for your Ethernet adapter by displaying its advanced properties. Type the following command “Get-NetAdapterAdvancedProperty -Name “Ethernet” | Format-Table” and hit Enter. “Ethernet” in this case is the particular title of your network adapter.

Step 3. Find the EEE option or its equivalent in the table. Then run the following command, replacing the adapter name and display name with the values shown on your system: Set-NetAdapterAdvancedProperty -Name “Ethernet” -DisplayName “Energy Efficient Ethernet” -DisplayValue “Enabled” and hit “Enter.” The “Display Name” will be whatever is listed in the table.
Step 4. Close PowerShell once done.
What if You Don’t Have EEE?
If your network adapter doesn’t have an EEE option, it may not support the feature through its current driver. Before you do this, it’s a good idea to ensure that your drivers are up to date. You can do this via Device Manager:
Step 1. Right-click your network adapter and select “Update driver” from the context menu.

Step 2. Choose “Search automatically for drivers” and see if there are any updates to install.
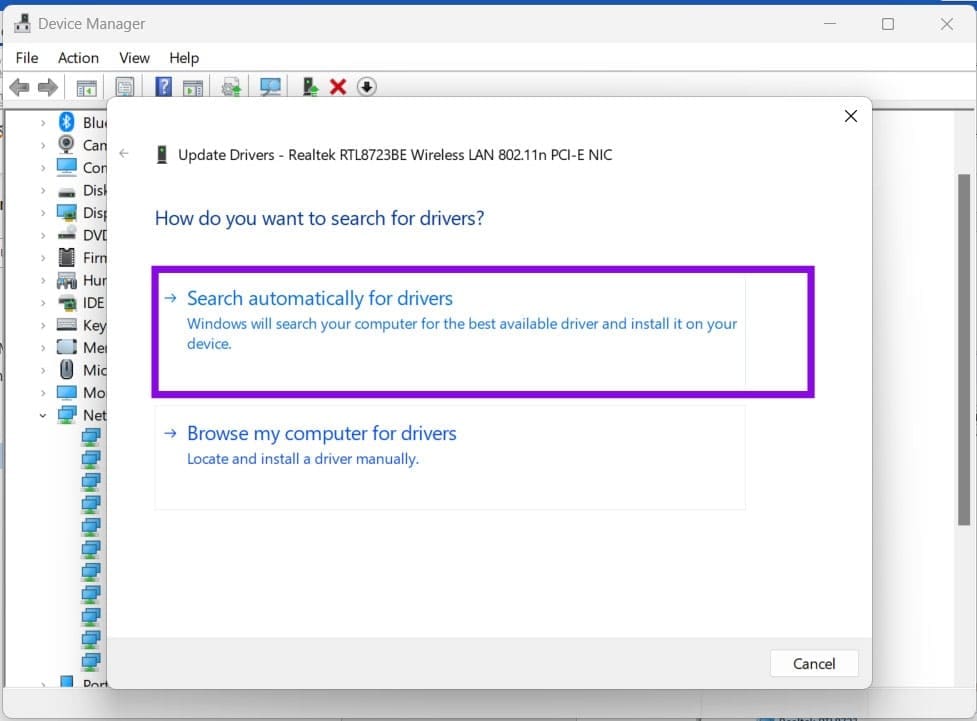
Step 3. If there are, follow the steps to install them.
If you still don’t see an EEE option, check the network adapter or PC manufacturer’s website to determine whether your particular model and driver support the feature.