

You could have sworn that you saved that file in your Work Folder, but it’s not there. You were in such a hurry that you didn’t even bother to look where you saved it. There is no need to panic since there are various methods you can try to find that misplaced file.
Windows 10 has various ways to locate a missing file without having to install any more programs. The last thing you may want to do is install a program that may make your computer work even more. Your computer is probably slow enough already.
Contents
1. Use the Search Bar Beside the Start Button
Instead of wasting time searching through the file manager, let your computer do the work for you. The search bar next to the start button can not only find apps installed in your computer, but it will also help you find files.

You don’t have to remember the entire name of the file you’ve misplaced. By typing the first few letters, Windows will show you all the files that start with those letters. Hopefully, your files are among the search results you’re shown.
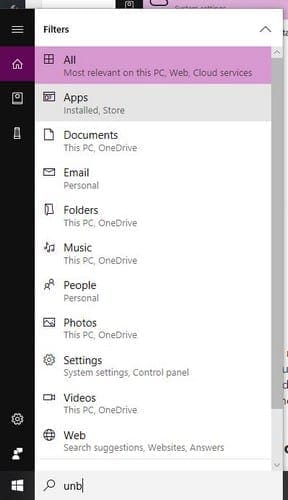
If you see too many results, you can filter the results, so it only shows files in specific areas. To filter your results, click on the drop-down menu to the right of the filter option.

Click on the option where you think your file might be and Windows will show you if any files that match your search.
2. How to Find a File When You Can’t Remember its Name
If the worst has happened and you don’t even remember the name of the file, there is still a way to find the file. If you’ve been working on the missing file recently, you should be able to see it in the Recent Documents section. If the file is a Word document, go to File > Open > Recent Documents.
3. Search for the File by Extension
You’re not obligated to have to remember the name of the file, you have good chances of finding your file as long as you can remember the file extension. The following is a list of the most common file extensions you can use to find that missing file.
- .doc/.docx – Microsoft Word
- .odt – OpenOffice
- .pdf – PDF File
- .txt – Plain text file
- RTF – Rich text format
- JPG
- PNG
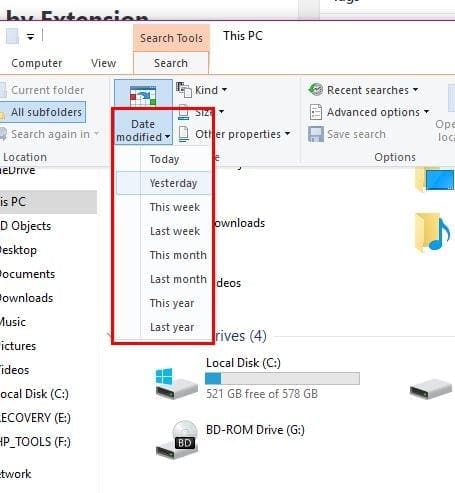
4. Find a File By Date Last Modified
You have no clue what you named the file, but you remember that you worked on it last week. Believe it or not, there is still a way for you to find the file. Open the File Explorer and click on the search in the upper right-hand corner.
After clicking, a Date Modified option will appear. Click on the drop-down menu and choose the time frame that you think applies to your file. You can either select today, this week, last week, this month, last month, this year, and last year.
As long as you have the search options open, click on Advanced options and make sure that the File contents option is checked. Type a phrase or what you remember of the file title, and Windows will start searching. If any results match what you’ve typed, they should appear in the right pane.

Don’t forget that you can also check the recycling bin, just in case you erased it accidentally. You can click on the Recycle bin icon on your desktop, or you can use Cortana’s search bar.
Conclusion
Taking a minute to see where you saved a file, can save your several minutes trying to find it later. Try to check to see where the file is being saved so the next time you need it, you can find it instantly. How do you search for your files? Leave a comment and share your thoughts.


Exactly – I forgot file name (sorry -senior citizen, no digital native …), tried “Date last modified: this month” and I do not get a single result (though I am in WORD every day, there should be lots of files …)