If your Windows computer is running on the 22H2, then you’ll be able to find Live Captions. It’s a feature that is very helpful. Now you won’t miss a single word of what is being said, even if it’s a video playing on your browser. Turning on the feature is quick, and you can even change the position of the Live Captions. You can place them at the top, middle, or bottom. Whatever makes it easier for you to read. It’s even possible to change the color of the text and the background.
Contents
Hot to Turn on Live Captions on Windows 11
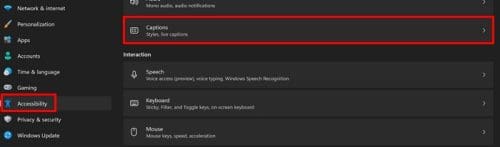
You’ll need to download the language pack if it’s your first time using it. But to get to that part, go to Settings. You can press the Windows, and I keys for the fastest route or click on the Windows Start icon, followed by the Settings option. Once you’re in Settings, go to Accessibility, followed by Captions. The option to enable it will be at the top on the next page.
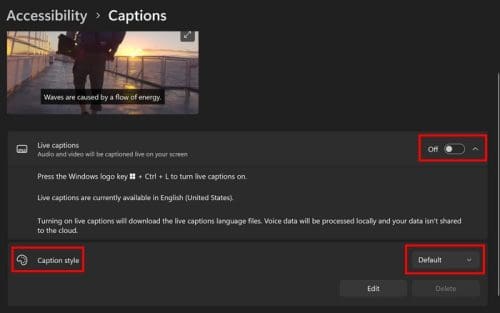
As mentioned, you’ll see a download button at the top if it’s your first time using Live Captions. Click on it, and the download process will begin; it shouldn’t take long. If you’re more of a keyboard shortcut person, you can press the Windows + Ctrl + L keys to turn on Live Caption. You can also right-click on the WiFi, Volume, and Battery tile and click on Accessibility. When the set of options appears, choose the Live Captions option.

You can also click on the Windows Start icon, followed by the All apps option. The Live Captions feature will be listed as one of the available options.

How to Customize the Live Captions
Now that you know how to turn on Live Caption, it’s time to see how you can customize it. Once you go to Settings > Accessibility > Captions, here you can do things such as change the colors and the size of the text. Other options include white-on-black text and small text, and default.
The Edit button will allow you to change the font, size, opacity, and effects. You’ll also see options to change the window and background color. There are also other options you can choose from when the Live Captions are one. Remember that you can enable them by pressing Windows + Ctrl + L. If you haven’t changed the position of the Live Caption, it should appear at the top, but you can change the position by clicking or tapping on the cogwheel.

If you want to keep things clean, you can filter out profanity. Click on the cogwheel and place the cursor on Caption Options, and the Profanity Filter will be the first one on the list. The second option is to include the audio from a microphone. If you haven’t added a mic, click on the Sound Settings link to add one.
Changing the Size of the Live Caption Box
If you choose the floating box, you have more options when it comes to adjusting the size. Place the cursor on the sides and when it turns into arrows right-click and change the size.
Further Reading
It’s also possible to use Live Caption on browsers such as Chrome and Closed Captioning on Zoom. It’s also possible to enable Closed Captioning on Microsoft Teams. If you want more reading material, you can always use the search bar for more articles.
Conclusion
Enabling Live Caption on your Windows 11 computer will only take a moment. When it’s no longer useful turning it off is also an easy task. You can give it your personal touch and change the colors, size, and position as well. Keep in mind that the feature is only available if your Windows 11 computer is running on the 22H2 version. How often do you use Live Caption on your computer? Let me know in the comments below, and don’t forget to share the article on social media.