The whole purpose of a password is to protect your computer. Without a password, anyone with access to it can turn it on, access all your important files, and make changes to your computer that can cause severe damage. But, if you live alone or there is no way anyone can access your computer, having a password can be annoying since it makes you go through an unnecessary step. But the good news is that you can easily make some changes to your Windows 11 computer, so the next time you turn on your computer, you don’t have to enter a password.
Contents
How to Enable Auto Login on Windows 11
To activate automatic login, you must open user accounts and uncheck an option called User must enter a username and password to use this computer. But this last option has been known to be greyed out for some users. So before you get to that option, there are some other options you’ll need to disable to discard that the Users must enter a username and password to this computer option is not greyed out for you when you access it.
In Settings
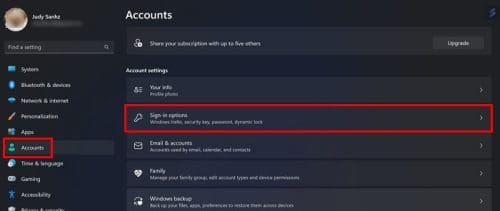
To get started, you’ll need to go to Settings. You can access it by pressing the Windows + I keys (the fastest option) or clicking on the Windows Start menu, followed by the Settings option. Once you’re in Settings, click on Accounts on the left, followed by Sign-in options.
Under the Additional settings section, look for an option called If you’ve been away when should Windows require you to sign in again? Click on the options dropdown menu and choose the never option. Above this option, you should see another option called For improved security, only allow Windows Hello sign-in for Microsoft accounts on this device (Recommended). Toggle off this option.

Also, if you have any sign-in option enabled, such as:
- Face recognition (Windows Hello)
- Fingerprint recognition (Windows Hello)
- Pin (Windows Hello) Security key
Ensure that these sign-in options are disabled. You’ll find these options in Settings > Accounts > Sign-in options. At the top, you’ll see all the available options. If you don’t have access to one, you’ll see a message that says the choice is currently unavailable, so you don’t have to worry about that specific option. Click on the option you want to disable and choose the Remove button. You’ll be asked to enter your password, followed by the OK button. Microsoft needs to make sure that it’s you making the changes.

User Accounts Window
Now that you’ve turned off all these options, it’s time to open the Run box by pressing the Windows + R keys. Enter netplwiz and click ok or press enter. When the user account window opens, click on the username you want to change and uncheck the box for the Users must enter a username and password to use this computer.

Click Ok and Apply. You’ll be asked to enter a username and password. If you’re using a Microsoft account, you’ll need to enter the sign-in info for that account.
What if the Users Must Enter a User Name and Password Option is Missing?
There have been some cases where this option is missing from the User Account window. If that’s your case, you can make it reappear by using the Registry. Be careful when using the Registry since making the wrong changes can damage your computer. Press the Windows +R keys to open the Run box. When it appears, enter regedit. When the Registry window appears, go to:
- HKEY_LOCAL_MACHINE
- SOFTWARE
- Microsoft
- Windows NT
- CurrentVersion
- PasswordLess
- Device
- Double-click on the DevicePasswordLessBuildVersion option
- Replace the Value data with zero
- Click OK
Check to see if the option is now available, and if it’s not, restart your computer and re-check. That’s all there is to it. Now you don’t have to enter your password whenever you need to use your computer. If you ever want to go back and enter your password, ensure that the Users must enter a username and password to use this computer option is checked.
Further Reading
If you feel comfortable using the registry and want to learn to do some others things, here is how you can compare Windows Registry differences. Since you will come across errors sooner or later, here is how you can fix Windows 10 Registry filter driver exception. Or, you can fix system Registry file is missing or contains errors. Remember that you can always use the search bar to look for a specific topic about the registry or any other topic.
Conclusion
Not having to deal with entering your password when you want to use your Windows computer can save you valuable time. When you finally remove the login and use it for the first time without entering your password, you’ll see the login screen, but only to have it auto-login to your account. It shouldn’t take more than a few seconds. The changes will only apply to the account you choose; if there are any others, those will require a password to enter. So, on how many accounts did you remove the login option? Share your thoughts in the comments below, and don’t forget to share the article with others on social media.