

Learn how to install a printer in Microsoft Windows 11 using an IP address using this step-by-step tutorial.
These days, it has become fairly easy to access devices and accessories on a Windows 11 PC. Microsoft stuffed the operating system with many hardware drivers and device interface programs. Thus, Windows 11 easily identifies any compatible devices. With networked printers, it’s even easier to add a printer as you no longer need to find a compatible cable to create the connection between the PC and printer. Let’s get started!
Contents
Reasons to Install Printer Via IP Address
You might ask why you should add a printer to a Windows 11 PC using TCP/IP protocols when you can simply do that using a cable. Here are the reasons:
- It’s easier to share one printer with everyone at home or the workplace by connecting the printer to a Wi-Fi network. Then, the printer gets a unique IP address. Now, you can just treat the printer as another computer and connect using its IP address.
- If a compatible cable isn’t around, IP printing is the best possible method to connect a printer wirelessly.
- Businesses that allow their employees to work from home, set up printers as a server. To send a print to such on-premise printers, you must connect to it using its IP address.
- You can move a printer around the home or workplace effortlessly when setting it up using an IP address instead of a cable.
How to Add Printer by IP Address on Windows 11
Now that you know the benefits of IP printing, find below a step-by-step guide to installing a printer on a Windows 11 PC using its IP configuration:
- Hit the Windows + I keys together to launch the Settings utility on Windows 11.
- Click the Bluetooth & devices menu in the left-side navigation panel.
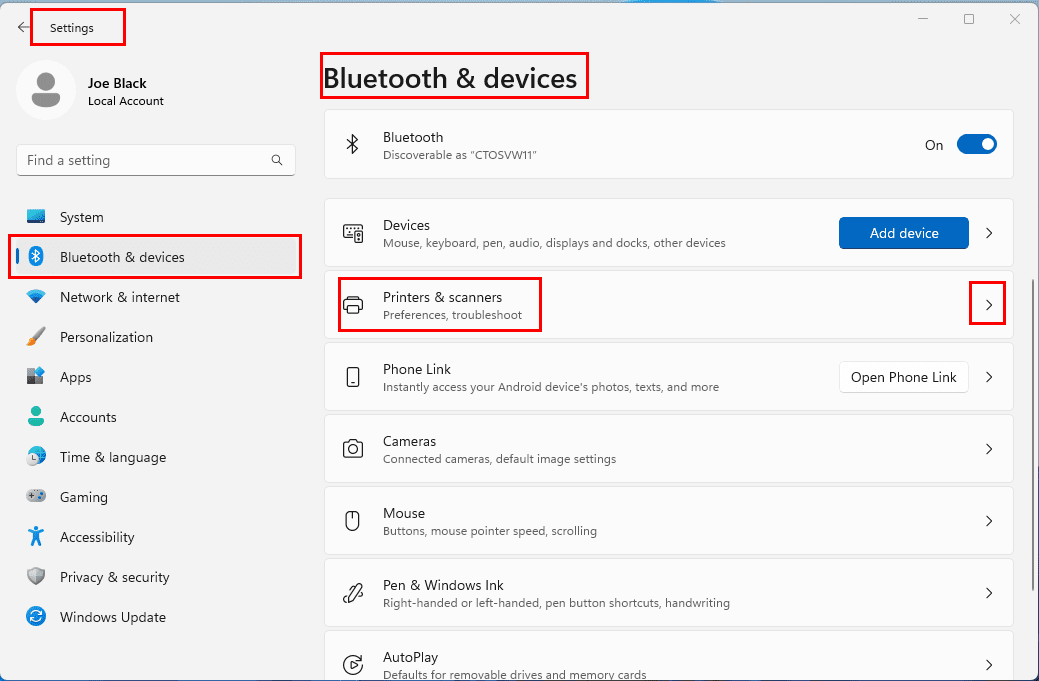
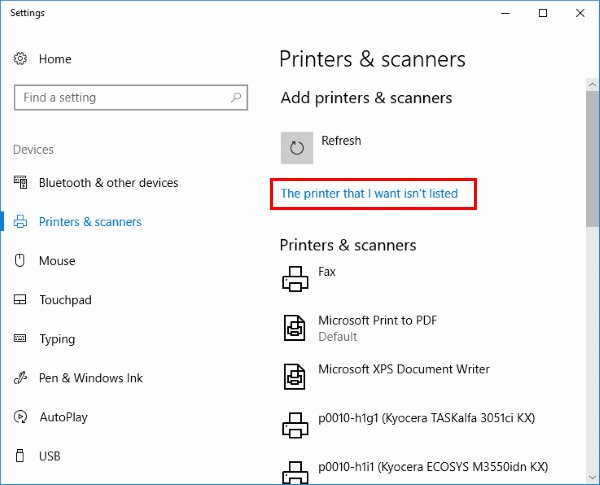
- Find the Printers & scanners menu on the right-side panel and click on that.
- Now, click Add device button on the Add a printer or scanner menu.
- Wait until Windows 11 shows the “The printer that I want isn’t listed” remark along with the Add manually button.
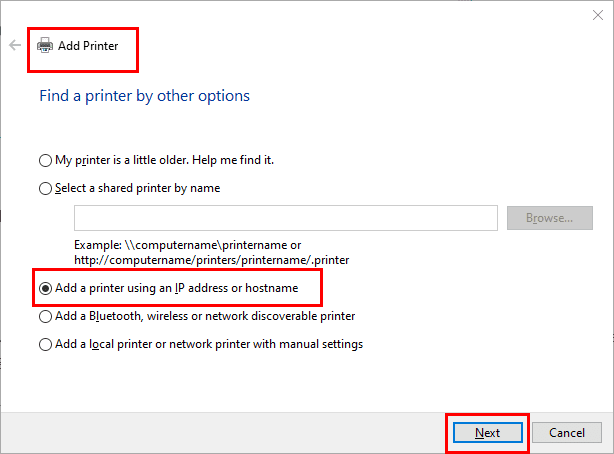
- Hit Add manually to open the Add Printer dialog box.
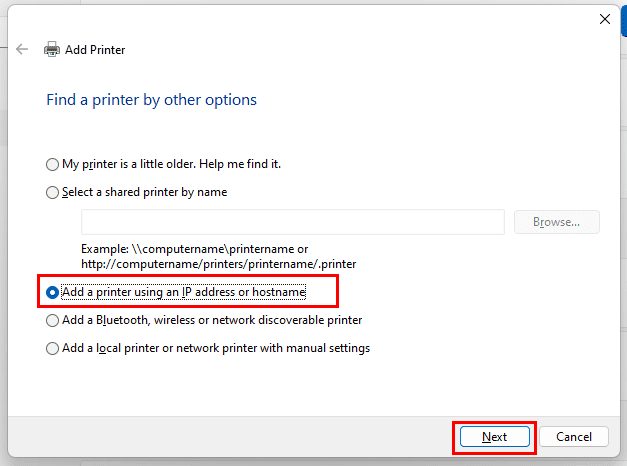
- Select an Add Printer option that indicates you can use an IP address or hostname to set up the printer.
- On the next screen, click Device type and change it to TCP/IP Device.
- Type in the networked printer IP address into the Hostname box.
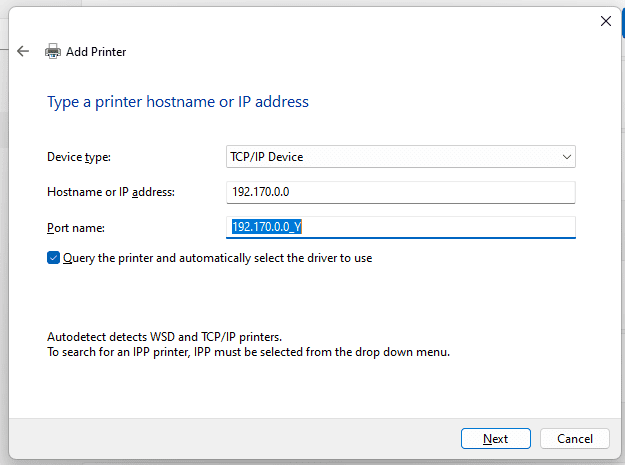
- The Port name populates itself. But, you must rename by adding an additional text like 192.170.0.0_Y, as shown in the image.
- Windows 11 should be able to find and connect with the printer as soon as you hit the Next button.
Advanced Manual Configuration
You should be able to add the printer by following the above instructions. Rarely, the method may not work. In that situation, try these steps:
- On the “Additional port…” screen, you should see a Device Type section.
- If you know the printer’s make and model, select Standard and click the drop-down list to pick a network card for the target printer.
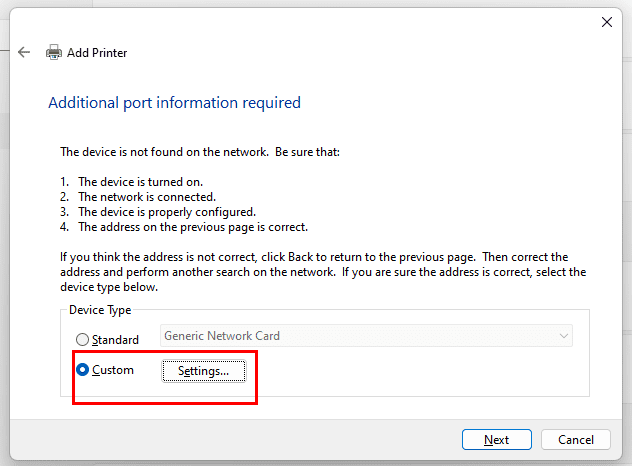
- Suppose, you’re unable to find an appropriate network card, then select Custom and click Settings.
- The Port Settings dialog box will show up.
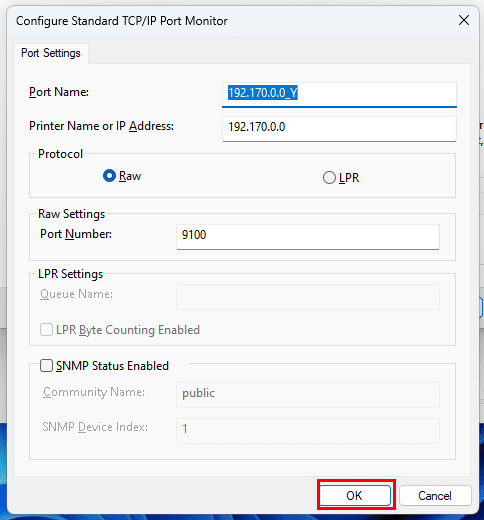
- Here, enter details for the fields like Port Name, Printer Name/ IP Address, Protocol (Raw / LPR), Port Number, etc.
- Once done, click OK.
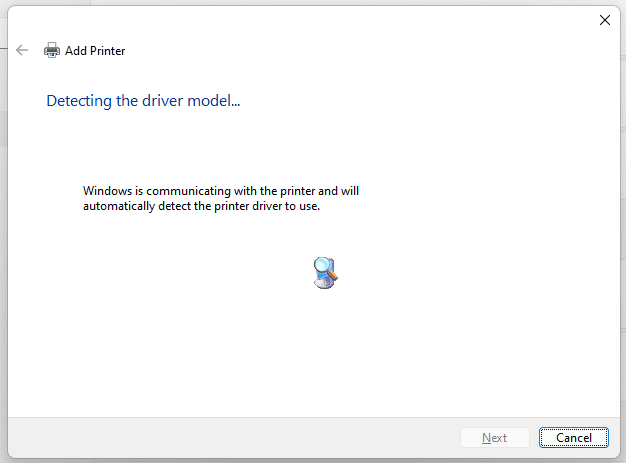
- Upon hitting Next on the Add Printer screen, Windows 11 will search and find the printer.
- You should now see the Install the printer driver dialog box.
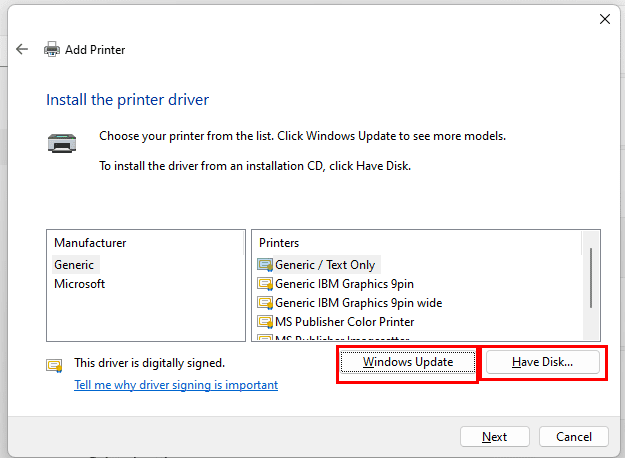
- If you’ve got a driver CD that came with the printer, choose Have Disk.
- If you don’t have any driver CD, click on Windows Update.
Windows will now walk you through the device driver installation process. Once it’s done, you’ll see a final Add Printer dialog box that shows the Print a test page button. Click this button to check if printing is okay or not.
Steps For Adding a Printer Using IP Address on Windows 10
If you’re still on a Windows 10 PC, follow these instructions to install a printer using its TCP/IP configuration:
- Select Start and type Printers in the search box.
- Choose the Printers & scanners under the Best match section.
- On the Printers & scanners screen, click the plus (+) button for the Add a printer or scanner auto setup.
- Wait for the prompt “The printer that I want isn’t listed” to show up, and then select it.
- The manual method of Add Printer wizard will pop up.
- There, select the radio button for Add a printer using an IP address or hostname choice.
- Click the Next button to go to the next screen.
- Now, you should find yourself in the Type a printer hostname or IP address dialog box.
- Click the Device type drop-down list and select TCP/IP Device.
- Now, you must type the Hostname or the IP address of the printer manually.
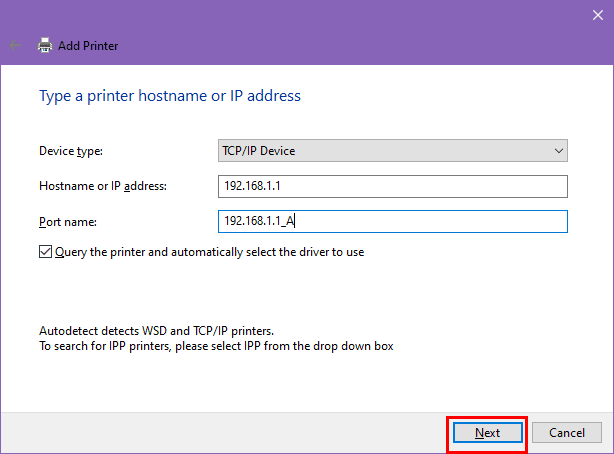
- The Add Printer wizard will automatically populate the Port name, which is the same as the IP address of the printer.
- You can put a text at the end of the Port name IP, for instance, 192.168.1.1_A to distinguish it from the actual printer IP address.
- By default, Add Printer checks the checkbox for “Query the printer...” If it’s not checked, checkmark the checkbox.
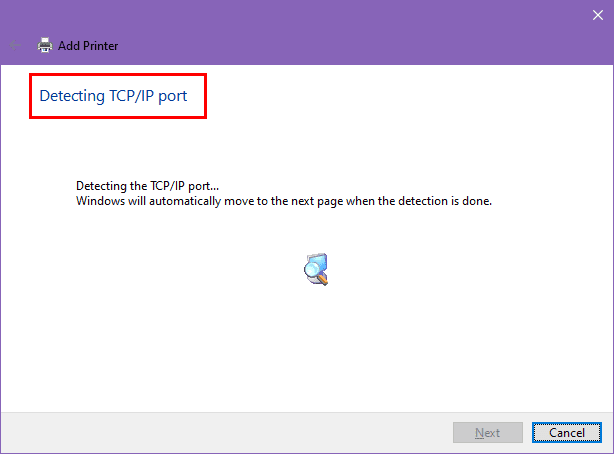
- Windows 10 Add Printer wizard should find the printer if the printer is online and configured correctly.
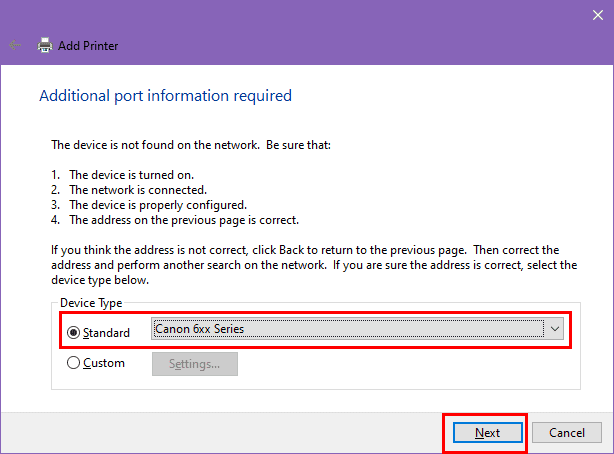
What to Do if Device Type Isn’t Listed
- You might have to specify more information. If prompted, select the type of network adapter installed in the printer in the Device Type drop-down list.
- Here, you mainly need to select the make and model of the printer you’re trying to install. For example, for Canon ColorStream 6000 series, choose Canon 6xx series.
- If you don’t know the model or the printer provider (organization’s IT admin) asked you to input manual configuration, then click Custom as Device Type.
- Hit the Settings button to enter the Configure Standard TCP/IP Port Monitor dialog box.
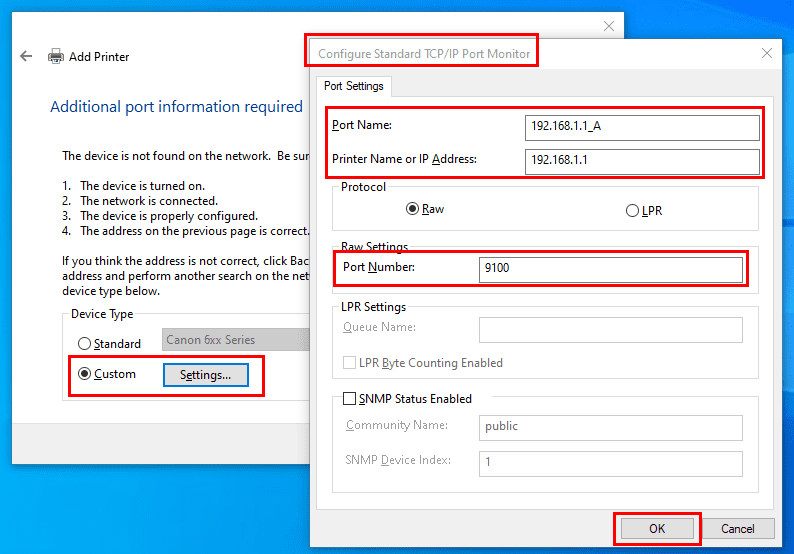
- Here, you need to type the following data points:
- Port Name: auto-populated
- Printer name or IP address: auto-populated
- Protocol Raw or LPR: supplied by IT admin or printer manufacturer
- Port Number: supplied by IT admin or printer manufacturer
- Once done, click OK to save the changes.
- Click Next again on the Add Printer wizard.
That’s it! Windows 10 will now walk you through installing the drivers for the printer. After the completion of driver installation, you should be able to send print commands to the printer via a direct IP address.
Add Printer by IP Address: FAQs
How do I add a printer by IP address in PowerShell?
If you’re unable to use the graphical user interface on a Windows 11 or 10 PC to set up a printer, here’s how you can utilize PowerShell:
- Click Start and type PowerShell.
- On the right half of the Start menu, the PowerShell app will show up.
- Below the app name, you’ll find Run as administrator. Click on this.
- Copy and paste the following cmdlet in PowerShell and hit Enter:
add-printerport –name “192.168.1.11” –printerhostaddress “192.168.1.11”
- In the above command, replace the IP addresses with the actual printer host address and port name for the target networked printer.
- Replace –name with a printer name you can remember. For instance, Canon.
- You must install the printer driver on the PC prior to executing the PowerShell command.
Can you add a printer by IP address?
Yes, you can add a printer by its IP address provided that you connected the printer to a Wi-Fi network.
How do I find the IP Address for my printer?
Visit our post about how to find the IP address.
Conclusion
Now you know how to add a printer by IP address in Windows 11 and 10 PCs. Depending on the PC you own, give any of the above methods a try. You should be able to install the printer quickly. If you know of any other methods to add a networked printing device to a Windows 11 PC using the printer IP address, do mention the steps in the comment box. Also, share this article from your social media profiles to help your followers and friends who might be facing issues in connecting their PC with a networked printer.


Thanks this helped. Ill save instructions so I remember next time.
This has been info I have needed for months. My printer has a fixed address and without this key info Windows 10 just could not seem to remember that. Thanks.
Thanks for the helpful article. Cute baby pic, btw :)
After hours of trying but with this instruction, I got it in a few minutes. Thank you !
I don’t know anything about computers and was able to add a printer for my new coworker with these instructions! Thank you
Default printer name is not acceptable. Must I change it on every PC?
Thank you for the guidance.. It does work.
can’t access “printui.exe” even though i’m admin
Great instructions. However, on your item #4 above:
Before selecting “The printer that I want isn’t listed” option, go further down the page and enable the “Download over metered connection” option. That way the printer driver can install properly.
That’s for those of us that chose a “metered connection” for our Wi-Fi network, to avoid the Windows 10 upgrade slowdown.
Wow. Just, wow. I set up and configured 2 desktops running Linux Mint 19 that *found* the network printer, installed the drivers and printed a test page in under a minute.
Now, this silly HP tablet-y thing is asking me what sort of network card is in it. You would think that it would look into its own internals to find that out.
Windows has NOT improved, AT ALL. Same old run-around.
What do you do if the “The printer that I want isn’t listed” doesn’t do anything?
Thank you. I had to assign new IP address on my machine to our shared printer. I followed your screenshots and it worked for me.