
It must be awful to see the “Windows 11 Wi-Fi not showing up” error. I know this since I also faced this a few days back. Hence, I’m compiling all the troubleshooting steps you can try below to resolve the “Wi-Fi network not showing up on Windows 11”.
Windows 11 took the world by storm by flaunting awesome graphical elements and performance features. However, it got hit with many OS bugs like these:
In addition to the above, “Windows 11 Wi-Fi not showing up” is one of the most annoying errors because you can’t connect to any Wi-Fi network. Thus, you can’t browse websites and do your homework, office work, or personal stuff at home.
Contents
- 1 Windows 11 Wi-Fi Not Showing Up: Reasons
- 2 Windows 11 Wi-Fi Not Showing Up: Methods to Inspect the Wi-Fi Router
- 3 Windows 11 Wi-Fi Not Showing Up: Methods to Debug the PC
- 3.1 7. Inspect the Wi-Fi Adapter Hardware Connections
- 3.2 8. Deactivate Airplane Mode
- 3.3 9. Activate the Wi-Fi Icon From Control Panel
- 3.4 10. Forget The Wi-Fi Network and Reconnect
- 3.5 11. Switch Off and Switch On Wi-Fi Adapter
- 3.6 12. Ensure WLAN Service Isn’t Turned Off
- 3.7 13. Uninstall and Re-Install Wi-Fi Adapter
- 3.8 14. Reset Network Settings
- 3.9 15. Restore Windows 11 PC
- 4 Windows 11 Wi-Fi Not Showing Up: Final Words
Windows 11 Wi-Fi Not Showing Up: Reasons
There could be a number of reasons for Windows 11 not showing the Wi-Fi network. I’m outlining the most frequent ones below:
- The Wi-Fi router is faulty. Here are the best D-Link routers you should check out
- Windows 11 Wi-Fi network adapter is faulty
- Windows 11 outdated
- Unknown issue in Windows 11 and need a thorough troubleshooting
- Critical Windows 11 networking file systems got corrupted
If you’re also facing the “Wi-Fi network not showing up on Windows 11” issue, try the troubleshooting methods mentioned below to attempt to fix “Wi-Fi not showing up on Windows 11” and get back to what you do best.
Not to mention, most of these steps will also work on Windows 10, 8, and 7 devices with a similar issue.
Windows 11 Wi-Fi Not Showing Up: Methods to Inspect the Wi-Fi Router
Before deep diving into the Windows 11 PC, first, confirm that there are no issues with the Wi-Fi router. You can try these methods to inspect the Wi-Fi router:
1. Router Is Turned On

The most common cause of home, school, or work “Wi-Fi not showing up on Windows 11” PC is someone may’ve switched off the router.
If you can access the router, check if the Power LED of the router is lit. If it’s not, turn on the Wi-Fi router and then try to connect to it
2. Router’s Wi-Fi Signal Is On
You may see that the Wi-Fi router is switched on but still “Wi-Fi network not showing up on Windows 11” PC. A common cause at this phase is someone turned off the Wi-Fi broadcasters of the router.
Hence, you need to access the Wi-Fi control panel from a web browser and activate all the Wi-Fi bands. Here are the steps you may want to try:
- When on the home page of the router control panel, click the Wireless tab, option, button, or icon.
- There, you must find the Advanced options menu. Click on it.
- Inside the Advanced option, again click Wireless on the left side panel.
- The Wireless menu will now expand, Click Wireless Settings.
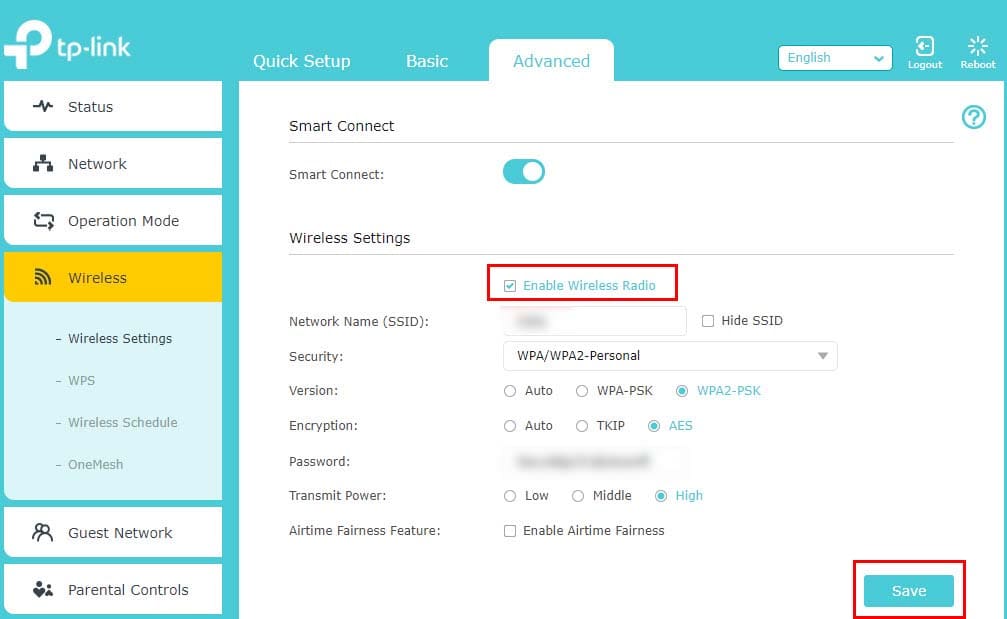
- Now, you must see the Enable Wireless Radio option.
- If Wi-Fi broadcasters are active, this option should show a checkmark.
- If there is no such thing, checkmark the checkbox beside Enable Wireless Radio.
- Now, look at the LED panel of the physical router.
- You should see LEDs lit for Wi-Fi broadcasters.
- Now, try to connect to your Wi-Fi network from your Windows 11 computer.
3. Activate Dual-Band
On dual-band Wi-Fi routers, 2.4 GHz and 5.0 GHz frequencies work simultaneously to offer jam-free wireless services. Some advanced routers may let you deactivate either of the frequencies for research and development purposes.
If you turned off any of the bands of Wi-Fi that your Windows PC needs (either 2.4 GHz or 5.0 GHz) then you won’t see a Wi-Fi network on your PC. Hence, turn on all the bands to ensure your PC gets the correct frequency to connect to.
4. Windows 11 PC Is Not on the Blacklist
Many advanced Wi-Fi router control panels let you blacklist devices to restrict access to the network. Is it possible that someone is playing a prank on you by blacklisting your device from the Wi-Fi router? Follow these steps to find out blacklisted devices:
- Open the router control mobile app or desktop app.
- Go to Advanced settings and then select Security.
- In the Security tab, you should find Access Control.
- Click Access Control, and you must see two tables: Online Devices and Devices in Blacklist.
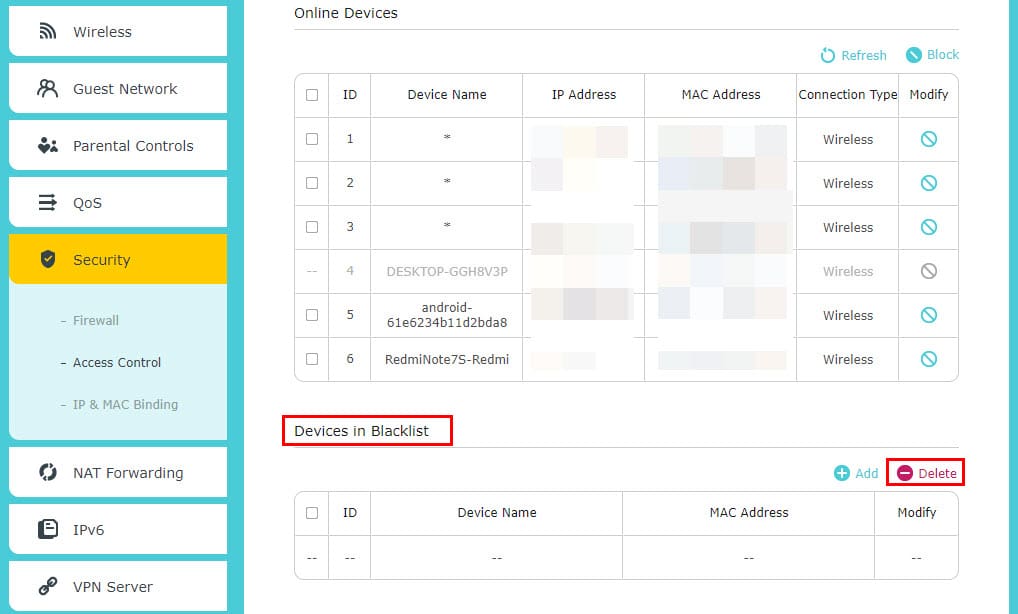
- Check the Device Name column on the Devices in the Blacklist table.
- If you see your device there, click the Delete button to remove your device from the blacklist.
You should now see the Wi-Fi Service Set Identifier (SSID) of your router on your Windows PC. You can connect to Wi-Fi now to enjoy the Internet.
5. Show Router SSID
Another prank someone can play on you so you face the “Windows 11 Wi-Fi not showing up” issue is hiding the SSID of the Wi-Fi router.
The SSID is the name identifier by which you see the network name on your Windows PC and connect. If you don’t see the SSID, there is no way you can hook up your PC with Wi-Fi.
Again, fire up the Wi-Fi router control app and enable SSID broadcast by following these steps:
- Go to the Wireless option from the router home page.
- Just beside the Network Name option, you should see the Hide SSID checkbox.
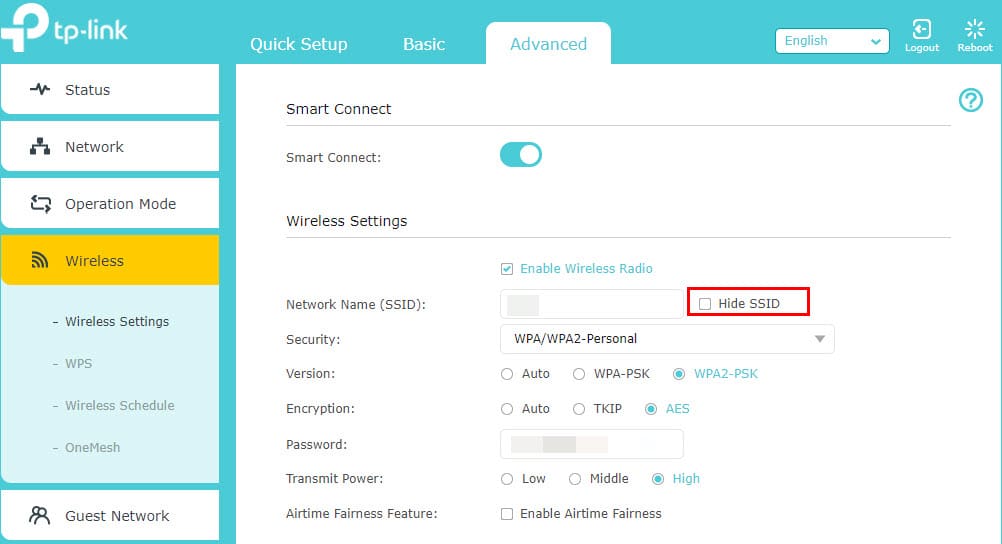
- The checkbox should always stay unchecked.
- If you see it checked, uncheck it, and you’ll immediately see the home or workplace Wi-Fi SSID on your Windows 11 PC.
6. Power Cycle the Router
If nothing seems to be wrong with the router and still “Wi-Fi not showing up on Windows 11”, you must try the router power cycle. Here’s how it’s done:
- Switch off the router by pressing its power button.
- Unplug the power adapter.
- Disconnect the Ethernet port connector or the RJ45 cable connector.
- Leave the router in this state for a few minutes and let it cool off.
- Now, connect the RJ45 cable connector and the power adapter.
- The router should show all LEDs brightly lit and then go back to the first LED and blink for a few seconds.
- When all the LEDs are on like Wi-Fi radio LED, Internet data LED, etc., try to connect your Windows 11 PC.
By now, you should have resolved the “Wi-Fi not showing up on Windows 11” issue if it’s linked to the router. If the issue isn’t gone, continue trying the following troubleshooting methods on the PC:
Windows 11 Wi-Fi Not Showing Up: Methods to Debug the PC
7. Inspect the Wi-Fi Adapter Hardware Connections
If you’re facing a Wi-Fi network issue on a desktop computer, then you must check whether the Wi-Fi hardware is connected or not.
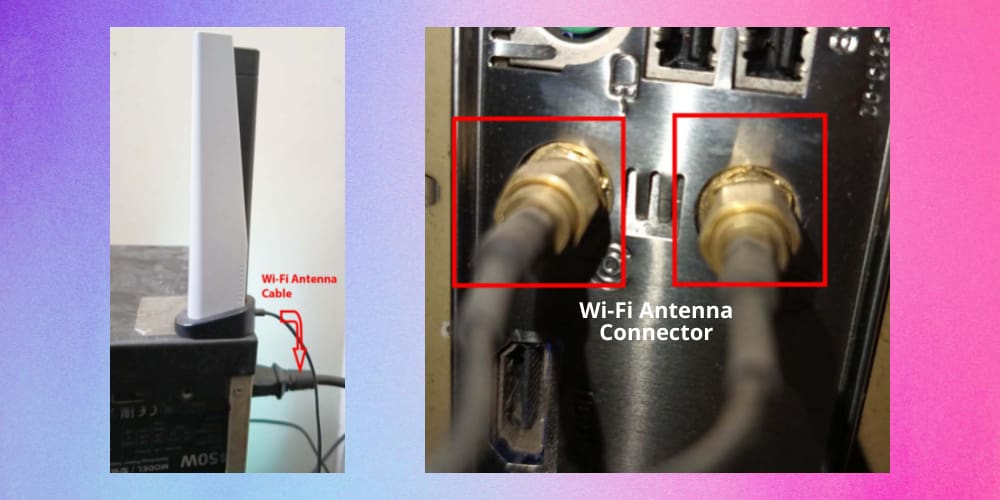
For most motherboards, there will be an antenna with two cables that go into a compatible pair of ports on the I/O panel of the motherboard.
Mostly, you need to insert the connectors and slowly turn the knobs clockwise to tighten the connectors. If the hardware is already connected, disconnect and reconnect the Wi-Fi antenna.
8. Deactivate Airplane Mode
It might be possible that you’ve mistakenly activated the Airplane mode and forgot to deactivate it.

Click the Wi-Fi icon on the system Notification Area and then click the Airplane mode icon to deactivate it.
If the option was already off, turn on Airplane mode. Keep it on for 10 seconds, and turn it off again. Now, open the Wi-Fi menu and see if you’re able to find the network you’re looking for.
9. Activate the Wi-Fi Icon From Control Panel
Anyone can hide the Wi-Fi icon from the Notification Area. If you’re unable to see the Wi-Fi icon, perform these steps now:
- Go to the Control Panel by searching the tool on Windows Search.
- Now, select Taskbar and Navigation.
- On the Taskbar window, scroll down until you find the Other system tray icons link. Click on it.
- The Network or Wi-Fi icon should be the first option.
- If you see the toggle button is off, click the toggle to activate the icon.
- Now, simply click the Wi-Fi icon on Notification Area to connect to your favorite wireless network.
10. Forget The Wi-Fi Network and Reconnect
One peculiar issue with the Network of Windows 11 is sometimes you’ll see a Wi-Fi is connected and upon clicking the Wi-Fi icon, it keeps on showing animated dots without discovering any SSIDs.
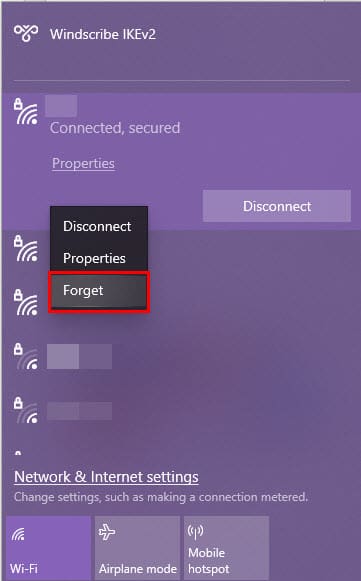
To resolve this, click the Wi-Fi network icon and then right-click on the current connection. Then, you’ll see the Forget button on a drop-down list. Click Forget to delete the connected profile for good.
Now, click the Wi-Fi icon again, and you should find all the available networks. You must enter a network password to connect.
11. Switch Off and Switch On Wi-Fi Adapter
You can also try power cycling the Wi-Fi adapter by following these steps:
- Hit Windows + R and type Network Connections.
- Under Best match, select the Control panel result.
- You’re now on the Network Connections window.

- Right-click the Wi-Fi adapter and then select Disable.
- After 10 to 20 seconds, right-click the Wi-Fi adapter again and select Enable.
12. Ensure WLAN Service Isn’t Turned Off
- Go to Services by looking it up on Windows Search.
- Now, scroll down the list until you find WLAN AutoConfig.
- If the status is Running, close the tool.
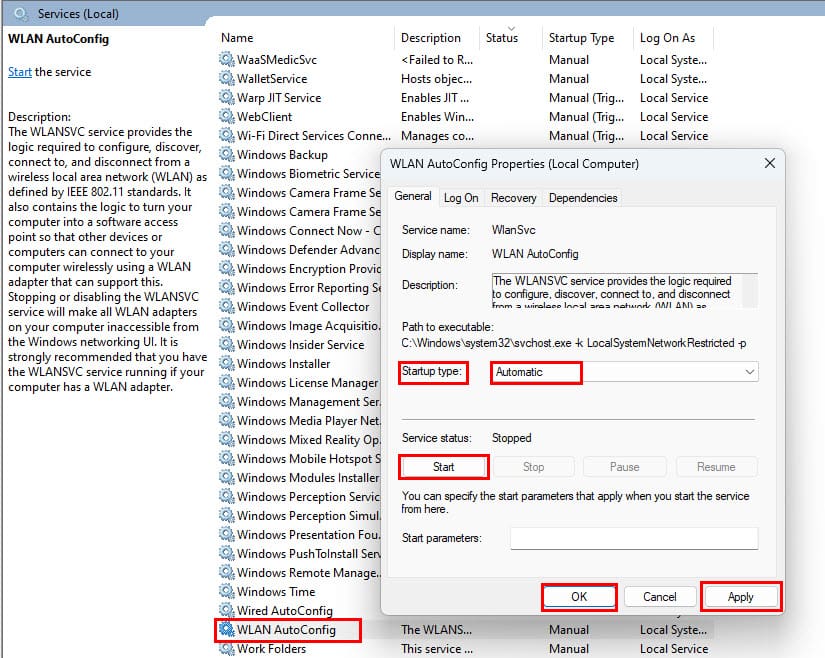
- If it’s not running, double-click WLAN AutoConfig and choose Startup type as Automatic.
- Now, click the Run button and select Apply to save the changes.
- Click OK to continue.
13. Uninstall and Re-Install Wi-Fi Adapter
- Go to Device Manager from Windows Search.
- On Device Manager, find and expand the Network adapters menu.
- Right-click the Wi-Fi adapter and then select Uninstall Device.

- Restart the PC and give it a few minutes of idle time.
- Now, come back to Device Manager > Network adapters and expand it.
- Right-click the same adapter and check if it shows Uninstall again.
- If that’s the case, try to connect to a Wi-Fi network.
14. Reset Network Settings
- On Windows Search, type Network.
- Click the Network Reset System settings option.
- Ensure that you know the Wi-Fi password.

- Once confirmed, click Reset now.
15. Restore Windows 11 PC
Finally, if all other methods fail, try restoring your PC to the last known good configuration by following these steps:
- On Windows Search, type Restore.
- Click Recovery.
- Now, choose Open System Restore.

- Do you see Choose a different restore point? If yes, click on it and then choose Next.
- Choose any restore point you think is good and complete the process.
- Once the PC restarts, you should see that the “Windows 11 Wi-Fi not showing up” issue is no longer there.
Windows 11 Wi-Fi Not Showing Up: Final Words
Above, you got all the methods to fix “Wi-Fi not showing up on Windows 11”. Give these troubleshooting steps a try, and you should be working on your project or homework in no time.
If you see I missed any troubleshooting steps to fix the “Wi-Fi network not showing up on Windows 11”, do leave a comment below with the name of the method.
Next up, the computer is stuck on “Let’s Connect You to a Network”.