
A wall of identical yellow folders gets old fast. But you can swap in a photo, a logo, a different icon, or any given shape to make the folder icons more palatable.
The only real obstacle is that Windows doesn’t use JPG or PNG images as viable icons. Instead, to add custom folder icons in Windows 11, the image has to be converted first, and there is a specific way to do it so the icon doesn’t disappear later.
How to Customize Folder Icons in Windows 11 – Basics
Windows icons use the ICO format, which is a “container” rather than a single picture. That means each ICO file holds the same artwork at several sizes, typically 16, 32, 48, and 256 pixels. Windows can use the appropriate size from the ICO file for different views and resolutions, allowing a single icon to look sharp at different sizes.
The trick is that many standard image-editing programs don’t export ICO files directly, and you can’t simply rename the extension, as the file needs to be properly built as an ICO.
Part 1 – Prepare the Image
For this, you can use any image you want. We’ll start with a fairly generic folder icon.
Step 1. Crop the image to a square. You can use the Photos app and the crop function, keeping the ratio as a square so the entire image fits.

Step 2. Remove the background. You can use the “Background remover” utility here, but make sure to draw in the mask over any white parts that you want to keep, as that usually gets flagged by the detector. Click on the “Remove” option and go to “Save as a copy” on the top-right under “Save options.”
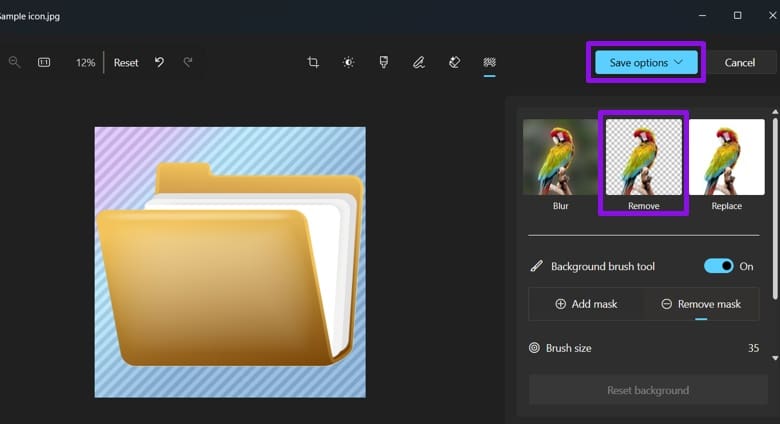
Step 3. Resize the image to 256 x 256 pixels. Again, you can use the “Resize image” option in Photos, if available.
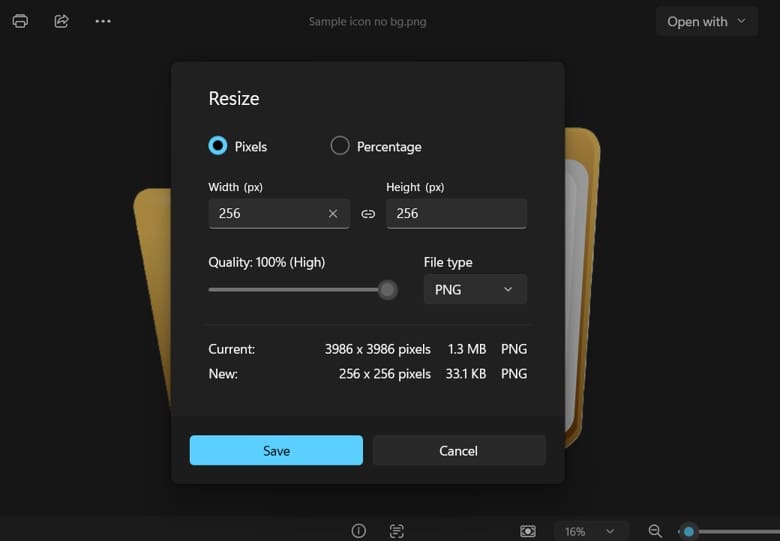
If needed, you may need to simplify the image to lose some details. Note that Photos can save a background-free image as a PNG even if you start with a JPG, but this doesn’t matter due to the next step.
Part 2 – Convert the Image to an ICO File
Standard Microsoft programs like Photos or Paint can’t save a file in ICO format, so you will need something else.
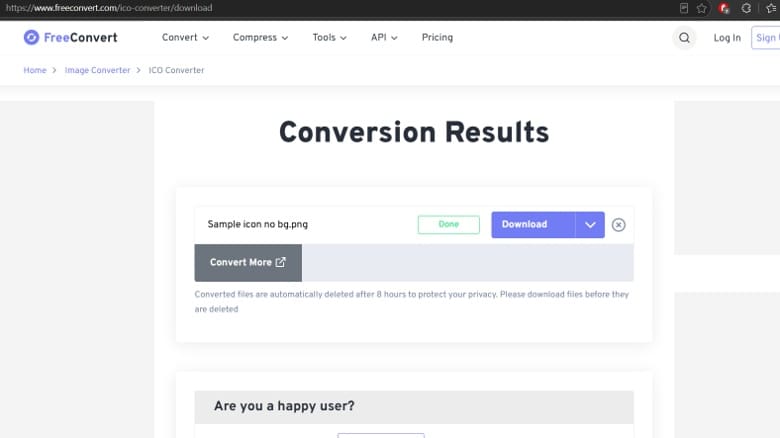
For a quick one-off, use a reputable web converter. Typically, all you have to do is upload the image, choose ICO as the output, and download the result. Avoid uploading sensitive or private images to an online converter.
For more control, you can use GIMP, which can export to ICO natively. In there, you need to open your image, choose “File,” then “Export As,” and type a filename ending in .ico.
If the tool offers a choice of sizes, select several rather than just one. Including 16, 32, 48, and 256 gives Windows the full set to work from and avoids scaling artifacts.
An important note is to save the finished file somewhere permanent. A dedicated “Icons” folder inside Pictures is ideal. Don’t leave it in Downloads because you will inevitably clear out the folder and toss it out, which breaks the link as a folder icon.
Part 3 – Add Custom Folder Icons in Windows 11
With the ICO file set up, you can apply it to a folder.
Step 1. Right-click on the folder and choose “Properties.”
Step 2. Open the “Customize” tab and click “Change Icon” in the “Folder icons” subsection.
Step 3. Click on “Browse” in the new dialog.
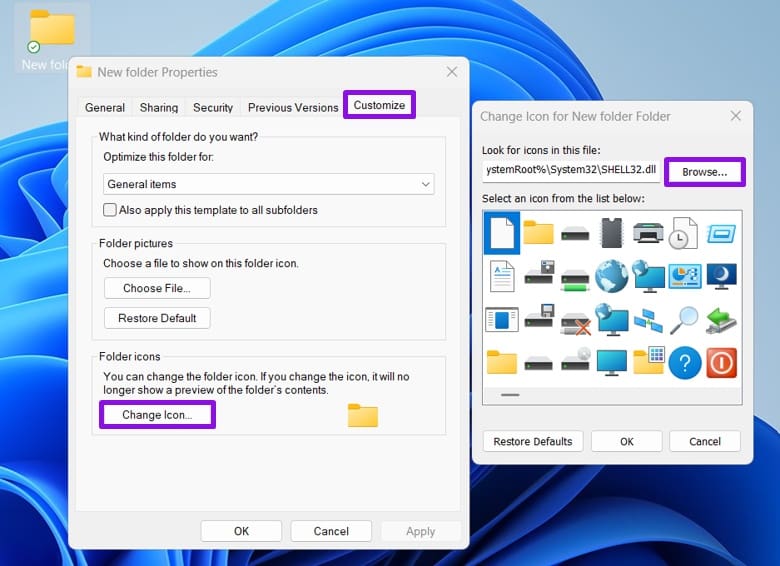
Step 4. Find the ICO folder you saved in the permanent location and select “Open.”

Step 5. Click “OK,” then “Apply,” then “OK” again. The folder should update.

The same Properties tab also has a “Restore Defaults” button if you change your mind later.
Part 4 – Stop the Icon From Breaking Later
When you apply an icon, Windows writes a hidden file called desktop.ini inside the folder, and that file records the full path to your ICO. If you move the ICO, rename it, or delete it, the folder reverts to the default icon.
That also means a folder you copy to a USB stick or an external drive arrives on someone else’s PC pointing at a path that does not exist there. One way to make the icon more portable is to store the ICO inside the folder and use a relative path.
Step 1. Put the ICO file inside the folder you are customizing.
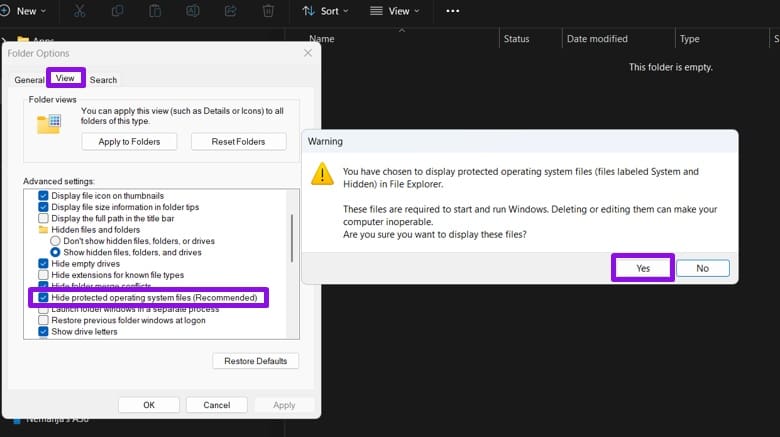
Step 2. Go to the “More” option and select Settings. In there, go to “View” and uncheck “Hide protected operating system files.” You’ll get a warning prompt to confirm. Then, click on “Apply” and “OK.”
Step 3. You should have at least two files now: the ICO and the “desktop.ini” file in the folder.
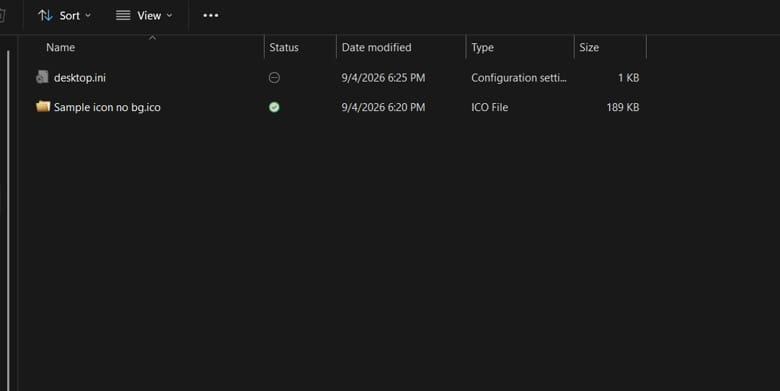
Step 4. Open “desktop.ini” in Notepad and set the icon reference to a relative path, for example:
IconFile=filename.ico
IconIndex=0
If the filename contains spaces, wrap it in quotation marks, like IconResource=“.\my icon.ico”,0. Save the file and refresh the folder. Our file is named “Sample icon no bg.ico,” so we use that.
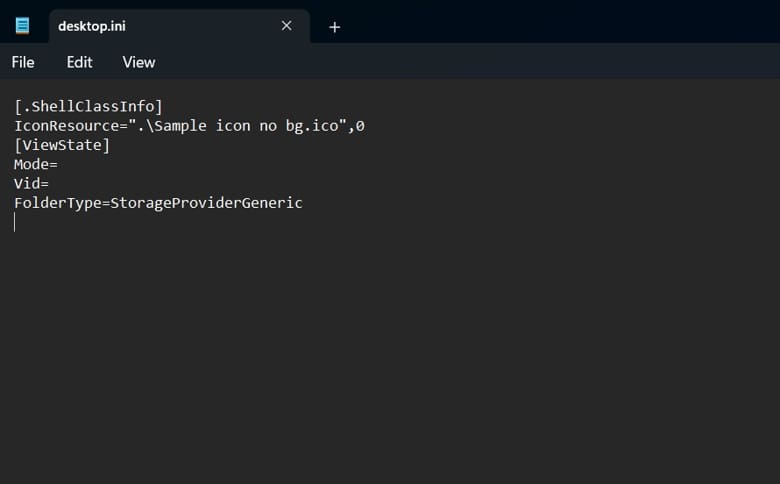
Step 5. Save the file in Notepad.
Step 6. If the icon doesn’t change immediately, use the Refresh option on the screen or restart File Explorer in Task Manager (the process is “explorer.exe”).
You can undo the change that reveals hidden files to make sure you don’t accidentally delete them.