
Everyone who has installed Windows knows the pain of sitting through the installation process, only to then have to wait for dozens of updates to download and apply as well, often over multiple restarts.
Slipstreaming is a process where you download the Windows installation file and the updates you need, and then build your own Windows installation disk with all of the updates already included. This way, the installation process is quick and efficient, and you don’t have to wait for updates.
Slipstreaming doesn’t necessarily provide a benefit to everyone, and the process of identifying exactly which updates should be included can be complex. If you’re a home user, and you’re just wanting to install Windows on a new computer, this process probably isn’t for you.
It will likely take more time and be more complex and risk-prone than updating your new Windows installation the normal way and sitting through the updates. However, if you’re in a situation where you need to install Windows on a large number of devices, slipstreaming can prove beneficial by both saving time and reducing the overall amount of data that needs to be downloaded, not to mention getting devices ready sooner.
Downloading the iso
To slipstream a Windows installation, the first thing you need is to have a Windows installation file available, in the form of an “iso” disk image. The best way to get a Windows iso is to download it through the use of the official Media Creation Tool, available from Microsoft here.
Tip: Never trust third-party iso sources – they are very likely going to contain spy- or malware.
The Media Creation Tool is a standalone application that doesn’t require installation. Just run the exe file once it is downloaded by double-clicking it. Once launched, you’ll have to accept a licence agreement to be able to proceed.
The next screen will give you a choice between upgrading the current PC or creating an installation media. Select “Create installation media (USB flash drive, DVD or ISO file) for another PC” and then click Next.

The next screen is used to configure the language, edition, and architecture of Windows that the iso you’ll be generating will install. Language configures the Windows display language of the end system. Edition defines which flavour of Windows should be installed. This option may only show “Windows 10” though – or a selection of Home, Pro and so on.
Architecture defines what processor type Windows should be configured for, this should be set to 64-bit, unless you know that your CPU only supports the older 32-bit architecture (which is relatively unlikely).

The next screen will ask you which media you want to use. Your choices are USB flash drive and ISO file. Select “ISO file”, click next and then select where you want the Windows 10 iso disk image to download to.

Once the download is complete, you can click on the file path to the iso to open Windows Explorer and navigate to the correct directory and then click “Finish”.
Modifying the iso
Once you’ve got the iso downloaded the next stage is to modify it to include the Windows updates you want. The tool you’ll need to do this is called “NTLite” and is available for free from Nitesoft here.
Once you’ve downloaded NTLite, you’ll need to install it by double-clicking on the exe. The first stage of the installation is to accept the licence agreement. You then need to select an install location and finally, if you want a desktop shortcut or not.
Tip: You should not install NTLite in “portable mode” as this will make it harder to uninstall it properly afterward.
Once the installer has finished, click “Finish” with the “Launch NTLite” checkbox ticked to launch NTLite. The first thing you’ll see in the program is a licencing popup. If you have, or need, a paid licence you should activate it here. If you are not using NTLite in a commercial capacity, you can select the free licence and then click “OK” to start.
To be able to import an image into NTLite you need to extract the files from the iso drive. To do so, double click the iso file in File Explorer. It will then mount the file and treat it as if it were a physical DVD.
Next, you need to copy all the files from the iso into a new directory on your hard drive. This way, you can edit this copy and still have a known good version to come back to, if you make a mistake and want to start again.
Back in NTLite, click “Add” in the top left corner, and select “Image directory” from the dropdown list. In the new popup window, select the folder that you copied the contents of the iso to. Then, click “Select Folder” in the bottom right to import it.
If the folder successfully imported you should now see a list of Windows editions listed under “Image history”.
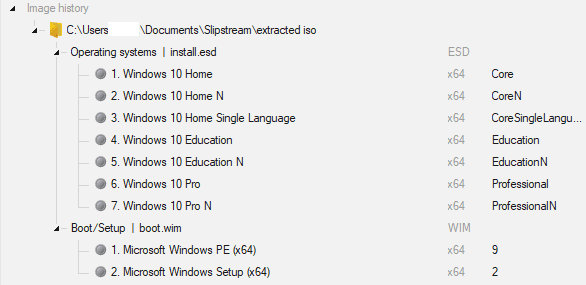
Now you need to load one of the editions so you can modify it. Select which edition of Windows you want to modify, this should likely be “Home” or “Home N”.
Tip: The “N” editions of Windows are identical to their non “N” namesakes, the only difference is that they are missing multimedia playback features such as Windows Media Player. If you aren’t sure which edition to pick, go with the regular one!
When you know which edition of Windows you want to modify, right-click on it and select “Load”. You may see a popup box asking if you want to convert the file “install.esd” into the “standard WIM format”.
If so, click “OK” to continue.

Tip: One of the possible sources is listed under “Live install”, do NOT use this unless you are absolutely confident that you know what you are doing. This source is your current Windows installation, if you make the wrong changes you could cause system instability or corruption.
When the image has been successfully loaded, it will move from the “Image history” section to the “Mounted images” section, and the grey dot next to it will turn green.
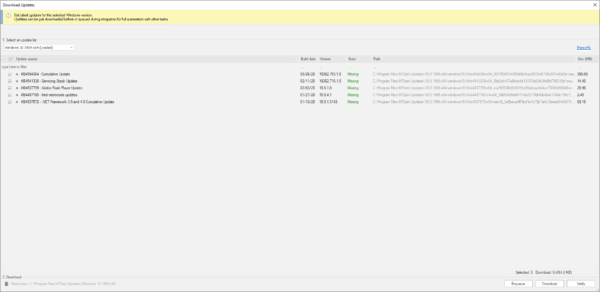
Next, you need to switch to the “Updates” tab via the menu on the left-hand side. To add updates to the iso, click “Add” in the top left corner and then select “Latest online updates” from the dropdown box.

In the new “Download updates” window, select which build of Windows you want to apply updates for in the dropdown box in the top right of the page. The build version you should use is likely the highest or second-highest number.
Just be aware that it is possible that the highest build version is a preview build in a beta state – if so, you shouldn’t select it. You should research the latest available build version when you are going through the process in order to ensure it is a live build and not a preview.
<slipstream 7.png> Select the latest live build version, it may not be the highest available version.
Tip: You should always install the latest live build. It is better to avoid preview builds unless you actively want to participate in beta tests, as there may be stability and other issues that impact performance.
Once you’ve selected the correct build version for your purposes, ensure that all of the updates have their checkboxes ticked and click “Enqueue”.
Tip: NTLite can make a lot of other changes to the Windows installer that go beyond the scope of this guide. Be careful with these options though, as it is possible to remove critical Windows features, such as the networking functions used to access the internet by accident.
The final stage is to apply your changes. Use the menu on the left-hand side to switch to the “Apply” tab. From here, ensure that either “Save the image” or “Save the image and trim editions” is selected under “Saving mode”. Next, select “Create ISO” under “Options”. You’ll need to select a filename and location to save it in the first popup window and then apply a label with the second.

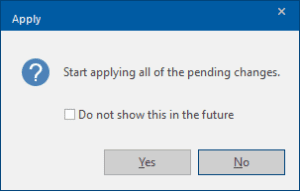
Once you’ve ensured these settings are enabled, you can click on “Process” in the top left corner. If you have Windows Defender’s Real-time protection enabled, you’ll see a warning message that this can slow down the process. Click “No” to leave your antivirus running, and then click “Yes” to “Start applying all of the pending changes.”
When the process is complete, all of the stages will have the status “Done”.
Your new iso is now ready for use, you just need to copy it to a USB drive. The transfer may take some time as the iso will be multiple gigabytes.

To use the USB to install your slipstreamed version of Windows, you need to plug the USB in, before turning the computer on. While the computer is booting up, you need to select the USB drive as the boot device. On some computers this may happen automatically, on others you may be asked or have to press a key to open the menu. Once in the Windows installer, just follow the instructions to install Windows.
You can use the USB as many times as you want, to install it on multiple devices.


is it possible to slipstream ms office 2019 and certain applications if possible please be kind enough to guide .