Microsoft Access Error 53 is a VBA runtime error that comes with a straightforward message: “File Not Found.” What’s less straightforward is what file Access can’t find, because the error can be caused by several different situations. Here’s what each cause looks like and how to fix it.
What Causes Microsoft Access Error 53
Access throws the error 53 any time it tries to open, load, or reference a file and can’t find it at the specified path. These most commonly include:
- VBA code that uses a hardcoded file path, which has since changed
- Linked tables that point to an external database, spreadsheet, or data source that has been renamed, moved, or is on a network location
- Missing or unregistered files that Access needs to load
- Broken VBA library references, which appear as “Missing:” in the References list
- A corrupted database file
The error message sometimes names the file Access is looking for, which you should note before doing anything else, as it tells you exactly which fix to start with.
Fix 1 – Check and Correct the File Path in Code or Macros
If the error fires when a macro runs or a VBA procedure executes, a hardcoded path pointing to a file that’s been moved or renamed is the most likely cause.
Step 1. Click on “Debug” if the option is available. This opens the VBA Editor and highlights the exact line causing the error. If the debug option isn’t present, press “Alt + F11” to open the VBA Editor manually, then look through the relevant module for any line that references a file path.
Step 2. Confirm whether the file still exists at that path using File Explorer.
Step 3. Update the path in the code to match the file’s current location, then save the module and test again.
If the database is shared across multiple machines where drive mappings differ, replace hardcoded paths with dynamic ones, such as with “CurrentProject.Path” or an environment variable.
Fix 2 – Relink Broken Linked Tables
Linked tables are one of the most common sources of Error 53, especially in split databases where the front-end and back-end live in separate files. If one gets moved, they will likely throw an error since they can’t find each other.
Step 1. Open your Access database.
Step 2. Go to the “External Data” tab in the ribbon and click on “Linked Table Manager.”
Step 3. You’ll see a list of all linked tables with their current source paths. Any table with a broken link will either show a warning or fail to display a valid path.
Step 4. Select all the linked tables, then click “Relink.” Access will prompt you for the new file location if it can’t find the current one.
Step 5. Browse to the correct location of the back-end database or source file, select it, and confirm. Access will update the links for all selected tables.
Step 6. If only one table is failing, relink it individually rather than all at once.
Fix 3 – Fix Missing VBA Library References
Access databases that use VBA often reference external libraries, things like the Microsoft DAO Object Library, the ActiveX Data Objects (ADO) library, or third-party controls. If one of these is moved or modified, they need to be re-added.
Step 1. Press “Alt + F11” to open the VBA Editor.
Step 2. Go to “Tools” in the menu bar and select “References.”
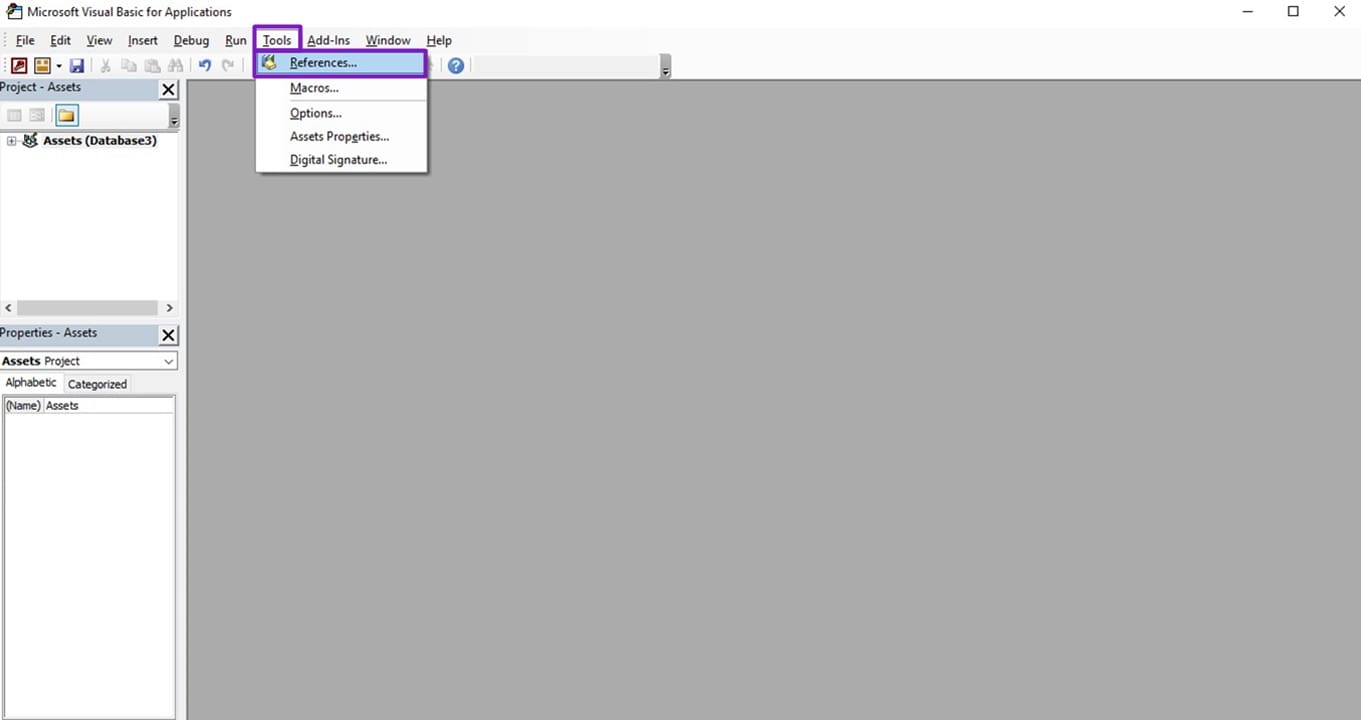
Step 3. Scroll through the list and look for any entry marked “MISSING:” followed by a library name.
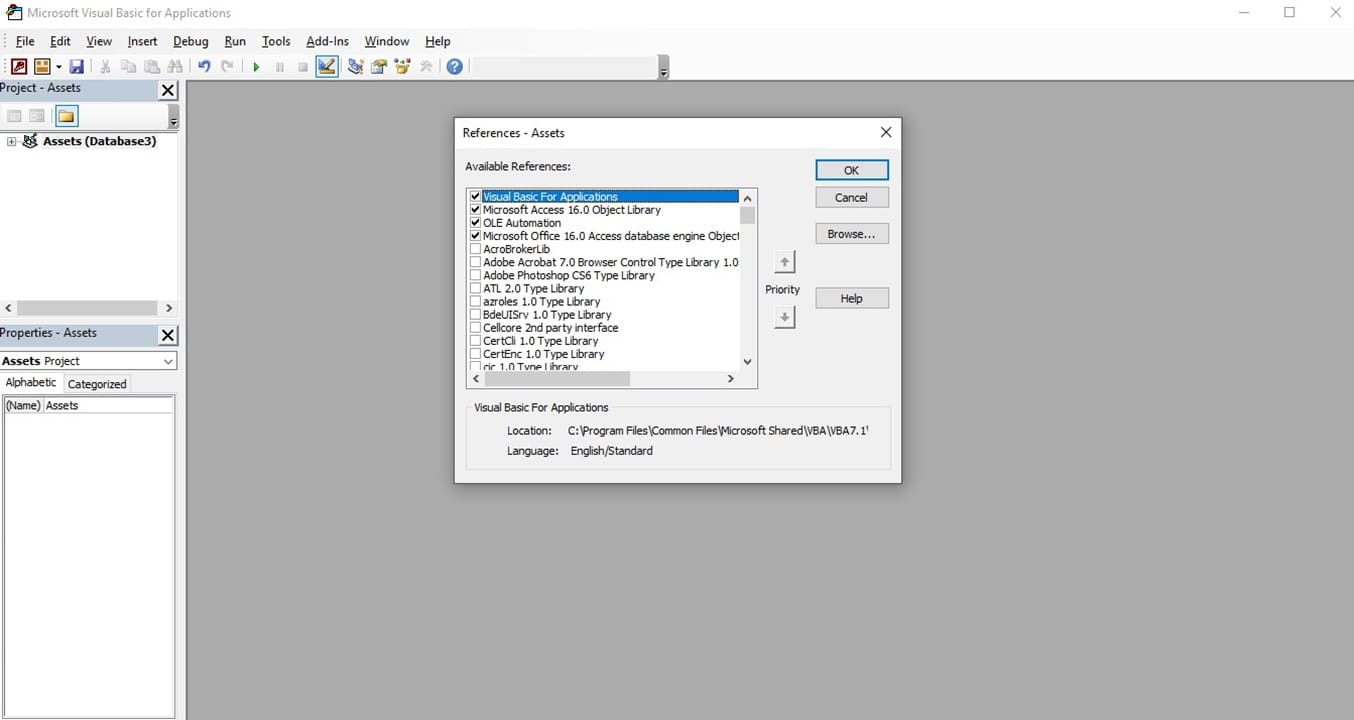
Step 4. If the library is one you recognize and still need, uncheck it, close the References dialog, then reopen it and locate the correct version of the library in the list to re-add it. If the missing reference is to a library you no longer use, simply uncheck it and click “OK.”
Fix 4 – Re-Register Access Wizard Libraries and DLL Files
Access uses a set of Wizard libraries and ActiveX controls for its features. If these files become unregistered (which can happen after an Office update), Windows will return Error 53 when Access tries to load them.
Step 1. Close Microsoft Access.
Step 2. Open Command Prompt as the administrator (you can search for it).
Step 3. Navigate to the Office installation folder by running:
cd “C:\Program Files\Microsoft Office\root\Office16”
Step 4. Re-register the core Access Wizard libraries by running the following commands one at a time:
regsvr32 /s acwiz.dll
regsvr32 /s acwzmain.accde
regsvr32 /s acwzlib.accde
Step 5. If the error message names a specific third-party DLL or OCX file, register that file as well using its full path:
regsvr32 “C:\full\path\to\the\file.dll”
Step 6. Close the Command Prompt, reopen Access, and test the operation that triggered the error.
A success dialog will appear after each regsvr32 command if it works.
Fix 5 – Run Access as Administrator
Running Access as an administrator grants it the access level it needs without changing any file or system settings permanently.
Fix 6 – Compact and Repair the Database
Over time, Access databases can develop corrupted references, especially if they are opened and closed frequently or have grown significantly in size.
Step 1. Open Microsoft Access.
Step 2. Go to “File” and select “Info.”
Step 3. Click “Compact & Repair Database.” Access will close the current database, run the process, and reopen it automatically.
Alternatively, you can compact and repair without opening the database first. Simply go to “File,” then “Open,” browse to the database file, and hold the “Shift” key while opening it to bypass any startup macros that might trigger the error before you can reach the menu.
Fix 7 – Repair Microsoft Office
If none of the above fixes resolve the error, the issue may be in the Office installation itself.
Step 1. Press “Win + I” to open “Settings,” then go to “Apps” and “Installed apps.”
Step 2. Find “Microsoft Office” or “Microsoft 365” in the list and click the three-dot menu next to it.
Step 3. Select “Modify.”
Step 4. Choose “Quick Repair” first. This runs entirely offline and takes a few minutes. If the error persists, use “Online Repair.”
Step 5. Restart the PC.