

Windows 10 offline file functionality is a network function of Sync Center that makes it possible for users to access files stored on another point in their network (so not their own computer) to be accessed even if the network connection itself isn’t working. For example, a file can still be available from another computer even if the shared network is down because of maintenance. Enable or disable offline files with these steps.
Prerequisites
First off – the offline file functionality is only available in the Pro, Enterprise and Education versions of Windows 10. If you aren’t sure which version you have, you can find out easily.
Press the Windows key and type ‘system information’. Click on the search result with that label and a new window will open, containing all sorts of information about your computer – among them, at the very top, the Windows version you are running.
This could be Windows 10 Home, for example – if so, your computer does NOT support offline file functionality. Only Pro, Enterprise and Education do. If you have one of the correct versions for this, follow the steps below to turn offline files on or off.
Changing the setting
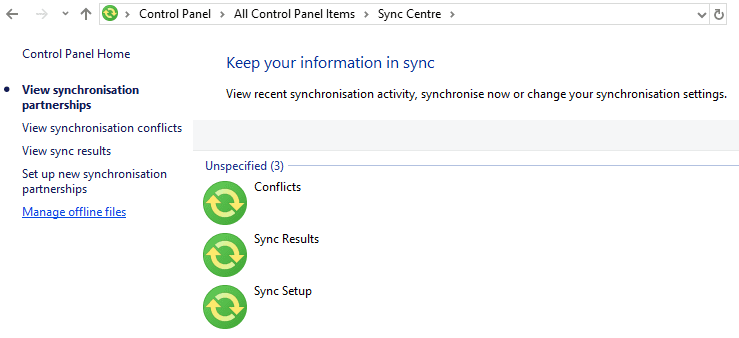
In order to either turn this on or off, you need to go to your Sync Centre. To do so, press the Windows key on your keyboard and type ‘mobsync’.

Press the enter key, and your Sync Centre will open. On the left side, you’ll see several options to choose from – click on the one labelled ‘Manage offline files’.
A new window labelled ‘Offline files’ will open. Here, you have a few options. The first button allows you to enable or disable offline files. Of course, if they are already off, you can’t turn them off and vice versa.
Tip: In order to change this setting, you need to have full administrator rights. Either your specific Windows account needs to have them, or you need an administrator to confirm the change with the use of their own password.


The other two options allow you to reopen the Sync Centre from before, and to check for offline files you may already have – if you don’t have any, this won’t show you any results, though.
Click on the en/disabling button in the general tab, then click on ‘Yes’ at the bottom. Please be aware that in order for the change to take effect, you will have to restart your computer.
Tip: Before restarting, make sure you have all important documents saved, so you won’t lose any data!
You’ll have to confirm you are ready and want to restart – when you have done so, your computer will turn off and back on, and your new setting will be in effect!
Tip: If your change doesn’t work, this is likely because of a policy setting – network administrators can use the Local Group Policy Editor to set certain options for all computers on a network. If a setting there prevents offline files from being turned on or off, contact a network administrator to change it!


Does it keep automatically recently used file in offline mode? OR I have to do any setting for that?