Skip to content
LogoTechnipages
LogoTechnipages
  • Topics
        • Android
        • Browsers
        • Gaming
        • Hardware
        • Internet
        • iPhone
        • Linux
        • macOS
        • Office
        • Reviews
        • Software
        • Windows
        • Definitions
        • All Recent Posts
  • Product Reviews
  • About

How to Enable Seconds on The Windows Taskbar Clock

Evan MercerMay 9, 2026 Comments (0)
enable seconds in windows taskbar clock

The Windows 11 taskbar has plenty going on to help you stay organized. You can see what apps you have open, check your Wi-Fi connection strength, and even start a focused work session. The clock is also a useful feature, showing the current time and, below it, the day’s date. But if you’re used to a more precise way of measuring time, you may be frustrated that, by default, it’s missing a certain something: seconds.

The default Windows 11 taskbar clock only shows hours and minutes. If you’re someone who likes to take a break for a few seconds now and then, or who appreciates the accuracy of a more detailed clock, there is a way to change this.

Learn to enable seconds in Windows 11 taskbar clock by following the steps below. Note: You must make sure you’ve updated Windows 11 to the latest version for these instructions to work. Go to Settings > Windows Update > Check for Updates to do this.

Enable Seconds in Windows Taskbar Clock: Step-by-Step Guide

Step 1. Open Settings. You can do this by searching using the taskbar’s search function, or by pressing this key combination: Windows + I.

How to Enable Seconds on The Windows Taskbar Clock 1

Step 2. Click on “Time & language” in the left-hand menu.

How to Enable Seconds on The Windows Taskbar Clock 2

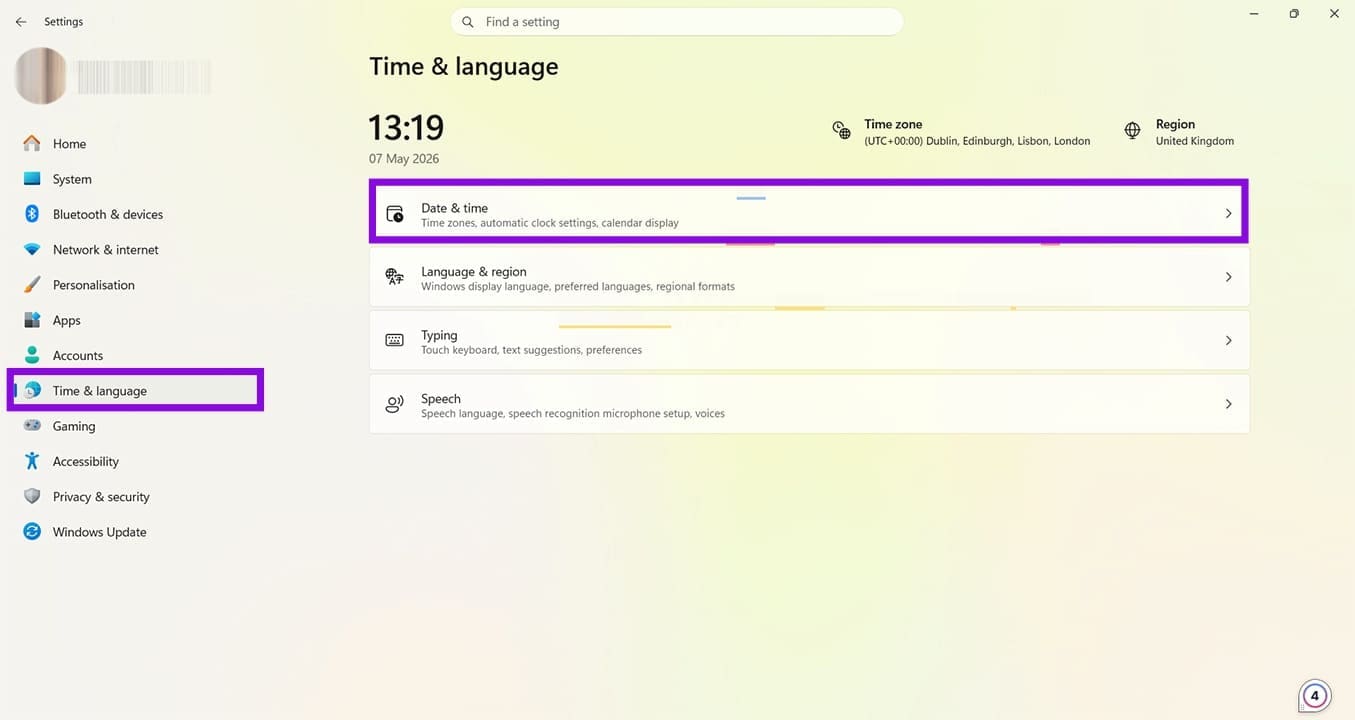
Step 3. Next, click on “Date & time,” shown at the top of the “Time & language” options.

How to Enable Seconds on The Windows Taskbar Clock 3

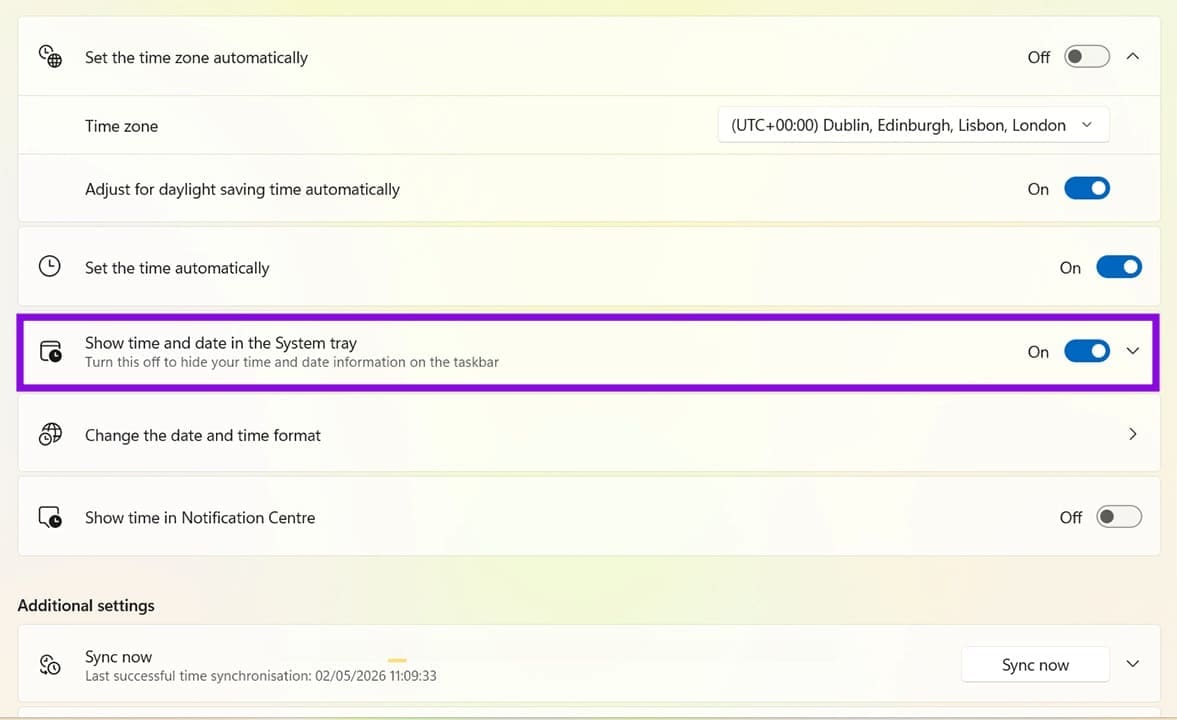
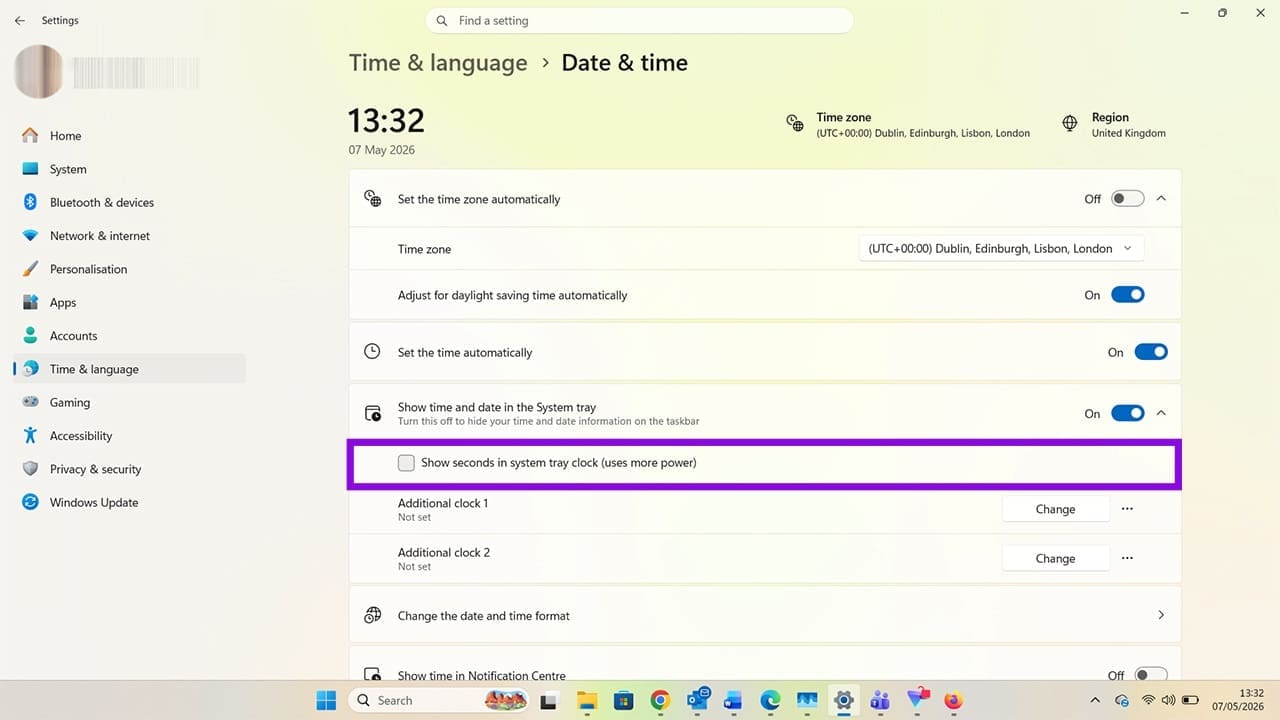
Step 4. Look for the option that says, “Show time and date in the System tray.” By default, this will be toggled on (blue). There’s a drop-down arrow next to the toggle button. Click here.

How to Enable Seconds on The Windows Taskbar Clock 4

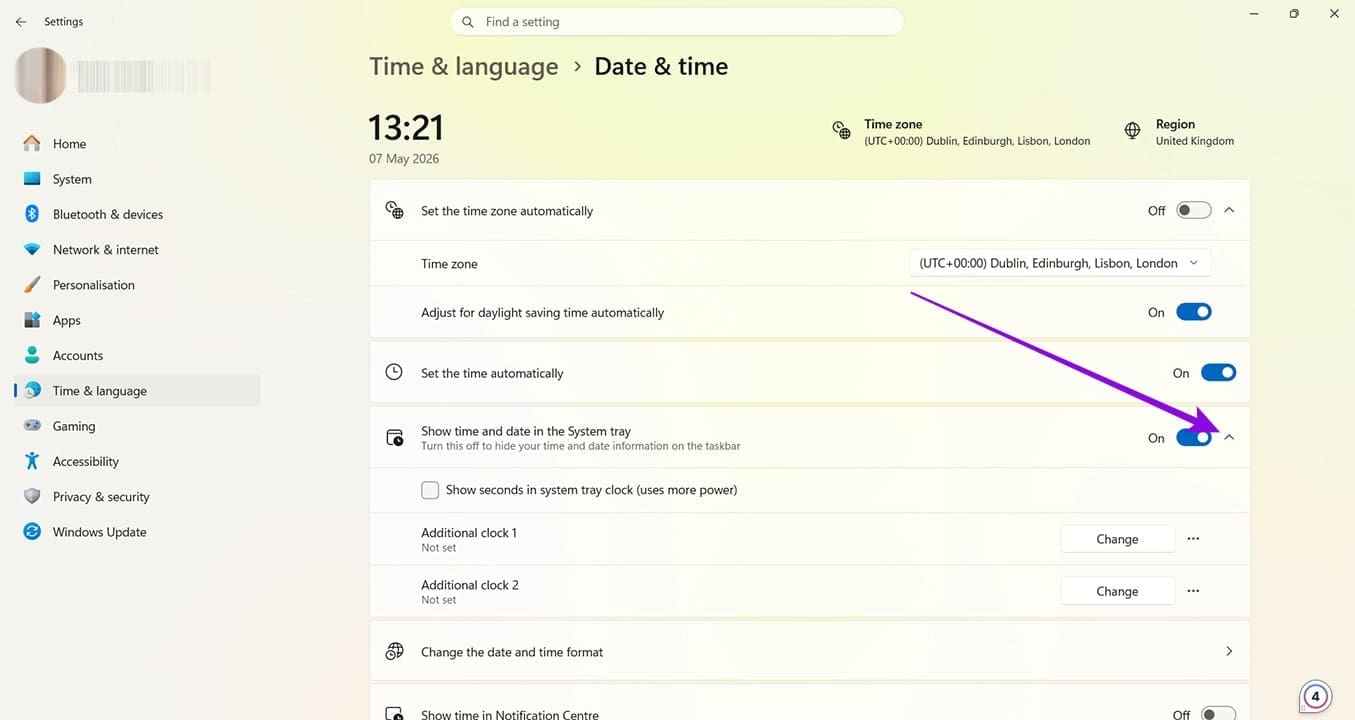
Step 5. You can now tick the box that says, “Show seconds in system tray clock (uses more power).”

How to Enable Seconds on The Windows Taskbar Clock 5

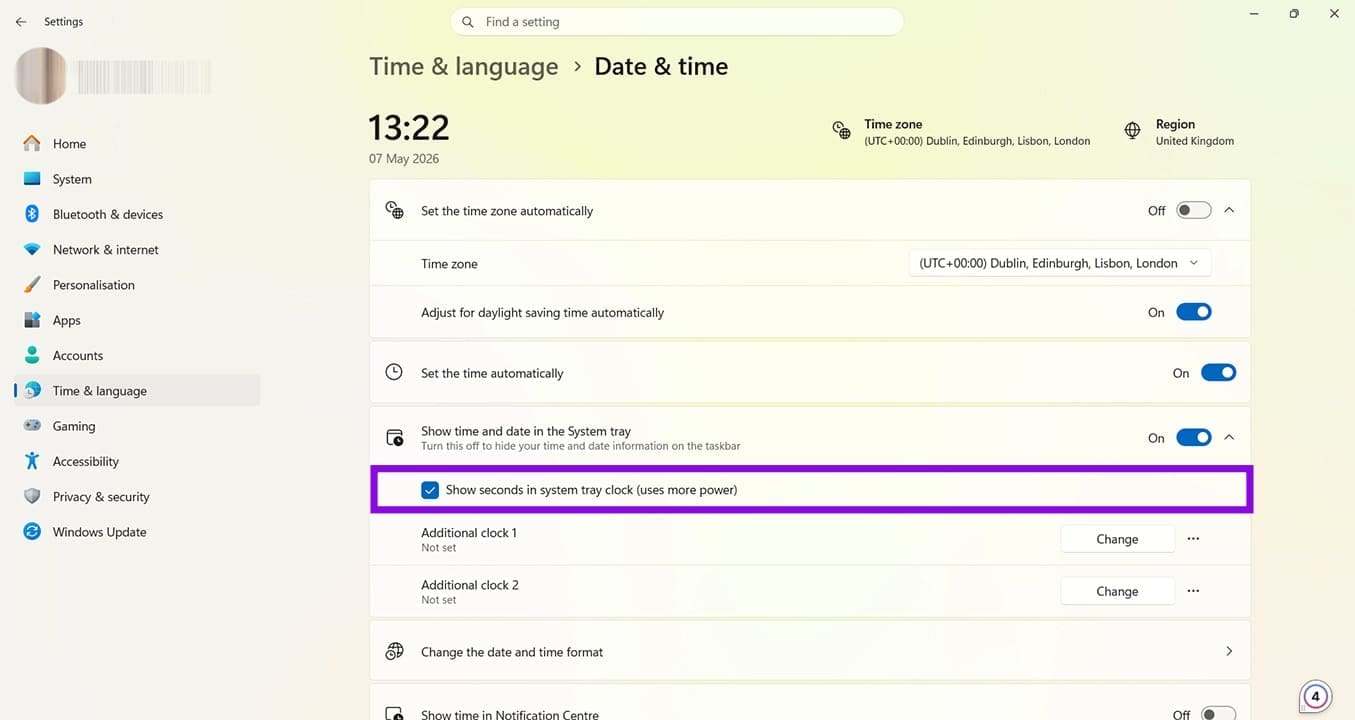
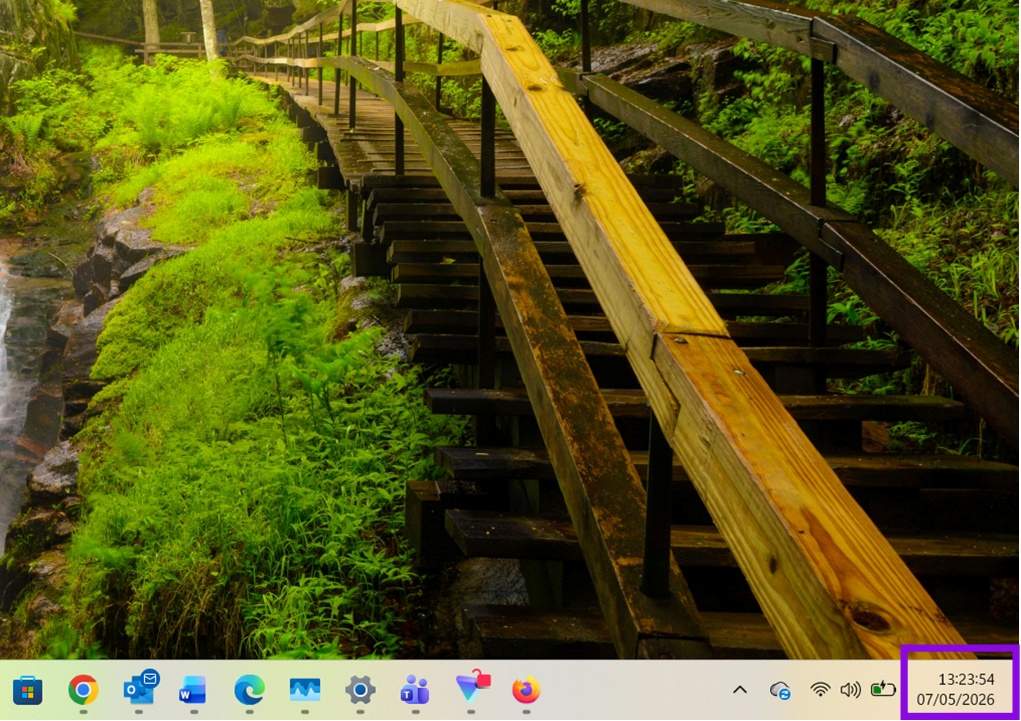
Step 6. You don’t need to apply this setting manually; it will instantly change the display format of your Windows taskbar clock.

How to Enable Seconds on The Windows Taskbar Clock 6

If you’re wondering how to show seconds on the Windows 11 taskbar clock and are concerned that doing so uses more power, don’t worry. The power increase is negligible. You can check how it impacts your power usage by heading to Settings > System > Power & battery > Battery usage > Battery levels.

How to Enable Seconds on The Windows Taskbar Clock 7

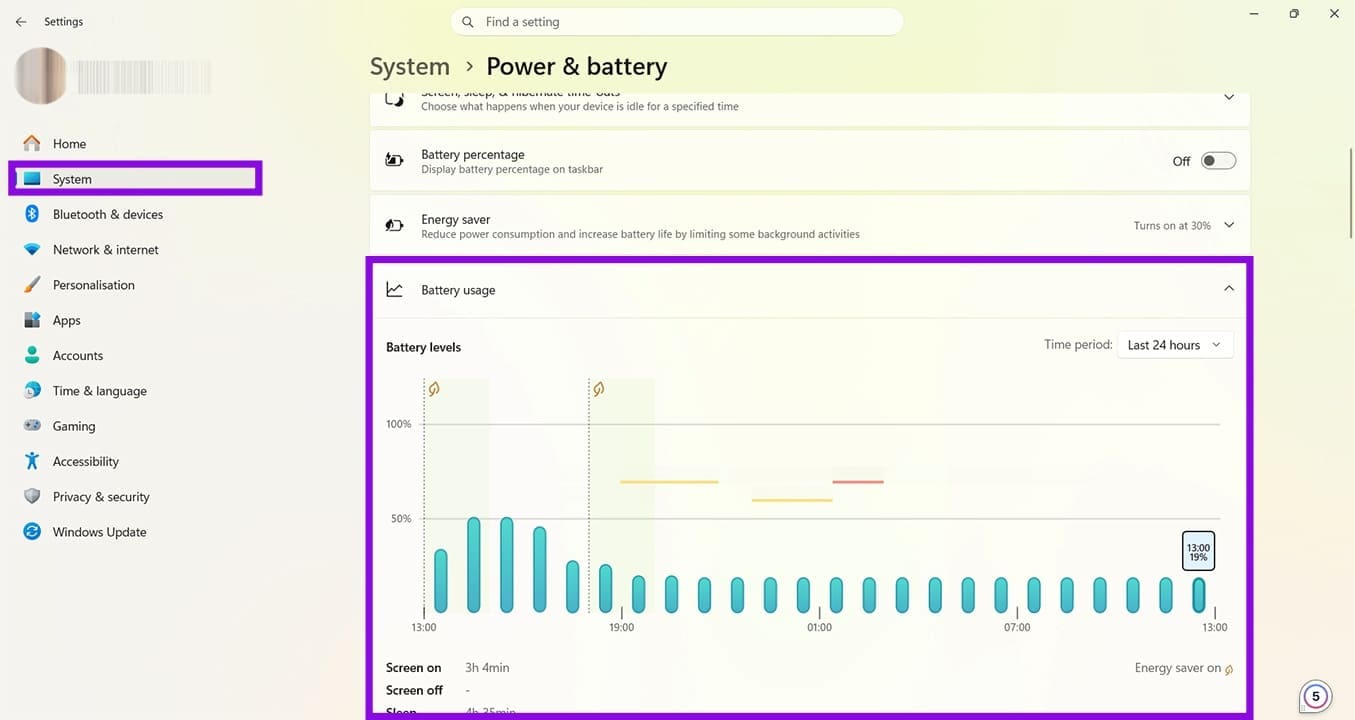
The graph above shows the last 24 hours, with the bars at the right showing the most recent usage levels. There was no notable difference in usage from before the clock was adjusted and after. You can also review what apps and services are using the most power simply by scrolling down on the same page.

How to Enable Seconds on The Windows Taskbar Clock 8

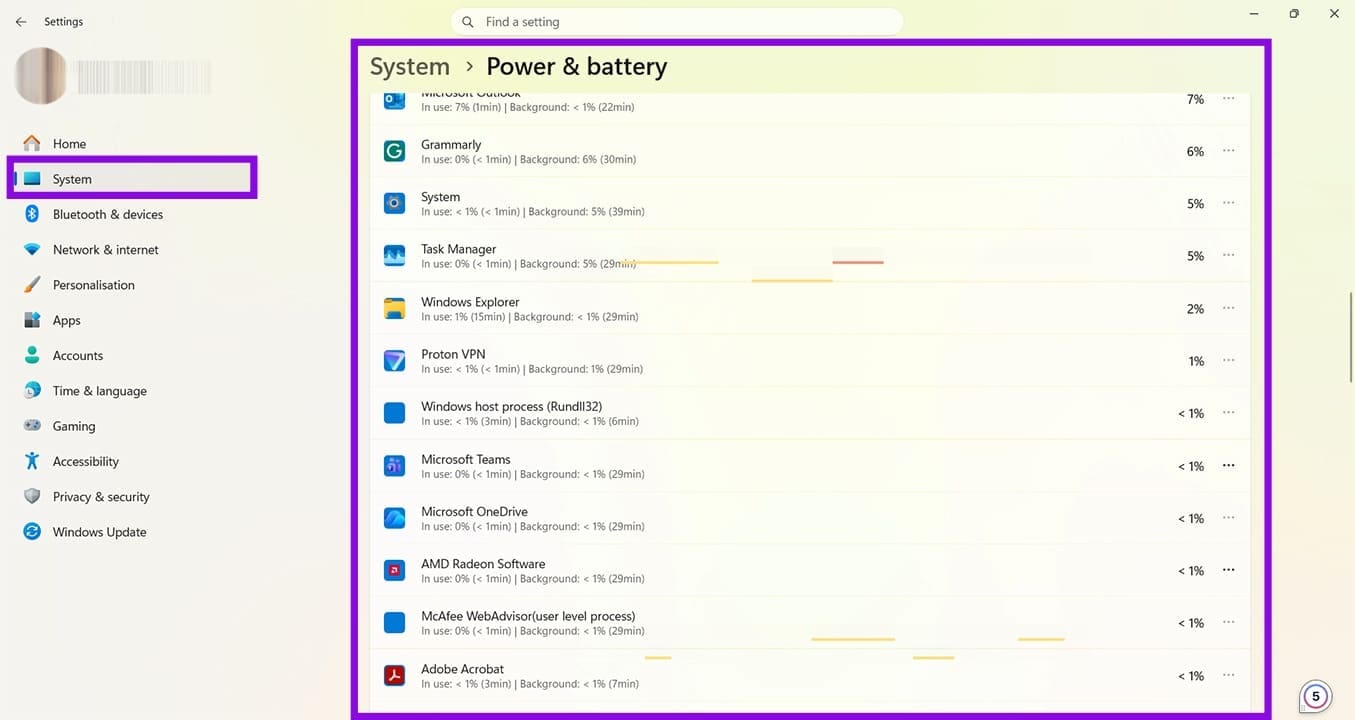
The system battery usage is less than one percent, apart from background processes. If you’re concerned about the “seconds” feature eating up your battery, you can head back into Settings > Time & language > Date & time > Show time and date in the System tray, and switch the feature off again. The seconds will instantly be removed from the Windows 11 taskbar clock.

How to Enable Seconds on The Windows Taskbar Clock 9
Categories: Windows

Author Evan Mercer

I’m a computer science grad who loves to tinker with smartphones and tablets in my spare time. When I’m not writing about how to fix techy problems, I like hanging out with my dogs and sipping nice wine after a tough day.

You Might Also Like

  • Encryption Header

    How to Turn Off Windows File Encryption (EFS)

    Mitch BartlettWindows
  • Win11 Install Telnet Header

    How to Install Telnet in Windows 11

    Mitch BartlettWindows
  • authentication-error-function-requested-not-supported-windows-10

    Fix Windows 10 Remote Desktop Authentication Errors

    Madalina DinitaWindows
  • microsoft-word-pasting-not-working

    How to Quickly Erase All Images in a Word Document

    Judy SanhzWindows

Leave a Reply

Your email address will not be published. Required fields are marked *

  • how to fix your device ran into a problem

    How to Fix “Your Device Ran Into a Problem and Couldn’t Be Repaired” Error

  • taskbar popping up in games

    Taskbar Popping Up During Games? Here’s What to Do

  • error code 0x803f7001

    5 Fixes for Error Code 0x803F7001 in Windows 11

  • disable category start menu in windows 11

    How to Disable the Category Start Menu in Windows 11

  • reset notepad to factory settings

    How to Reset Notepad to Factory Settings

profile pic

The Experts Behind Technipages

My name is Mitch Bartlett. I've been working in technology for over 20 years in a wide range of tech jobs from Tech Support to Software Testing. I started this site as a technical guide for myself and it has grown into what I hope is a useful reference for all.

Learn More

technipages logo white
linkedin icon

Technipages is part of Guiding Tech Media, a leading digital media publisher focused on helping people figure out technology. Learn more about our mission and team here.

© 2026 Guiding Tech Media All Rights Reserved

  • About Us
  • Contact
  • Terms of Use
  • Privacy Policy

© 2026 Guiding Tech Media All Rights Reserved

Information from your device can be used to personalize your ad experience.
Do not sell my personal information.

Last Updated on May 9, 2026 by Evan Mercer