If your VPN provider doesn’t provide an Android app, you may feel like you’re out of luck or that you should have picked a different VPN provider. Most VPN providers supply VPN configuration files or details to paid users, that can be used with third-party VPN clients such as the VPN functionality built-in to Android.
Android has built-in support for VPNs using the PPTP, L2TP/IPSec, and IPSec/IKEv2 protocols. Of these, the IPSec/IKEv2 combination offers the best protection. PPTP and L2TP/IPSec are both considered outdated and weak, as they do not provide strong security levels.
Note: IPSec is a suite of communication protocols used to secure communications between two devices. When used with the L2TP communications protocol, IPSec is used to secure the data, however, due to the complexity of the L2TP protocol, weak pre-shared keys are often used for encryption. Additionally, a leaked NSA presentation suggests that they are aware of a vulnerability in the protocol. With IPSec/IKEv2, the IKEv2 protocol within the IPSec suite is specifically used to secure the connection. There are no known vulnerabilities in the protocol. The PPTP protocol is limited to using the RC4 encryption algorithm, which is known to be broken and easily decrypted.
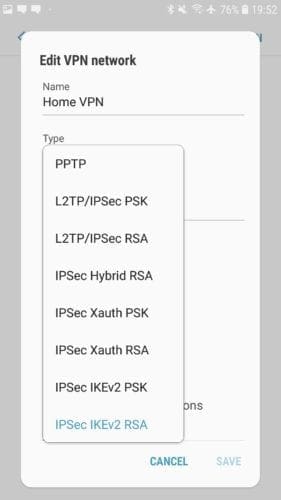
In terms of IPSec options, Android offers an RSA and PSK version of three types of connection: Hybrid, Xauth, and IKEv2. Hybrid and Xauth both use the old IKEv1 protocol which is overly complex and can cause performance and weak security. The ideal option here is IPSec/IKEv2 with RSA authentication, as IKEv2 offers a range of design, performance, and security issues in IKEv1 and other protocols, while RSA certificates offer the most secure form of authentication.
Tip: RSA is an authentication method that uses certificates to prove identity, whereas PSK uses a password or Pre-Shared Key to do the same.
To add a new VPN connection to Android, you need to open the Settings app, then browse to Connections > More connection settings > VPN. The exact naming of all of these options may vary on your device, but the VPN settings should be in the same general area as the Wi-Fi and Bluetooth settings.
Once in the VPN settings, tap “Add VPN” in the top-right corner. The first option when configuring a VPN connection is the name of the connection, this is only used on your device and should be something recognisable so you can tell what connection will be made.
Next is the type of VPN connection. You will have to choose your VPN connection protocol from those offered by your VPN provider.
The next option is “Server address”, this is the URL or IP address of the VPN server you wish to connect to. This will be specific to an individual VPN server rather than the entire VPN provider. To switch VPN servers, you’d either need to edit the VPN profile or make a new one.
There are now three certificate options, “IPSec user certificate”, “IPSec CA certificate”, and “IPSec server certificate”. Depending on the instructions of your VPN provider, you’ll need to download and import a certificate to use as the IPSec user certificate. The other two certificate options can be left blank unless otherwise instructed.
You should enable the always-on VPN feature which restricts communications outside of the VPN and automatically reconnects when your device loses connection. To do so you may be required to specify a DNS server. The DNS server options are under advanced options, you should enter the IP address “1.1.1.1” into the “DNS servers” field. This will configure your device to use the Cloudflare public DNS server. Once you’ve specified a DNS server, you can enable the always-on VPN setting.
Once you’ve configured your VPN settings, you can save the configuration by tapping “Save” in the bottom-right corner.
Tip: If your VPN provider offers the OpenVPN protocol and configuration files, you can install the OpenVPN app and import the configs there instead.