
Antimalware Service Executable is the name of the process for Microsoft Defender when running as the antivirus. By default, it should only use a lot of CPU during a scan or after a Windows Update, but something could be making it scan more often. Here’s how to troubleshoot Antimalware Service Executable high CPU usage.
Fix 1 – Check Antimalware Service Executable High CPU Usage in Task Manager
Before changing settings, make sure that the service is actually running.
Step 1. Hit “Ctrl + Shift + Esc” or right-click on the taskbar and open Task Manager.
Step 2. In the “Processes” tab, click the “CPU” column header to sort by usage.

Step 3. Monitor if “Antimalware Service Executable” stays at the top and for how long. Short spikes of activity indicate active scans, which can also happen during updates or downloads.
Step 4. You can right-click on the Antimalware Service Executable process and select “End task” to cancel it. Windows will automatically start it up as soon as possible, but it will delay a regular scan.
If another process is consistently using more CPU, investigate that process instead. Another antivirus program that commonly hogs both RAM and CPU is Malwarebytes, but that’s a third-party program and should be diagnosed separately.
Fix 2 – Update Defender and Windows
Windows Defender gets security updates separately from the operating system itself, but you might need to update both for them to work optimally.
Step 1. Update Windows to the most recent version (other than feature editions).
Step 2. Go to “Windows Security” in search or in Settings, then open “Virus & threat protection.”
Step 3. In the “Virus & threat protection” section, click on “Protection updates.”
Step 4. Hit “Check for updates” and wait for the process to complete.

Fix 3 – Adjust Defender via Task Scheduler
If Defender’s CPU usage ramps up at the same time every day, it’s likely running a scheduled scan. Here’s how to adjust that scheduling to be weekly and at another time (such as after work hours).
Step 1. Press “Win + R,” type “taskschd.msc,” and hit “Enter.”
Step 2. In the navigation pane on the left, expand “Task Scheduler Library,” then “Microsoft,” “Windows,” then go to “Windows Defender.”
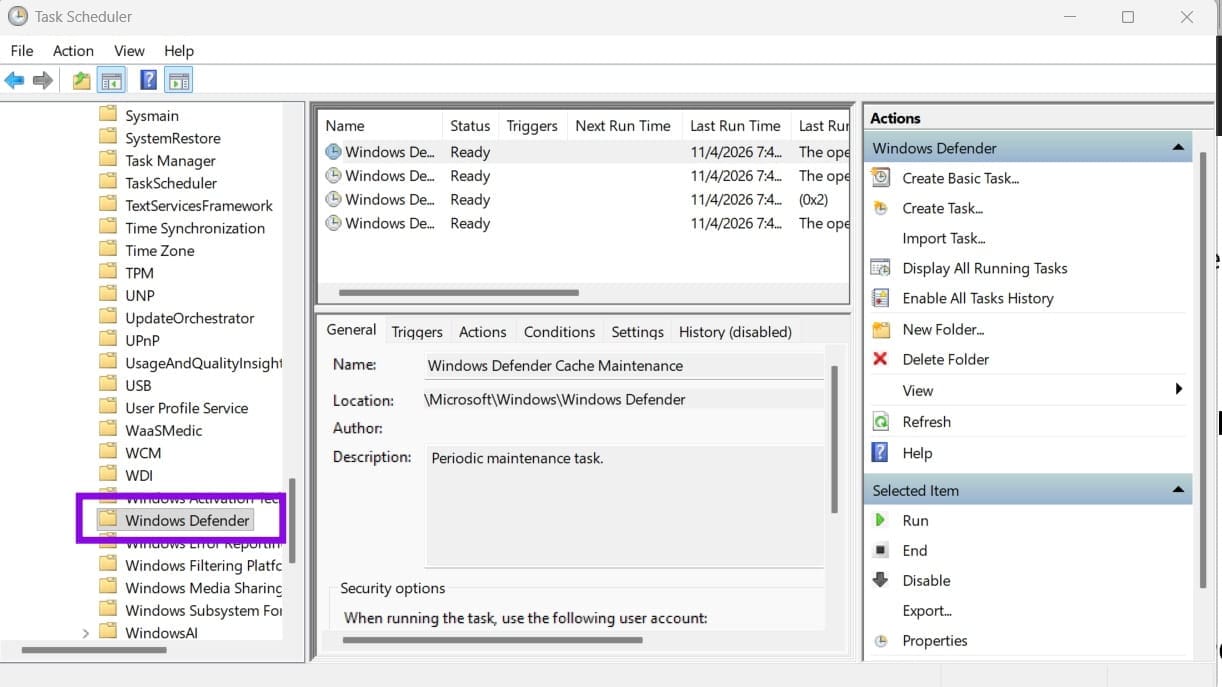
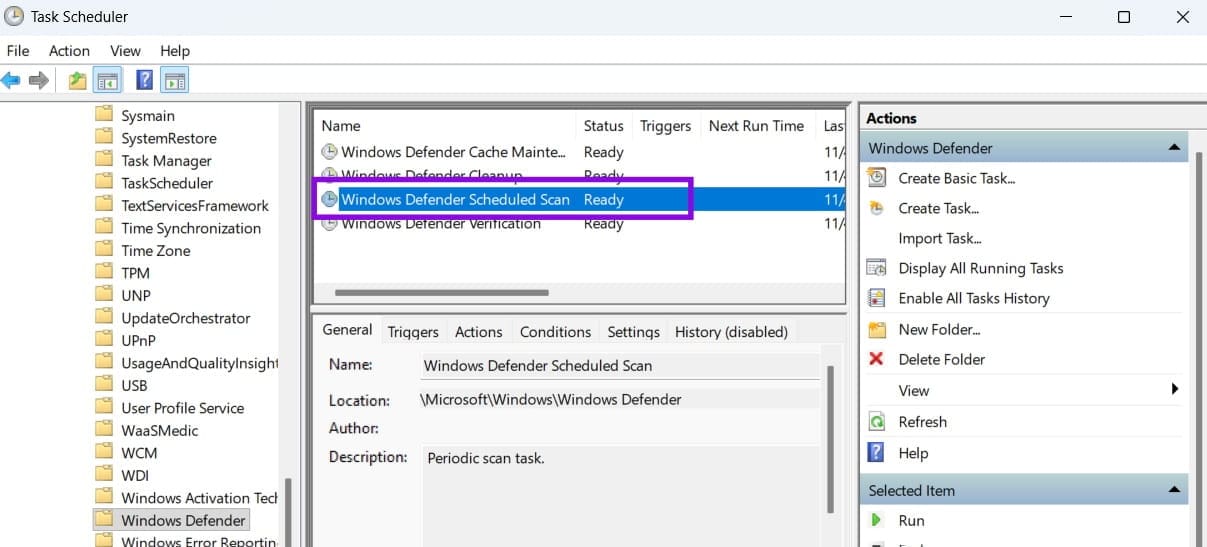
Step 3. Double-click on “Windows Defender Scheduled Scan” in the middle pane to open it. You may need to expand the name category to see it.
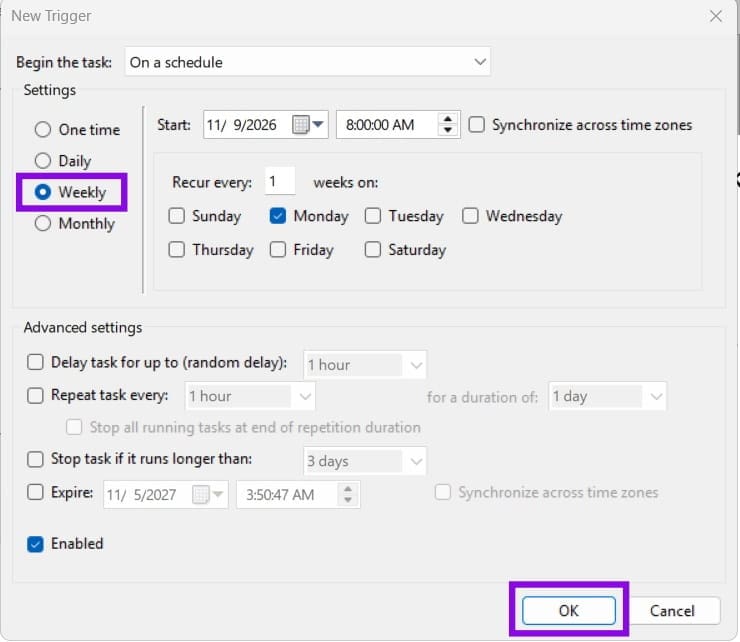
Step 4. Open the “Triggers” tab, click on “New,” and use the on-screen options and the calendar to make the scan run weekly at a time when the PC is on but you’re not using it much. Click on “OK” to confirm.
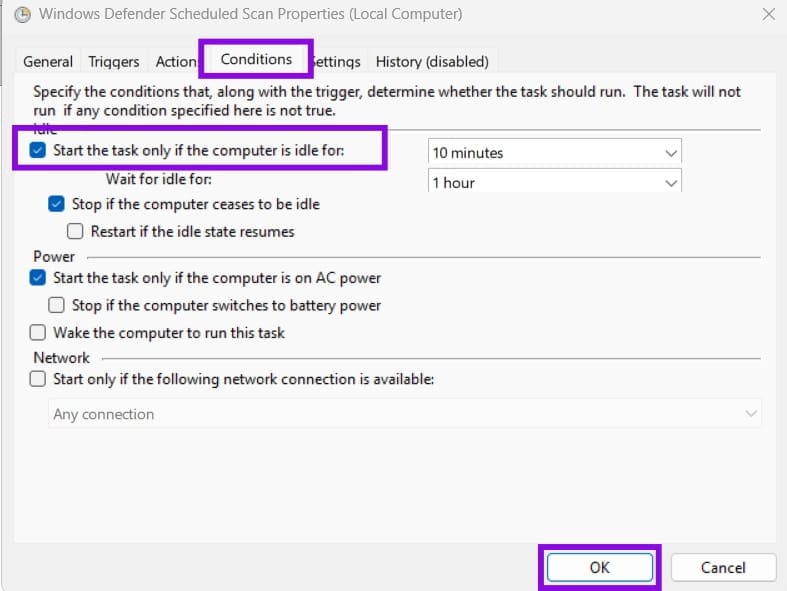
Step 5. In the “Conditions” tab, check “Start the task only if the computer is idle for.” Leave the default times and click “OK.”
Defender that runs more often (like daily) usually means it doesn’t run for as long. Scans that run only when the PC is idle may also paradoxically use more CPU because Defender can use all system resources to finish them faster.
Fix 4 – Limit Antimalware Service Executable High CPU Usage via Commands
By default, Defender tries to keep its average CPU usage under 50% during scheduled scans. While this should normally mean it’s relatively silent, running other programs might mean they lock each other out. You can force Defender to use less resources.
Step 1. Right-click the Start icon and go to “Terminal (Admin).” Accept the User Account Control prompt.
Step 2. Use the following command to reduce the scan’s target CPU load to 20 (change the number at the end if needed, but not below 10):
Set-MpPreference -ScanAvgCPULoadFactor 20

Step 3. The following command makes scheduled scans run at low priority, which can allow other apps to “take over” resources and threads to indirectly reduce CPU usage at peak times.
Set-MpPreference -EnableLowCpuPriority $true
Fix 5 – Exclude Commonly-Changed Folders
If Defender keeps high CPU usage, it’s probably checking files that are being overwritten. For large files like in video editing platforms, this can take a while and clash with the tool’s own high resource needs. Windows has a built-in tool that shows exactly which files and processes are being accessed, which you can then exclude from Defender’s search list.
Step 1. Right-click on the Start icon and select “Terminal (Admin),” then run the following command:
New-MpPerformanceRecording -RecordTo C:\defender.etl
Step 2. Use your PC as you normally would until the CPU spike happens, then go back to the Terminal window and press “Enter” to stop the recording.
Step 3. Run the following command to get results:
Get-MpPerformanceReport -Path C:\defender.etl -TopFiles 10 -TopProcesses 10 -TopExtensions 10
This lists the processes that were most often targeted by Windows Defender or used by the operating system. If any of them are in constant use and you’re certain they’re safe, check their file paths.
Step 4. Open “Windows Security” and go to “Virus & threat protection.”
Step 5. In the “Virus & threat protection settings” section, go to “Manage settings.”
Step 6. Scroll down to “Exclusions” and click “Add or remove exclusions.” Choose “Add an exclusion” and choose the folder or process to exclude from the list or enter its path.
Never exclude your Downloads folder or a whole drive.