Building a PC can be great fun. You get to make all the important decisions, from what parts to use to how to decorate your new machine. One of the most versatile – and also most visually interesting – tools you have at your disposal when building a PC is RGB lighting.
Not only is it visually appealing, but it also gives the owner a lot of control over the design even after the PC is complete. A lot of RGB parts are available as ARGB versions as well. The A stands for ‘addressable’ RGB and denotes a more advanced version of the same RGB tech. When plugged into the motherboard (or sometimes connected to another kind of controller), the user can control the color options. They can also switch from the default rainbow to any other sort of color they choose! You can realize your own personal color scheme within the RGB spectrum.
While that is a cool option available for almost all RGB PC parts, it comes with a downside – often, ARGB options are a little pricier. Also, the more such parts you put into your PC, the more connectors you’ll need to hook things up. This can add additional challenges and means you’ll have to be careful when picking your motherboard.
Building an RGB PC isn’t drastically different from building any other sort. Still, there are some additional things to keep in mind. We decided to write up a handy guide to help you achieve all your RGB dreams with your new build!
Contents
Step 1: Make a List of What You Need
An RGB PC will still need all the same parts as for any other kind, with a few additions. While the parts such as CPU, GPU, PSU, and so on are the same, you’ll probably also want to put in some additional RGB decorations that you’ll need to accommodate your budget. Lighting strips, additional fans, and RGB plugins can drive up the cost. So make sure you make an exact list of what you need and what you want to avoid any nasty surprises.
Most PC parts are available in both RGB and non-RGB versions – depending on your build, you might be able to save a few bucks here and there by selecting carefully which elements of your machine will have RGB lighting. For example, if something is hidden within your build, you won’t need to spend extra to light it up – going for a cheaper alternative on something like HDDs without RGB could free up some money to get that extra-bright RGB CPU cooler you’ve been eyeing.
Step 2: Finalize the Budget, Pick the Parts
Once you’ve made a list of all the things you need, you can get to actually picking the exact parts you want to buy, thus finalizing your budget. Keep an eye on the usual – compatibility with either Intel or AMD and similar things like that. The nicest RGB design won’t help if you choose an Intel motherboard for an AMD CPU!
It might help to have an overall design scheme in mind – if you do, you’ll find it easier to select the perfect parts for yourself! While RGB parts will, of course, be able to change their colors, having an overall design plan will help you choose between parts where you have lots of options, such as RAM!
Tip: Keep in mind that all parts with RGB lighting will be more expensive than their non-RGB counterparts. Consider where to best place your RGB features to make the most of them! For example, fans that you plan to place downwards or wall-facing could be a good place to save some money on a cheaper non-RGB component.
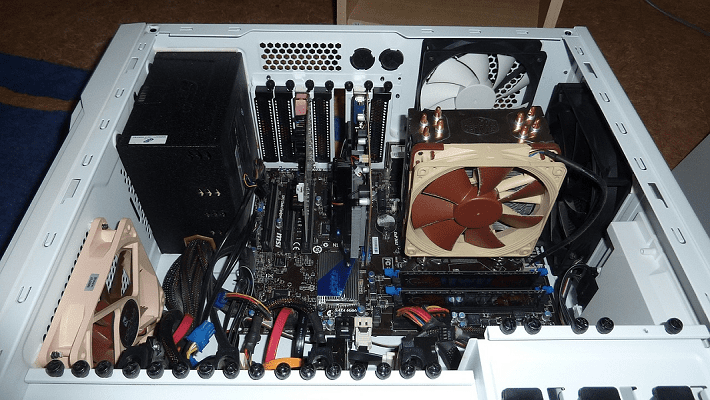
CPU
The CPU is one of the few parts where RGB lighting isn’t an option. It is, after all, completely invisible once the PC is assembled. As such, simply pick the kind of CPU you want, performance-wise. If you are building a gaming PC, a Ryzen 5 or 7 is a good choice, or an Intel i5 or i7. Select the cooler and motherboard so that they fit with your chosen CPU!
CPU Cooler
You have two options for CPU cooling, and both of them are available with RGB detailing. Both air cooling – so, larger fans and heatsinks – and liquid cooling are available with RGB lights. Generally, if you can afford to do so, we recommend you go with liquid cooling. It is quieter and more efficient, but the cooler is also significantly smaller. It doesn’t obscure as much of your motherboard and builds as an air cooler would. AIOs or All In One liquid coolers come pre-assembled, are relatively easy to install. They don’t require maintenance other than an occasional removal of dust.
If you decide to go with air cooling, you might have to do some DIY – the heatsink itself will have fans mounted on it, which may or may not be plain by default – if so, you’ll need to manually replace them with RGB fans. Shop around for deals here – you might be able to get a bargain by buying a non-RGB cooler and then later adding RGB fans! This may even work with the default heatsink that most CPUs ship with – though please be aware that they are often subpar when it comes to performance! Whatever you choose, make sure you don’t sacrifice performance for style!
Motherboard
While RGB motherboards are unnecessary most of the time as most of the small RGB lights on them tend to be hidden by other PC parts, a good motherboard is a must-have choice. Make sure the board you choose a motherboard that supports as much RGB as possible. Generally, whatever lighting is on the motherboard will determine what software you can use to control it. For example, the RGBFusion software that ships with Gigabyte motherboards. MSI and Asus have similar programs, and if you have a preference for a specific brand or program, this can help you choose the right motherboard for your needs.
Another thing to consider is the availability and location of ports. You’ll want to plug some lighting elements into your motherboard to power and control them, which you won’t be able to do if you can’t reach or don’t have enough of the relevant port. The motherboard is the basic building block on which your PC will be built. So make the best choice for your plans!
Case
Naturally, to make your RGB build stand out, you’ll want a transparent case. Whether you go for one with one or several glass/transparent sides is up to you. Most modern cases in all sizes have at least one ‘window’ through which you’ll be able to see. But if you’re going for maximum impact, you’ll want to look for a case that shows as much of what’s inside. You can either go for one that already has RGB case fans installed, potentially saving yourself money and time. Or buy one without fans to select your own RGB fans to install when you build your machine.
While the latter gives you more freedom and can open some additional options for you (such as ARGB instead of RGB), it can drive up the price of your build a fair bit. So keep an eye on your overall budget when you make your choice!
Graphics Card
Graphics cards are expensive. If you are after a recent generation card, such as a 20 or 30 series Nvidia card, you might not have many options for RGB lighting. If you spot a deal or a card you are particularly interested in, you should probably grab it quickly. By not doing so, you run the risk of not being able to get it.
While your graphics card takes up a lot of space, the lack of RGB lighting can be quite visible. You may not have much choice if no RGB cards are available when building your PC. Remember that you can always upgrade or change your card later – within reason. Some Nvidia cards have LED logos that don’t change color – make sure to look for those, as a green logo could be quite an eyesore in the middle of a red or blue build!
Some RGB graphics cards aren’t addressable, such as the Asus Matrix 980 TI. You can’t control the colors, as they are determined by the GPU load and change automatically between blue, yellow, green, and red. If you end up buying a card like this, you might have limited options for your overall color scheme! You might be better off selecting a cheaper, more easily available non-RGB card and compensating with additional decorative RGB elements such as some lighting strips or more RGB case fans.
If your case supports it, you may also want to look into using a GPU riser to change the orientation of your graphics card, making its RGB lighting more visible. Just be aware that GPU riser cables can cause a performance impact on high-end GPUs.
RAM
RAM is currently being updated from DDR4 to DDR5. Most, but not all, CPUs will support one or the other. Motherboards can only support one of them as they have a slightly different connector. Make sure that what you choose is the right fit for your motherboard. Beyond that, you’ll have a lot of options – RGB RAM sticks are ubiquitous, and there is a lot of variety out there. For maximum effect, you could plan your setup to use 4 sticks instead of 2, giving you more visible RGB elements. A 4x4GB setup will give you 16GB of RAM, exactly like 2x8GB sticks. If you want as much lighting as possible, consider opting for 4 sticks for the visual effect.
Tip: There are many different RAM options available – from subtle glow effects to brilliantly bright sticks. Do your research to find the perfect options for the design you’re after.
Storage
While RGB drives are available, depending on your case and PC setup, you might not need or want to pay for them. If your drives are visible and you want an unusual RGB element, you could look for something like an RGB drive. Or even an additional hard drive cooling element or an external RGB drive.
If you are after an RGB SSD, the T-Force Delta is a popular and reasonably affordable choice. HyperX also makes RGB SSDs, though they can be pricier. Other brands make them, such as GigaByte. If you are set on getting one, shop around for one that fits your build!
Tip: Look at the case you want to use and work out where your hard drives will go. RGB lighting may not be visible on a hard drive in the back tray or in a hard drive enclosure. So you may be able to save money there with a non-RGB version.
PSU
RGB PSUs are available is somewhat less well-known than the more popular RGB parts such as GPU or RAM. Nevertheless, they can add a cool effect to your build and light up a part of your normally not colorful machine. Don’t neglect performance just because you want another RGB part. Remember that your PSU needs to provide enough power to run your PC, including your additional RGB elements and decorations!
Step 3: Hunt for Deals
Once you’ve selected all the parts you want in your build, it’s a great idea to search for deals at a range of stores for the best deals. It can be good to check local physical stores if they’re easy enough to get to, but often the best deals can be found online.
It can also be a great idea to check the prices of other products in the product stack for deals. You can occasionally find that the RAM you wanted isn’t on sale. But a slightly faster version from the same brand is on sale and actually cheaper than what you were looking for. Netting you both a performance boost and potentially cost savings simultaneously.
Step 4: Assemble!
At a basic level, assembling your RGB PC works much like any other machine. Make use of the many step-by-step video guides available online to make sure you put things together correctly – and plan in whatever additional RGB elements you’re going to use as well! In most cases, you’ll want to add them last. Once the core PC is built, you can comfortably add case decorations, light strips, and more without interfering with your build or accidentally blocking access to something you need later in your build!
Once you’ve built your computer, you’ll want to configure your RGB components if they’re addressable. This may need to be done through an RGB controller or through software, depending on the equipment you have and the way you set it up.
Conclusion
It’s generally worth cycling through all of the options to see if there are a few that appeal to you, even if you didn’t think they would. Finally, take pictures of your cool new build and share them; we’d love to see them. Don’t forget to comment!