
Many Windows users have complained they can’t use the keyboard arrow keys to scroll through the Photos App. As a result, they need to use their mouse to scroll through images. If you’re experiencing similar issues, follow the troubleshooting steps below.
Contents
What to Do If You Can’t Use Arrow Keys with Photos App
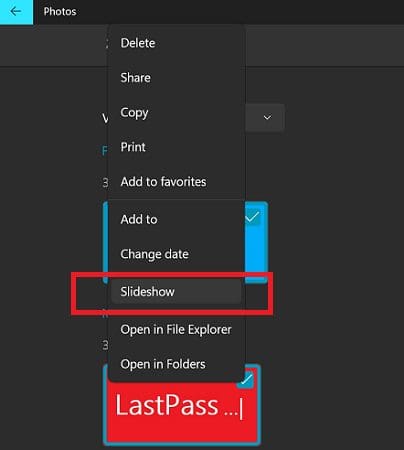
Select All the Photos
Press CTRL and A to select all the images. Then, right-click on the selection and click on Open. Or you can simply press Enter to open the first image. Use the arrow keys to go to the next photo. Alternatively, you can also use the Slideshow option.
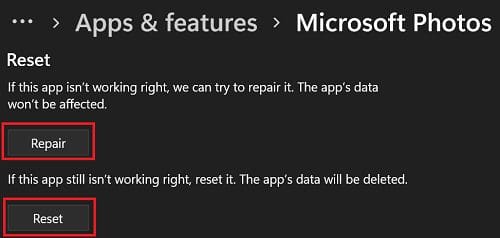
Repair or Reset Microsoft Photos
Try repairing the Photos app. If the issue persists, reset it.
- Navigate to Settings.
- Click on Apps.
- Go to Apps & Features.
- Locate Microsoft Photos.
- Click on the three dots and select Advanced options.
- First, repair the app.

- If you still can’t use your arrow keys, reset Photos.
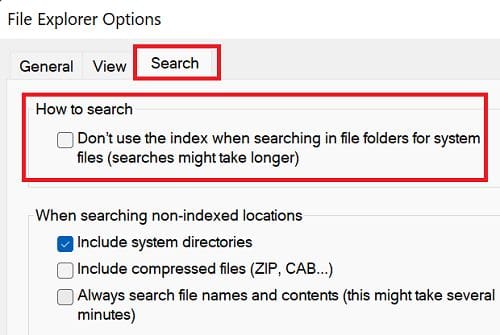
Disable the Index Option
- Launch File Explorer and click on File.
- Then, go to Change folder and search options.
- Click on the Search tab.
- Enable the option that reads Don’t use the index when searching in file folders for system files.
Reinstall Photos Using PowerShell
- Launch PowerShell with admin rights.
- Run the following command to uninstall the app
get-appxpackage Microsoft.Windows.Photos | remove-appxpackage
- Restart your computer.
- Relaunch PowerShell and run this command to reinstall Photos:
Get-AppxPackage -allusers Microsoft.Windows.Photos | Foreach {Add-AppxPackage -DisableDevelopmentMode -Register “$($_.InstallLocation)\AppXManifest.xml”
Use a Different Photo Viewer
If nothing works, switch to a different photo viewer. For example, you can use Faststone Image Viewer, IrfanView, Honeyview, or any other app of your choice. When downloading third-party apps, always make sure to download them from a trusted source such as the Microsoft Store.
Conclusion
If you can’t use the arrow keys on Microsoft Photos, select all the photos and hit Enter to open the first image. Alternatively, repair or reset the app. You can also disable the Index option in File Explorer settings. If the issue persists, reinstall Photos using PowerShell or use a different photo viewer app.
Which of these solutions restored the functionality of the arrow keys? Let us know in the comments below.


This restored the scroll arrows: Disable the Index Option
Thank you.
I ran into this problem after cloning my system drive to a new hard drive. Strangely, identical folders that had been cloned from the old drive would still scroll but the newly cloned folders would not. When selecting a photo, it would either scroll only to the first alphabetical filename in the folder and then scroll alphabetically from there, or it just wouldn’t scroll through other photos at all. This only happened on the (new) system drive, but it affected every folder on the new drive.
Disabling the index option solved the problem, however.
Simplest is to check the scroll lock is not on.
None of the above worked, short of doing the Powershell one which my other half threatened might result in needing to reinstall Windows on the whole machine if it went wrong. It was only a certain selection of photos that weren’t working; ones I added earlier or later were still OK. I cut and pasted them off my computer onto an external hard drive, checked that the arrow keys worked there, and then cut and pasted them back to my computer, and that seems to have fixed it, at least for this boot up.
Awesome, the “Disable the Index Option” did the trick.
great! file explore thing fixed
great!
THANK YOU!!!
-powershell.
This did resolve my issue, thank you. It is still super annoying that windows computers have this issue, when apple computers don’t. It seems like windows could easily improve their software or copy the software macs uses to overcome this issue so it doesn’t persist for their users. To always have to press multiple keys just to click an image side to side is very irritating, granted it’s not an actual problem. Thank you for the fix again.
Thank you. Did the select all and enter trick!
This article solved my problem with the arrows!
In particular it was the re installation using PowerShell that did the trick.
You might want to correct an error in the PowerShell script. There is a missing } bracket at the end of of the script:
It currently reads ….\AppXManifest.xml”
It should read ….\AppXManifest.xml”}