• Skip to main content
  • Skip to primary sidebar

Technipages

Tutorials and fixes for smartphone, gadget, and computer problems

  • Topics
    • Android
    • Browsers
    • Gaming
    • Hardware
    • Internet
    • iPhone
    • Linux
    • macOS
    • Office
    • Reviews
    • Software
    • Windows
    • Definitions
  • Product Reviews
  • Downloads
  • About
Microsoft Word: How to Protect Your Privacy By Blurring Your Pictures

Microsoft Word: How to Protect Your Privacy By Blurring Your Pictures

November 5, 2021 by Judy Sanhz Leave a Comment

There are many programs and mobile apps you can use to add a blur effect. For example, Google Meet allows its users to blur their backgrounds for more privacy. On Android, there’s an app that allows you to blur faces on any video.

But, if you need to blur an image you’ve added to your Microsoft Word document, you can do so without opening anything else. With a few clicks here and there, you can add as much blur effect as you want.

How to Add the Blur Effect to Any Image on Microsoft Word

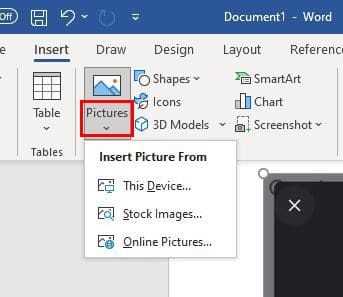
If you haven’t added the image you need to add the blur effect to, here’s how you can do that. Once you have Word open, click on the Insert tab at the top left, followed by the dropdown menu under the Pictures option.

Insert ImageMicrosoft Word

Choose the source from where you want to add your image. For example, you could choose the from this device option, but there are also the options to add an image through stock images and online pictures.

Insert image to Word Document

Once you’ve added the image, you should see the Corrections option to your left. If you don’t, click on the image until you see it. Click on the Picture Corrections option at the bottom.

Picture Corrections Options Word

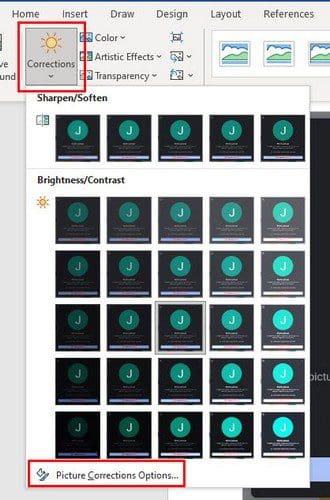
You’ll see different picture Corrections to the right. But, to blur your image, you’ll need to move the Sharpness slider to add as much blur as you want.  If you’re looking for a specific percentage, you can also click on the down arrow to the left of the slider. If you think you added too much blur, then you can click on the reset button to start over.

As long as you’re there, you can make other adjustments such as:

  • Presets (Sharpen/Soften)
  • Brightness contrast
  • Picture color
  • Picture transparency
  • Crop

Another way you can add blur to your image is by going to Artistic Effects. Once you’ve inserted the image, instead of clicking on Correction, click on the dropdown menu for Artistic Effects. The fifth option on the second row is the blur effect. Click on it, and the effect will be added.

Conclusion

The blur effect can add some style to your pictures. And, thanks to the integrated blur effect, you can add just the right amount of blur. There are always third-party programs you can use, but hopefully, the Microsoft Word feature is enough.  Do you think Microsoft Word offers enough when blurring your images? Share your thoughts in the comments below

You Might Also Like

  • microsoft teams blur background not working
    Fix Microsoft Teams Not Blurring Background
  • Telegram
    How to Protect Your Privacy and Hide Your Telegram Profile…
  • message failed to send snapchat
    Snapchat: How to Enable Ghost Mode and Protect Your Privacy
  • MS Word Header
    Word: Password Protect Document File
  • Camera
    How to Remove Your Location from Your Pictures
  • How to Download Pictures from Dropbox to Your iPad
    How to Download Pictures from Dropbox to Your iPad

Filed Under: Software

Reader Interactions

Did this help? Let us know!

Your email address will not be published. Required fields are marked *

This site uses Akismet to reduce spam. Learn how your comment data is processed.

Primary Sidebar

Recent Posts

  • How to Send HD Pictures and Videos on WhatsApp
  • How to Share Files Using Google Nearby Share
  • Android Battery Will Not Charge Fix
  • Turning on Triple Touch Zoom on Android
  • How to Connect Outlook 2023 to Gmail
  • Netflix: Change Password
  • Step-by-Step Guide: How to Use WhatsApp on Your Computer
  • Android: Enable or Disable Background Data

Who’s Behind Technipages?

Baby and Daddy My name is Mitch Bartlett. I've been working in technology for over 20 years in a wide range of tech jobs from Tech Support to Software Testing. I started this site as a technical guide for myself and it has grown into what I hope is a useful reference for all.

You May Also Like

  • Microsoft Word
  • Pretty Good Privacy (PGP)
  • Electronic Communications Privacy Act (ECPA)
  • Word Processing Program
  • Microsoft Windows NT
  • Microsoft Internet Explorer
  • Microsoft Windows
  • Microsoft

© Copyright 2023 Guiding Tech Media · All Rights Reserved · Privacy