Microsoft Word lets you do all sorts of things. For example, you can do things such as create a custom dictionary and remove any extra spaces too. Another useful option is to remove all the images you have in a Word document simultaneously when you need to make that change and don’t have a lot of time on your hands.
You don’t have to be an expert in Word to remove all the images from a document. You can make this change with a few clicks and then brag about it to your friend and maybe even teach it to them.
How to Remove All Images from a Microsoft Word Document
Once you have your Word document open, click on the Home tab near the top left. Once the options appear, go to the far right and click on the Replace option.
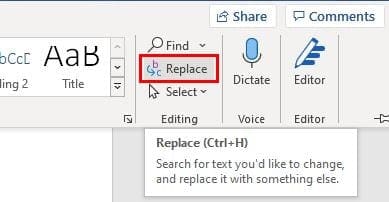
Once you click on this option, a new window will appear where you’ll need to enter a special code. The window should be in the Replace tab, and in the Find What box, you’ll need to enter ^g. This code will remove all images regardless if they are charts or something else.

To continue, click on the Replace All button at the bottom. The good news is that you could undo this if you were to change your mind down the road. To undo this Crlt + Z if you’re using a Windows computer. If you’re using a Mac, you’ll need to enter Command + Z. If you only want to erase a few images, you can always select that specific image and click on Delete.
Conclusion
We all make mistakes, and if you added the wrong images to your Word document, now you know how you can quickly remove them. As you can see, the steps are beginner-friendly, so there’s no need to ask any tech friends for help. But are the images you have to erase work-related? Let me know in the comments below, and don’t forget to share the article with others on social media.