Upgrading to Windows 11 should be an easy process, at least in theory. All you need to do is check for updates, and your computer will automatically install the latest OS version. Unfortunately, error code 0x80041010 may sometimes ruin your plans. This error usually occurs when you’re trying to upgrade to Windows 11 using the Update Assistant. Let’s see how you can fix the problem and complete the upgrade process.
⇒ Quick Notes
Before we dive into any troubleshooting solutions, make sure your computer meets the system requirements to run Windows 11. You can use the PCHealthCheck App to ensure your machine is compatible with this OS version. If your device doesn’t meet the necessary requirements, don’t be surprised if you can’t install Windows 11.
Additionally, check your OS drive and make sure you have enough space to download the new Windows Update files. Delete unnecessary apps and files to free up some space, and try again.
Contents
Fix Windows 11 Installation Assistant Error 0x80041010
Run the Windows Update Troubleshooter
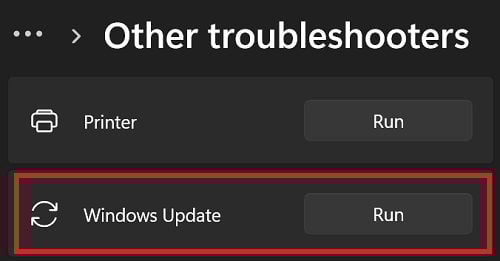
The quickest way to fix error code 0x80041010 is to run the Update Troubleshooter. Navigate to Settings, select System, and click on Troubleshoot. Go to Other troubleshooters, and click on Windows Update.
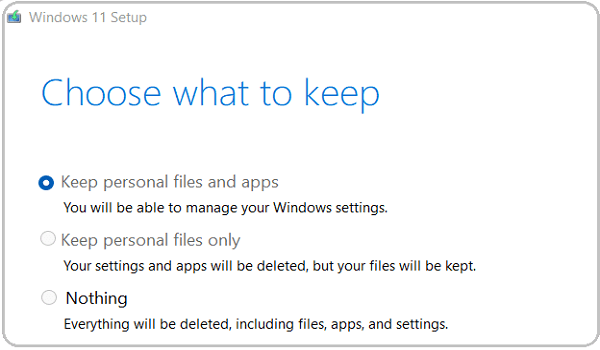
Wait until the troubleshooting process completes, and check for updates again. If the issue persists, go to Microsoft’s official website, and download the Media Creation Tool. Run the MediaCreationTool.exe file, select Upgrade this PC now, and then select Keep personal files and apps.
Repair Corrupted System Files
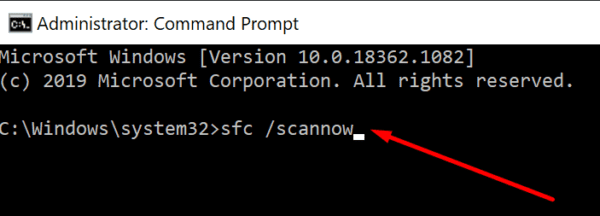
It’s not uncommon for corrupted system files to prevent your machine from downloading and installing Windows 11. To fix the issue, run SFC and DISM to automatically repair corrupted system files or reinstall missing files.
- Launch Command Prompt with admin rights.
- Run the following commands one by one:
- dism /online /cleanup-image /restorehealth
- sfc /scannow

- Restart your machine and check if the error persists.
Disconnect External Devices and Update Your Drivers
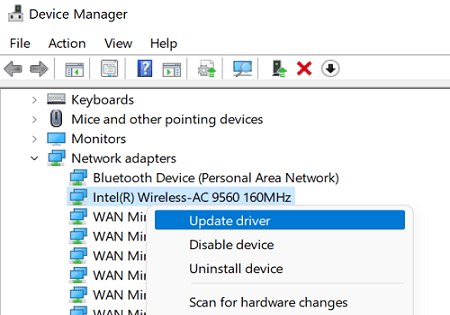
Unplug your peripherals to make sure they’re not blocking the update process. Then, restart your computer and try again. Additionally, launch the Device Manager, and check if there are any outdated drivers. Check if there’s an exclamation mark next to one of your drivers. Right-click on it, and select Update driver.
By the way, you can manually download the latest graphics driver updates straight from your GPU manufacturer’s website. Outdated drivers often cause all sorts of errors when you’re trying to update your OS.
Disable Your Antivirus and Firewall
If you’re using third-party security solutions, temporarily disable them and try to install Windows 11 again. Sometimes, your antivirus may block the Windows Update files after mistakenly labeling them as suspicious.
Additionally, perform a clean boot to make sure error 0x80041010 is not triggered by software conflicts. This allows you to restart Windows using only a minimum set of processes and drivers.
Conclusion
To fix Windows 11 Installation Assistant error 0x80041010, first, run the Windows Update troubleshooter. Then, run SFC and DISM to repair faulty
or missing system files. Additionally, update your drivers and disconnect all your peripherals. Make sure to disable your antivirus and firewall. Alternatively, perform a clean boot to get rid of software conflicts.
Did you manage to install Windows 11 on your computer? Which solution worked for you? Let us know in the comments below.