When developing code, having your development environment fit your personal preferences is important. There are many little details that are important to making your text editor feel just right, from auto-completion, to the width of the indentation of your code.
One of the things that can make your development environment fit you is the theme of your text editor. Some developers will prefer a simplistic black on white interface, while others prefer a more colourful interface or a darker theme.
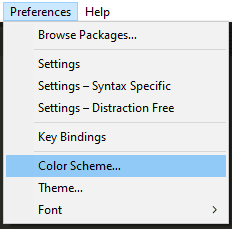
Sublime Text 3 has a number of pre-installed themes that can be enabled by clicking on “Preferences” in the top bar, then clicking “Color Scheme”.
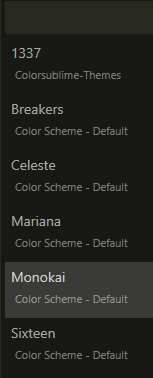
Next, a box will appear at the top of the window, with a few options. Mariana uses a blue background to provide a colourful option while Monokai provides a dark background. Breakers, Celeste, and Sixteen are all relatively similar white background themes, the main difference between them is the colours used by the syntax highlighting feature.

By clicking on “Theme” in the same menu as “Color Scheme”, there are two themes you can choose between. There are only very minor colour variations between the two, with the “Adaptive” theme being slightly darker than the “Default” theme.
Sublime Text 3’s colour schemes are configured through text files; you can make your own or download pre-build ones from the internet. You can find a list of themes for Sublime Text 3 here. To use them you can install the “Colorsublime” plugin or save the colour schemes manually.
To save the theme manually, click “Preferences” again, then click the top option “Browse Packages”. This will open a File Explorer window in the correct directory. In this directory, create a new folder and give it a name. Now download and save the custom colour schemes that you want to use in your new folder. You don’t even need to restart Sublime text for the new colour scheme to be available through the same colour scheme menu described above.