

Many Windows 11 users have complained they can’t turn checkbox usage off in File Explorer. When the app is open, each item has a strange checkbox next to it. If restarting File Explorer and rebooting your computer failed to solve the problem, follow the troubleshooting steps below.
How to Disable File Explorer Checkboxes in Windows 11
Disable Checkboxes in Folder Settings
- Press the Windows and R keys to open a new Run window.
- Enter control.exe folders, and hit Enter.
- In the new Folder Options window, locate Use checkboxes to select items.

- Untick the checkbox to disable the option.
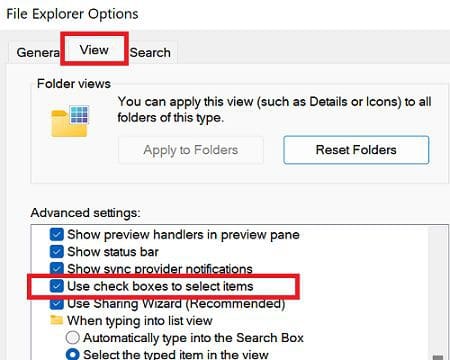
Restart File Explorer, and check if the checkboxes are still there.
Edit Your Registry
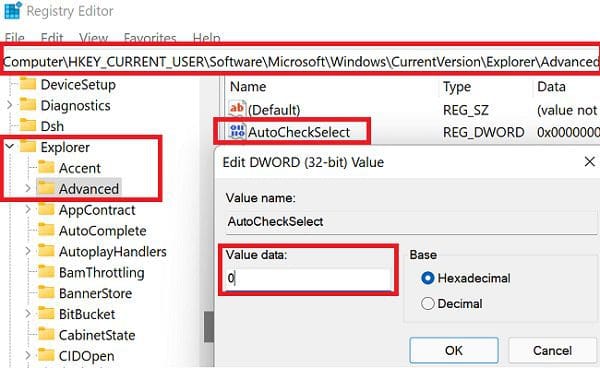
If the issue persists, tweak your Registry Editor settings, and disable AutoCheckSelect.
- Launch the Registry Editor.
- Navigate to HKEY_CURRENT_USER\SOFTWARE\Microsoft\Windows\CurrentVersion\Explorer\Advanced\AutoCheckSelect
- Double-click on the AutoCheckSelect key.
- Edit its value to 0 (zero)
 .
. - Save the settings, and check the results.
 .
.Disable Tablet Mode
This issue seems to occur more frequently when users flip the keyboard in Tablet mode. Basically, the OS ignores your settings and displays check boxes next to all items listed under File Explorer.
As a workaround, you can disable Tablet Mode. While this may not be the ideal solution, especially if you really need to use Table mode, do give it a try, and check if you notice any changes.
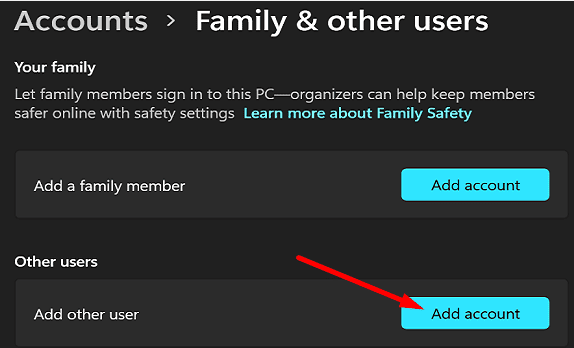
Create a New User Account
Check if this problem affects new user accounts as well.
- Navigate to Settings.
- Select Family and other users.
- Then, add a new user account.

- Log out of your current account.
- Log in to the newly created account, and check if the checkboxes are still there.
Roll Back to Windows 10 and Upgrade Again
If this checkbox issue is really that annoying to you, roll back to Windows 10. After upgrading to Windows 11, there is a 10-day window during which you can downgrade to Windows 10.
Navigate to Settings, select System, and click on Recovery. Then, select the Go back button. Wait for a few minutes, restart your computer, and install Windows 11 again. If this checkbox problem was caused by some unexpected glitches during the upgrade process, reinstalling the OS should fix it.
Conclusion
If you can’t disable checkboxes in File Explorer, try disabling the checkbox option in Folder Settings. Then, edit your Registry settings and disable AutoCheckSelect. Additionally, create a new user account. If the issue persists, downgrade to Windows 10, restart your computer, and reinstall Windows 11.
Did you manage to solve the problem? Let us know in the comments below.


I encountered the same problem with a new Asus Zeenbook UX3402ZA. Today I updated ASUSTeK COMPUTER INC. – Firmware – 10.1.2.309 and as soon as the laptop restarted, the check boxes disappeared!!!!
Cant get rid of them, no matter what I do….
I have the same problem, and I use my new Zenbook for the first time, I don’t install anything even on my laptop
This was driving me crazy. But, you can hide the checkboxes in desktop mode, keyboard folded normally.
But, on a windows tab, or 2-in-1, once the keyboard is disabled (folded back on 2-in-1) they persist. This is by Design.
To date, I haven’t found a way to get rid of the Check Boxes in Win 11. A lot of discussion and claims of working, but as I can tell, no solution. The ‘Brains’ at MS have out-thought themselves AGAIN !
dosent work, no tablet mode settings on my desktop.
Check boxes persist in Windows 11 despite settings were as recommended in all locations. I tried manually turning checkboxes on and then back off with no improvement. I then tried to implement your recommendation to “disable tablet mode”, only to find that that is not even an option in Windows 11. Unable to revert to windows 10 because the one week window for doing that has passed.