

Your computer may sometimes get stuck on the “Choose your keyboard layout” screen. You simply can’t select anything on the screen. This issue usually occurs when you boot up the machine after installing a new Windows version. Let’s explore what you can do to fix this problem.
Contents
How to Get Rid of the “Choose Your Keyboard Layout” Loop on Windows
⇒ Note: The troubleshooting steps below may take a while to complete. Some of them require using a USB flash drive.
Remove All Peripherals and Revert to a Previous OS Version
- Press and hold the Power button for about five seconds to perform a hard shut down.
- Check for updates again.
- If the error persists, perform three hard resets using the Power button.
- On the third restart, Windows should boot into the Recovery Environment.
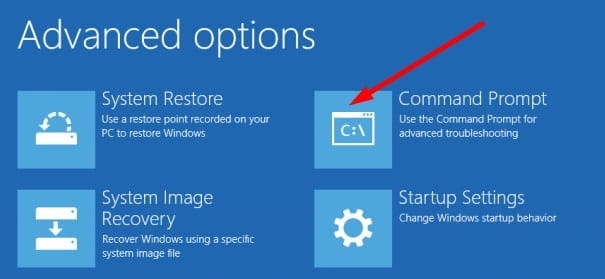
- Select Troubleshoot, and click on Advanced Options.
- Go back to the previous Windows build.

Do a Rollback
- At the “Choose your keyboard layout” screen, select your keyboard.
- Check if there’s an option on the screen that says Exit and continue to Windows Rollback. Select it.
- If the option is not visible, go to Troubleshoot and select Command Prompt.

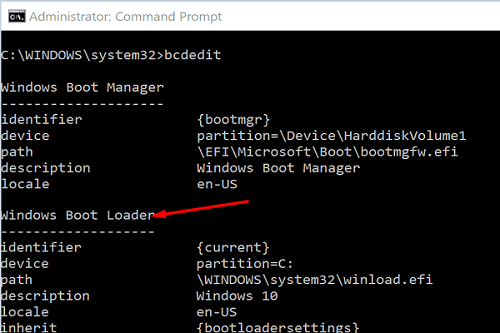
- Enter the bcdedit command and hit Enter.
- Ignore the {bootmgr} entry. Go to the Windows Boot Loader entry and note the drive letter.

- Enter the drive letter and hit Enter. For example, if the OS is installed on the C drive, type C: and hit Enter.
- Enter the following command:
copy \Windows.old\Windows\System32\OOBE\SetupPlatform\SetupPlatform.exe \$WINDOWS.~BT\Sources - Wait until the “1 file(s) copied” message appears on the screen.
- Type exit and hit Enter.
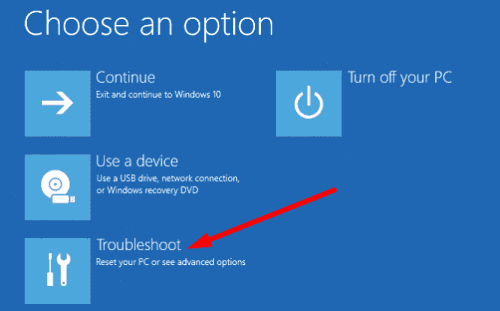
- The “Choose an option” screen should now be visible.
- Hit Continue, and then Exit and continue to Windows Rollback.
- Your computer will restart and then restore the previous OS version.
- Don’t check for updates again. Wait until Windows alerts you there’s a newer OS version available for download.
Do an In-Place Upgrade
- Get a 16GB USB drive, and go to Microsoft’s software download website on a second computer.
- Download the media creation tool on the USB drive.
- Select Create installation media for another PC.
- Select your OS language, edition, and architecture.
- Follow the on-screen steps to add the installation media to your USB drive.
- Boot the problematic machine into Recovery mode.
- Press the Windows and L keys, select the Power button, and press Shift to restart your PC. Wait until your PC restarts in the Windows Recovery Environment (WinRE).
- Alternatively, you can press the Power button for five seconds to hard reboot your machine. Do that three times to enter Recovery Mode.
- When asked to choose an option, select Troubleshoot.

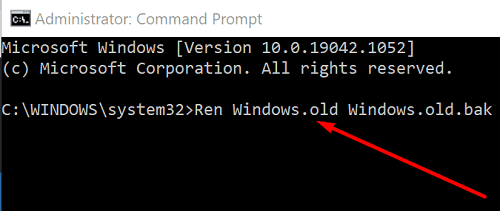
- Select Command Prompt, and type C: in CMD window.
- Rename the Windows.old folder with the help of this command: Ren Windows.old Windows.old.bak.

- Exit Command Prompt.
- On the Choose an option screen, select Use another operating system.
- Select the Windows 10 on volume X option, and wait until your computer loads the desktop.
- If you get any additional error messages, close them.
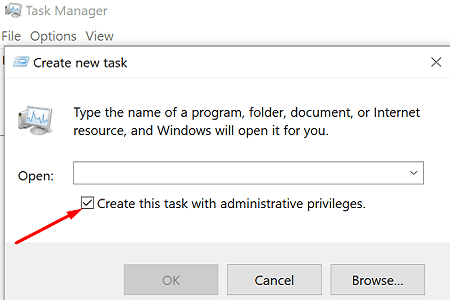
- Launch the Task Manager, select File, and then Run new task.
- Select Create this task with administrator privileges, and click on Browse.

- Now, insert the USB with the installation media.
- Run the setup.exe file and install Windows.
- When prompted to select what you want to keep, select Everything.
- Wait until the setup process completes. Sign in to your account and check if everything’s working properly.
- By the way, you can restore your files from the old Windows.old.bak folder.
Repair Your Master Boot Record
- Insert your Windows 10 bootable USB drive into your computer and restart it.
- Select the Recovery Menu, and then select Troubleshoot.
- Go to Advanced Options, and select Command Prompt.
- Run the following commands (assuming you installed the OS on your C drive):
bootrec /fixmbrbootrec /fixbootbootrec /rebuildbcdbcdboot c:\windows /s c:chkdsk c: /f
- Restart your computer and check if the issue is gone.
Conclusion
If your Windows computer got stuck on the “Choose your keyboard layout” screen, remove all peripherals, and check for updates again. Additionally, try to revert to a previous OS version. If you can’t roll back, do an in-place upgrade instead, and repair your Master Boot Record. Did you manage to fix the problem? Let us know in the comments below.


I did not have the option on this Dell Laptop after a reinstall of Windows 10 to select English (United Kingdom) for the layout it was grayed out all together so could not swap the @&” symbols over for the US set, at all. SOLUTION = Select Welsh as the language this fixes the issue.
No. this is useless. And googling the issue, shows it has been a problem unresolved by Microsoft of five years, now. I just created a Windows 10 “recovery disk” on CD-Rom. (because my motherboard does not support booting from USB). When I boot from the recovery disk, after startup, it goes straight to “choose your keyboard layout.” But no combination of keyboards (wired or wireless) wis functional. So the recovery disk is useless.
This was so helpful – I actually got windows to reload on what I was going to use as a doorstop! Thank you.