
Unless you have a photographic memory, you’ll need to add credit card details to autofill on Edge for Android. You can store all your credit card info, so the next time you want or need to go shopping, you get checkout without having to scramble for your credit card. You can add more than one card, and if you ever change your mind, you can return and remove it. The process is quick and easy, so keep reading to see how to enter your data for faster checkout.
Contents
How to Add Credit Card Details to Autill on Edge for Android
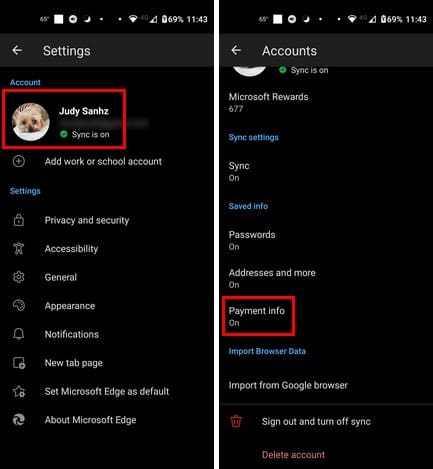
Once the Edge browser is open, tap on the three-lined menu at the bottom right and tap on Settings (cogwheel). Under the Accounts section, you’ll see your account with your name and email address. Tap on that to enter Accounts; swipe down to Payment info.
Toggle on the option for Save and fill payment info and on Add Card. You’ll need to enter information such as:
- Card number
- Expiration date
- Name on card
- Billing address
- Card nickname
One crucial piece of information that won’t be on the list is the CVV code. If the site asks for it (which it should), you must enter it manually. But it’s still better than remembering everything on the list. Remember to double-check that all the entered information is correct and tap on the Done button at the bottom right to save everything. That’s all there is to it. If you ever need to remove a card, you’ll need to come to this area to erase it.
Further Reading
Speaking of autofill, you can use this helpful feature elsewhere. For example, here is how to manually autofill a login on Bitwarden. If you need to erase the info after entering it, but on Firefox, here is how to remove saved information from Firefox autofill. For Opera users, here is how to configure autofill for that browser. Remember that you also have the search at the top right if you’re looking for a specific topic.
Conclusion
Having Edge fill out your card information can speed things up when shopping online. You can add one or more cards but remember that you’ll need to enter the CVV code for the card you’re using. How many cards will you be entering? Let me know in the comments below, and remember to share the article with others on social media.