
Cortana can be handy since she can give you all sorts of information. But, that doesn’t mean that you might want her everywhere, including your lock screen. After all, it’s been discovered that Cortana has been known to have security flaws.
Even though Microsoft always works on a fix, that fix might not come as soon as you’d like. In the meantime, it’s best that only you have access to Cortana when you want and avoid anyone else from doing who knows what with your computer.
Contents
Disabling Cortana on Lock Screen Using Settings
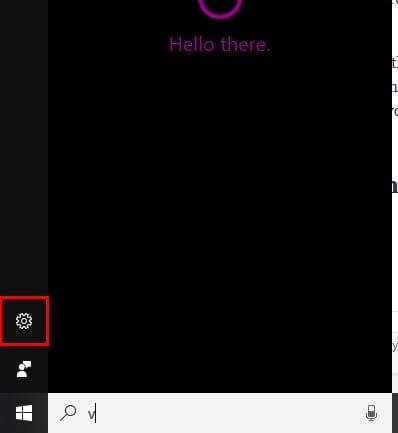
To remove Cortana from your computer’s lock screen, you’ll need to go into her Settings. Type anything in the Cortana search bar and click on the cog wheel.
Once you’re in the Settings page, scroll down to where it says Lock Screen (you won’t have to scroll much). You should see an option that says Use Cortana even when my device is locked.

Disabling Cortana on Lock Screen Using Group Policy
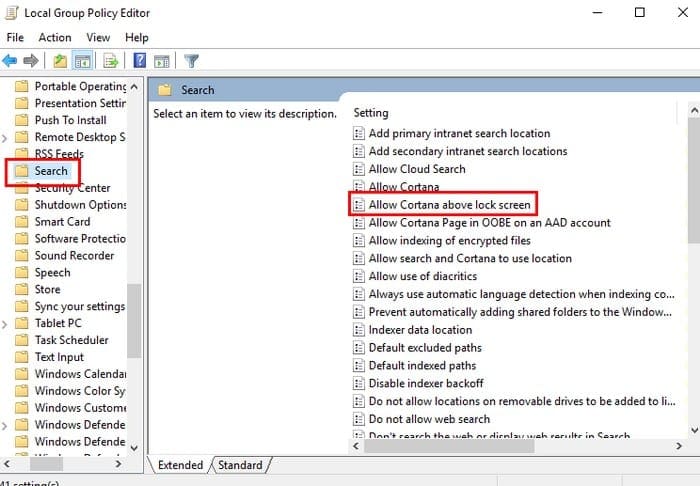
You can also use Local Group Policy Editor to disable Cortana from your lock screen. Open the run box by pressing the Windows and R keys on your keyboard, or you can type run in the search bar.
Type gpedit.msc and click OK. In the left pane, look for Computer Configuration > Administrative Templates > Windows Components > Allow Cortana above lock screen.
A window will now appear with three options at the top left: Not Configured, Enabled, and Disabled. Click on Disabled and then on OK.

Click on the Standard tab at the bottom and in the State column, it should now say that Cortana is disabled.

It is now safe to go ahead and close the Local Group Policy Editor. There are two ways you can close it, either by clicking on the X as usual or by clicking on File followed by Exit. This is the part where you restart your computer.
Turn Off Cortana Using the Registry Editor
If you prefer to use the Registry Editor to turn off Cortana, you’ll need to open the Run box again by pressing the Windows and R keys. But, this time you’ll need to type regedit and click yes when asked if you allow this app to make changes.
Click on HKEY_CURRENT_USER\SOFTWARE\Microsoft\Speech_OneCore\Preferences and double-click on VoiceActivationEnableAboveLockscreen.
Now, change the value data to 0 and don’t forget to click OK. If you don’t see the Windows Search option, right-click on an empty space on the right pane after clicking on the Windows folder, and select key -< New.
You’ll need to name the key Windows Search and when it’s created, right-click on it and select New and then DWORD (32-bit). Make sure you name it AllowCortana and when it appears the value should be set to zero. It’s now safe to leave the Registry Editor.
Conclusion
It’s better to be safe than sorry, and that’s why many might opt for having Cortana disabled at their lock screen. Which method are you going to try first?