Did you see the Critical Process Died or BSOD error in Windows 11 and don’t know what to do? Are you unable to boot up the PC after Windows 11 Critical Process Died error? Did the PC boot up, but you’re unsure what happened? Find answers to all these questions in this article!
The Blue Screen of Death (BSOD), stop, or bug check errors are the same, indicating a severe problem in your Windows 11 PC. It shows different error codes on the blue screen; one is Critical Process Died.
If the PC restarts to the Windows Home Screen automatically, you must investigate the error and troubleshoot to avoid further occurrence. Because the next time, you may not be able to go up to the Desktop of Windows 11.
In some severe situations, Windows 11 users cannot go to the Desktop.
Continue reading and follow the Critical Process Died or BSOD troubleshooting methods below to save your data on Windows 11 PC. The steps are also compatible with your Windows 10 PC.
Contents
- 1 Critical Process Died on Windows 11: Unable to Start PC
- 1.1 Solution 1: Start Windows 11 in Safe Mode
- 1.2 Solution 2: Uninstall Recently Installed Apps or Hardware
- 1.3 Solution 3: Uninstall Recently Installed Drivers
- 1.4 Solution 4: Remove Any Newly Installed Antivirus
- 1.5 Solution 5: Undo Recently Installed Windows 11 Updates
- 1.6 Solution 6: Restore Windows 11
- 1.7 Solution 7: Repair Windows 11
- 1.8 Solution 8: Factory Reset Windows 11
- 2 Critical Process Died on Windows 11: PC Starts
- 3 Resolved: Critical Process Died on Windows 11
Critical Process Died on Windows 11: Unable to Start PC
Since your PC won’t boot normally, you must try the following methods to fix it:
Solution 1: Start Windows 11 in Safe Mode

- Long press the power button of the PC case or laptop until the device shuts down.
- Let go of the power button and press it once to start the PC.
- As soon as you see the motherboard or laptop manufacturer’s logo, long press again to shut down the device.
- Repeat the steps twice, and you should see the Windows Recovery Environment, WinRE, or Windows RE.
- Under the Choose an option window, select Troubleshoot.
- Inside Troubleshoot window, select Advanced options.
- Now, click Startup Settings and then choose Restart.
- After the restart, you’ll see a list of options with corresponding numbers. Press the number 4 or whatever it’s showing on your end beside the Safe Mode option.
- The PC will boot into Safe Mode.
If you can boot Safe Mode, your Windows 11 PC is okay. There must be an app, driver, or hardware causing the problem.
Perform the following methods to eliminate the root cause for Critical Process Died on Windows 11 BSOD error.
Solution 2: Uninstall Recently Installed Apps or Hardware
If you remember that after installing a specific app, the issue instantly occurred, remove that app by following these steps:
- Hover the mouse cursor over the Start button and right-click.
- Then, choose Apps and Features from the context menu.
- Find the app from the list of apps, right-click on it, and then select Uninstall.
For hardware components, disconnect the USB cable. If you connected it internally, shut down the PC and remove the hardware.
This should resolve the BSOD screen instantly.
Solution 3: Uninstall Recently Installed Drivers
- Hit the Windows + R buttons together.
- Type in the following Run command in the Run dialog box.
devmgmt.msc
- Hit Enter and the Run app will start the Device Manager app.
- Click View on the top menu and then choose Show hidden devices.
- Now, expand any recently installed device type, like Disk drives, Firmware, Keyboards, Mice, Storage controllers, etc.
- If you find any yellow warning sign on any device or driver, click on it.
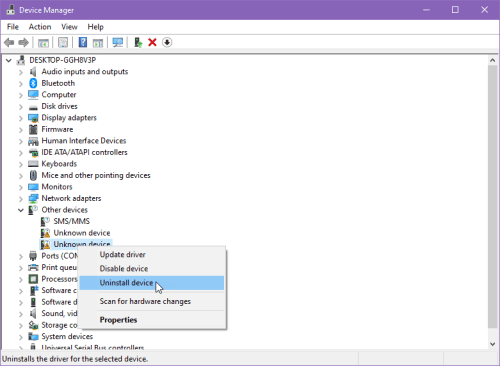
- Now, right-click and then select Uninstall device.
- Repeat for all other similar erroneous drivers or devices.
Solution 4: Remove Any Newly Installed Antivirus
Microsoft has reported that some third-party Antivirus may cause your PC to enter the BSOD screen. If you’ve installed any antivirus and then saw the blue screen error, uninstall the antivirus for now from Settings > Apps > select the app > Uninstall.
Solution 5: Undo Recently Installed Windows 11 Updates
Sometimes, a faulty update may cause the Windows 11 Critical Process Died error on a BSOD screen. Hence, it’s possible that removing that update will fix your PC. Try these steps to undo Windows 11 updates:
- On the Settings app, select Windows Update.
- Now, click View update history.
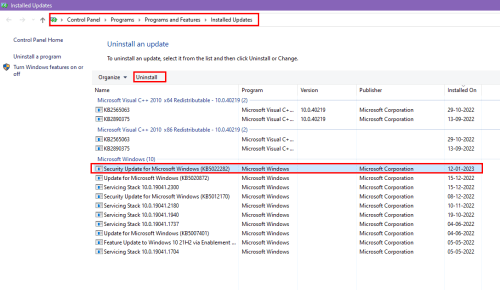
- Select Uninstall updates.
- Choose any update and click Uninstall.
Solution 6: Restore Windows 11
You can also automatically roll back most of the changes made on your PC and go to a stable state when your PC worked fine. Here’s how it’s done:
- Click the Windows Search icon and type Recovery.
- Under the Best match section, choose Recovery.
- On the Recovery screen, click Open System Restore.

- Either go with the Recommended restore or Choose a different restore point.
- Follow the on-screen guidance until you reach the dialogue box that says Finish.
- Click Finish to apply the restore point.
Restart the PC once the restoration is done, and you shouldn’t face the BSOD screen.
Solution 7: Repair Windows 11
You can also try the Startup Repair option on the Windows Recovery Environment screen. Follow these instructions to try this fix:

- Enter the WinRE screen by following the steps mentioned in Solution 1.
- Click Troubleshoot and then select Advanced.
- You should now see the Startup Repair command button.
- Click on it, and Windows 11 will take over.
The device will restart automatically, and you should find your way into the Windows 11 Desktop.
It means you’ve successfully fixed the BSOD error with Windows 11 Critical Process Died stop code.
Solution 8: Factory Reset Windows 11
If all methods fail, there’s no option but to install a fresh copy on Windows 11. Here’s how you can do it using an internet connection:

- Enter the WinRE screen and click Troubleshoot.
- Now, select Reset this PC.
- Choose Keep my files to remove apps and settings. This option will, however, keep your files on the Windows 11 installation drive.
- If you don’t have any Windows 11 installation DVD or USB disk, choose the Cloud download option.
- After the Getting things ready step, you’ll see Just remove my files button. Click on it.
- Now, click Reset to finalize the process.
- Windows 11 Reset wizard will download the necessary files and re-install the operating system.
Simply set up the PC as you would for a new one and enjoy using your Windows 11 system without any BSOD errors.
Critical Process Died on Windows 11: PC Starts
If the Windows 11 BSOD with Critical Process Died error code isn’t severe, the PC will recover automatically and arrive at the Desktop after a restart. However, this issue may appear unexpectedly again, and you may not get the chance to start your PC normally.
First, back up all important files immediately if you’re lucky enough to return to the Home Screen after the Critical Process Died on Windows 11 error.
Make sure you use external or separate internal hard drives to back up data. Don’t take a backup on the HDD or SSD on which you’ve installed the Windows 11 operating system. If the issue continues, there’s a chance you might need to wipe this drive and re-install Windows 11 from scratch.
After backing up your PC’s valuable data, perform all the steps from solutions 2 to 5. Then follow along from here:
Solution 9: Run System File Checker (SFC) Command
- Open Command Prompt with admin rights.
- You can press Windows + R, type in CMD, and then press Ctrl + Shift + Enter.
- Press Enter after typing in or copy-pasting this command:
sfc /scannow

Wait for the process to complete. Windows 11 will attempt to check and resolve system file issues that might be causing the error.
Solution 10: Execute Deployment Image Servicing and Management (DISM) Command
- Run Command Prompt with admin profile and perform various DISM checks and repairs.
- First off, run the following syntax:
dism /online /cleanup-image /checkhealth
- Once the above command execution is complete, run the following:
dism /online /cleanup-image /scanhealth
- If the above two commands find any issues, resolve those by executing this syntax:

dism /online /cleanup-image /restorehealth
Solution 11: Scan Windows 11 for Viruses
- Open the Settings app and then click Update & Security.
- Now, choose Windows Security from the left-side navigation pane.
- Click Virus & threat protection and then click the Scan now button.
- Windows Security app will scan, find, and eliminate all malware from your Windows 11 PC.
Solution 12: Run Find and Fix Blue Screen Problems Wizard
You can also use this dedicated troubleshooter for BSOD on your Windows 11 PC. However, most managed Windows 11 PCs might show an inactive troubleshooter screen for the Fix Blue Screen Problems wizard. To try it out, follow these steps:
- In the Windows Search field, type Fix Blue Screen.
- Click Find and Fix Blue Screen Problems.
- If the wizard shows Online Troubleshooting deactivated, you can’t use this wizard.
- If it shows active, follow the on-screen instructions.
If none of the above helps, perform Solution 8 mentioned earlier to install fresh Windows 11 after taking adequate system backup.
Resolved: Critical Process Died on Windows 11
After performing any, some, or all of the methods outlined above, you should successfully fix the Windows 11 Critical Process Died error.
Since Windows 11 and 10 are both based on the Windows NT operating system development architecture, the above fixes also help you to fix the Blue Screen of Death with Critical Process Died error on Windows 10 PCs.
Next up, learn to fix Windows installation error code 0x80041010.