
There are some bits of information that you may want to save securely in your password manager. Not everything fits the given categories. For example, software license keys don’t really fit in a login, card, or identity entry. To help out in these situations, Bitwarden allows you to save “Secure note” entries. These secure notes only have a name, folder, and notes section. They’re designed primarily for unstructured data, although you can add custom fields if you want to keep things a little more neatly.
How to Add a Card with the Bitwarden Browser Extension
To be able to add an entry to your Bitwarden vault, click on the Bitwarden icon to pen the extension pane, then click the “Add” icon in the top-right corner.

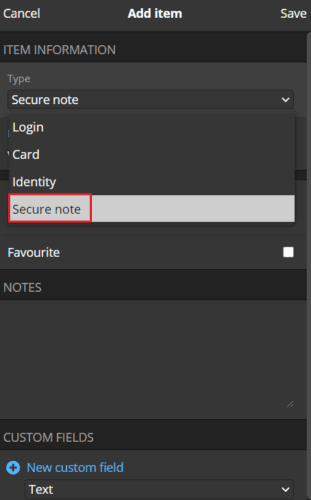
In the “Add item” screen, select “Secure note” from the “Type” dropdown box to see the card details form.
How to Add a Card from the Bitwarden Website
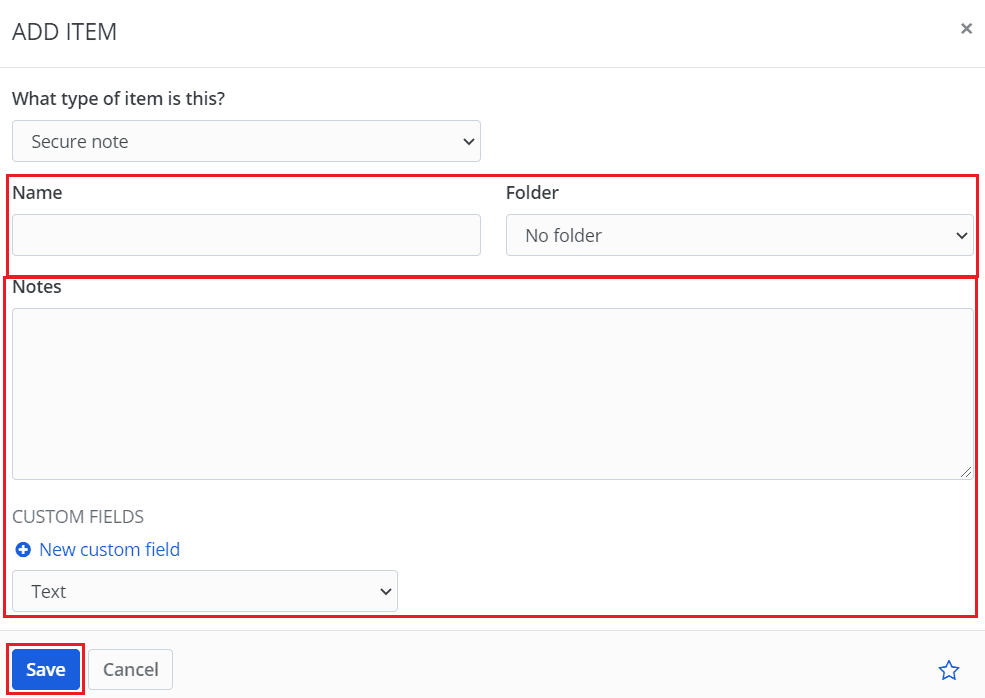
On the Bitwarden website, in the default “My vault” tab, click “Add item” in the top-right, then select “Secure note” in the “What type of item is this?” dropdown box.

With either platform, you can now give your secure note an identifying name, sort it into your folder structure, and add custom fields.
Tip: If you are keeping multiple bits of information in one secure note, using custom fields may make it easier to auto-fill the data if you ever want to. For example, if you save a software license key and the date it expires in the notes field, you may have auto-fill issues. If you store the expiry date in a custom field, though, you can keep that information separate. Only the actual license key will auto-fill.
Once you’ve entered all the information you want to save, click “Save.” In the browser extension, this is in the top-right corner of the extension pane, whereas on the website, this is in the bottom left of the popup.
Bitwarden’s “Secure note” feature is useful for storing data that doesn’t really fit in any of the other categories. By following the steps in this guide, you will save secure notes in your Bitwarden vault.


I have come to Bitwarden after using LastPass for many years. I like Bitwarden very much, but I am not at all satisfied with how “Secure Notes” are handled in Bitwarden. In LastPass, the “Secure Notes” are diffrent from other passowrds. They are truly made secure because to access them you need to enter in your password again, as well as you 2-factor identification, which only gives you access to your “Secure Notes” for a limited number of minutes.
However, in Bitwarden, the “Secure Notes” offer no additional security, it is just another label for a regular password folder- it has no ability to truly secure it by requiring entering the password or 2-factor verification to limit access to this folder. This is a huge disappointment and this security weakness of Bitwarden’s insecure “Secure Notes” is the reason why I will not store my sensitive personal information on Bitwarden. This lack of true Secure Notes is the main reason why I have not subscribed to Bitwarden, which otherwise I am very satisfied to use. I would subscribe to Bitwarden if it offered truly secure Secure Folder with extra security options to make it a stronger folder.
Please consider adding real additional security features to your Secure Folder to make it more than just another label on an otherwise regular folder. I ma sure that other users would like to have strong secured Secure Folder, even if this was a bonus features available only to subscribers.