Knowing how to edit your screenshots on your Android 11 device is essential. Maybe you need to send someone a part of your screen but not all of it. You’ll need to know how you can crop that unnecessary part of the image.
Android 11 gives you great options once you take the screenshots. You can also take scrolling screenshots without having to install a third-party app. Keep reading to see how you can edit your screenshots with all the options Android 11 has to offer.
Contents
How to Take a Screenshot on Android 11
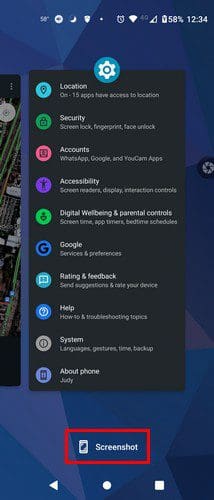
One way to take a screenshot is to tap on the recent apps button or perform the gesture that’ll take you there. At the bottom, you’ll notice an option that says Screenshot. Simply tap on it, and the screenshot will be taken.
The Button Method
The traditional method that everyone knows about when taking screenshots involves pressing two buttons. In this case, you’ll need to press the volume down and power buttons for a few seconds.
Editing
When you take the screenshot, you’ll see a preview of it at the bottom left. You’ll see options such as:
- Pencil Icon – By tapping this option, you’ll see how a menu with all the apps you can edit the screenshot with.
- Share Button
- Erase
- Google Lens – With this option, you can get more information on what’s in your screenshot with
If you’re not happy with the screenshot you took, you can always dismiss it. You can do this by swiping the screenshot to the side or, there’s always the trash can icon as soon as you take it.
These are the same buttons you need to press for a scrolling screenshot. When you press the volume down and power button, you’ll see arrows pointing down below the screenshot preview. Tap on the arrows, and you’ll see how the scrolling screenshot is taking, but you’ll also see a red stop button. Tap this red button when you want to stop the screenshot. As long as the screenshot is being taken, you’ll see a processing message. When it disappears, that means it’s done taking the screenshot.
Screen Recorder
On Android 11, you have the option of using the screen recorder option. This is great if you’re not sure what screenshots you’re going to need exactly. You can access this option by swiping down from the top of your screen twice and accessing Quick Settings. If you don’t see the screen recorder option, then that means it’s hidden.

To move it for faster access, you’ll need to tap on the pencil icon at the bottom left. Swipe all the way down and look for the Screen Recorder option. Once you’ve found it, long-press on it and drag it to a more convenient part of Quick Settings.
When you need to use the Screen Recorder, you’ll notice it’s straightforward to use. When you tap on the option, you’ll see a warning message. Once you get past that, you’ll see a countdown clock at the top right. There will also be a red stop button, and an arrow pointing left. By tapping on the arrow, you can access options such as Sound and Camera. In the Sound option, you can add audio to your video through the Mic, System sound, Mic and system sound, or no sound.
The video will consist of a recording from the front-facing camera. By tapping on the camera icon, you can include yourself in the recording. The recording time will also be shown under the stop button.
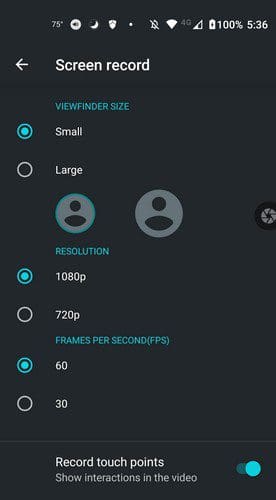
To make any adjustment to the Screen Recorder option, swipe down as you did before, but this time long-press on the Screen Recorder option. You’ll be taking to its Settings. You can adjust the viewfinder size, choose the resolution, modify the frames per second. Suppose you’re recording a brief tutorial for someone. In that case, you can make it easier for them to follow your steps by enabling the record touchpoints option.
Conclusion
As Android advances, you’re seeing some handy features when it comes to taking screenshots. Do you think that other features should be added to make taking screenshots even better? Share your thoughts in the comments below, and don’t forget to share the article with others on social media.