

Do you need to tweak Windows 11, 10, 8, & 7 PC performance or free up RAM for large apps or databases? Find out how to enable or disable Superfetch (Prefetch) below.
You’ll find many suggestions online to either enable or disable the Windows 11, 10, 8, or 7 Superfetch (otherwise known as Prefetch) feature to enhance the performance of your PC. You must learn what Superfetch is and its working process to take the right decision on whether you should enable or disable this system process for Windows PCs.
Superfetch caches data of apps and tools of your Windows PC so that apps and tools can immediately access the data from RAM or system memory rather than the internal storage like HDDs, SATA SSDs, or NVMe SSDs. Sometimes enabling or disabling this system process can positively or negatively impact the Windows PC performance for certain applications. However, it’s not a thumb rule or guaranteed system tweak of any sort. Moreover, it tends to not work well with gaming but can improve performance for business apps like Microsoft 365 apps.
Read this article until the end to learn Prefetch or Superfetch from the ground up. You’ll also explore effortless methods to enable or disable Superfetch in concise and easy-to-perform steps.
Contents
- 1 What Is Prefetch or Superfetch in Windows PCs?
- 2 How Does Windows Prefetch Work?
- 3 When to Disable Superfetch or Prefetch
- 4 When to Enable Prefetch or Superfetch
- 5 How to Enable or Disable Superfetch in Windows 11, 10, 8, and 7
- 5.1 Enable or Disable Prefetch From Services
- 5.2 Disable Superfetch (SysMain) From Task Manager
- 5.3 Enable or Disable Superfetch Using the Command Prompt
- 5.4 Enable or Disable Superfetch Using the PowerShell
- 5.5 Enable or Disable Prefetch From the Registry Tool
- 5.6 FAQs On Enabling or Disabling Superfetch
- 5.7 Should I Enable Prefetch?
- 5.8 Should I Turn Prefetch on or Off in SSD?
- 6 Enable or Disable Superfetch: Final Words
What Is Prefetch or Superfetch in Windows PCs?
Prefetch or Superfetch are simply different names for the same system process in all Windows PCs starting from Windows XP. The responsibility of this system process is to cache boot and application files essential to startup the Windows or installed software. This process is prevalent in Windows PC that runs on HDDs.
Prefetch monitors the boot process to learn about which files are opened during the system startup. Also, when you run various apps on your Windows 11, 10, etc., PCs, it monitors those apps too. Then it creates profiles of apps and boot processes in a secured Windows location on the internal storage. The location of the Prefetch folder is as mentioned below. The folder can hold up to 128 app or boot process profiles.
C:\Windows\Prefetch
On HDDs, that inherently come with a slow read and write processes, the Prefetcher service loads these boot processes or application profiles in the RAM before the system or you call those files. Thus, you experience faster Windows OS boot or application initialization.
Also read: How to Install an NVMe SSD in a Desktop and Laptop
Microsoft revamped Prefetch in Windows Vista, and since then it’s known as Superfetch and ReadyBoost. Superfetch mostly monitors the application usage on your Windows PC. Then it predicts which app you may run and accordingly it loads a small portion of the applications in RAM or system memory. On the contrary, ReadyBoost features use external mass storage devices like USB flash drives, external HDDs, external SATA SSDs, etc., as system cache and reduce the load on the system RAM chips.
Also read: Can You Mix RAM Brands: A Guide for RAM Mix and Match
Another component in Windows Memory Management, just like Prefetch and Superfetch is ReadyBoot and it’s also a part of ReadyBoost. ReadyBoot replaces Prefetch to load boot process files in advance when the system has more than 700 MB of free RAM. Now, an interesting thing is that all these Windows Memory Management utilities link to one Windows system service known as SysMain.
How Does Windows Prefetch Work?
Superfetch, Prefetch, SysMain, ReadyBoost, and ReadyBoot are all the same and they’re highly intelligent tools of Windows 11, 10, 8, 7, etc., modern operating systems from Microsoft. Find below its working processes:
- On HDDs, Superfetch preloads boot files and software programs so that you can use these instantly.
- It can predict up to three apps on Windows 11 and other modern Windows operating systems.
- When you use RAM and HDD performance-intensive apps or programs on your Windows 11 PC, Superfetch delays system maintenance tasks like disk defragmenting, Windows Updating, and other background apps.
- It automatically pushes resources to active programs by reducing the number of background apps.
- Superfetch automatically adapts to changes in your app usage.
When to Disable Superfetch or Prefetch
Here are some scenarios where you may want to disable Superfetch or related Window Memory processes to reduce CPU, RAM, and HDD utilization:
- Superfetch is unable to predict gaming apps of big sizes and unnecessarily keeps using CPU, RAM, and HDD, thereby slowing down the game engine.
- You’re using normal business apps like SQL databases, enterprise resource planning (ERP) apps, large Microsoft Excel worksheets, etc., and experiencing sluggish performance.
- You always notice that your computer’s Task Manager shows CPU, RAM, HDD, etc., are above the 50% utilization mark even when the PC is in idle condition.
- You’re running the Windows operating system in a SATA or NVMe SSD.
When to Enable Prefetch or Superfetch
- If you use your PC for work-related apps and running on HDDs, you must enable Superfetch all the time.
- You’re experiencing slower system startup and app startup issues.
- There’s an external hard drive or USB flash drive always connected to the PC via a USB port and ReadyBoost can utilize these external storages as extended cache repositories.
If you don’t disable Superfetch or Prefetch manually, Windows 11, 10, 8, 7, etc., modern operating systems will automatically restore Prefetch files and start using Superfetch.
How to Enable or Disable Superfetch in Windows 11, 10, 8, and 7
There are multiple ways to deactivate and reactivate Superfetch on Windows 11 and earlier operating systems. Some of the effortless methods are as outlined below:
Enable or Disable Prefetch From Services
- Hold the Windows key, while pressing R to bring up the Run dialog box.
- Type Services.msc, then press Enter.
- The Services window will pop up. Find Superfetch in the list.
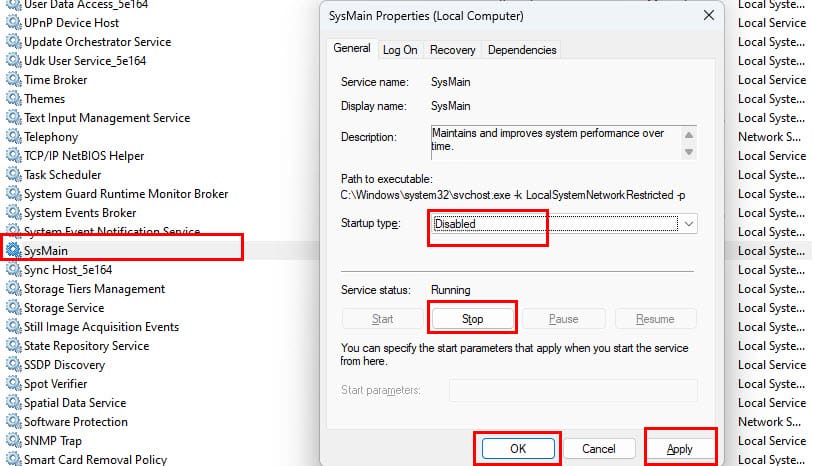
- Right-click Superfetch, then select Properties.
- Select the Stop button if you wish to stop the service.
- In the Startup type dropdown menu, choose Disabled.
In advanced Windows operating systems like Windows 11 and 10, you may not find Superfetch. Instead, you’ll find SysMain service. In place of Superfetch, perform the above steps for SysMain to disable Prefetch or Superfetch on your PC.
When you decide to enable the above feature, simply follow these steps:
- Go to the Services app and select SysMain.
- Right-click and then select Properties.
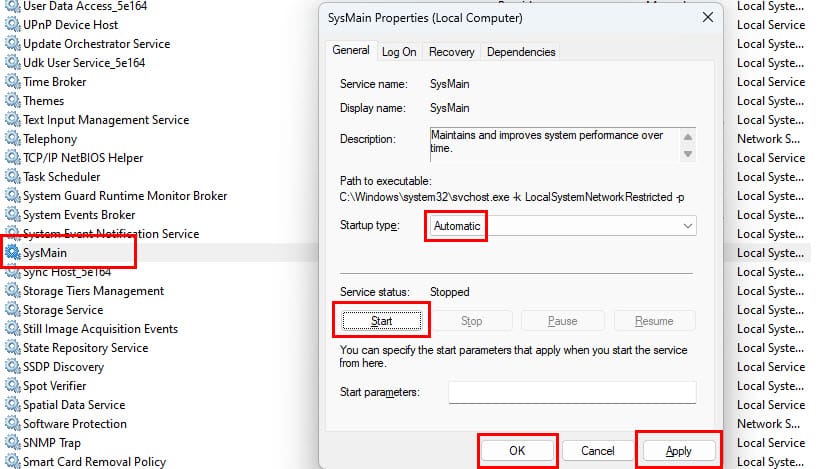
- Now, set the Startup type to Automatic by selecting the option from its drop-down list.
- Then, click Start under Service status to run the process.
- Select Apply and then hit the OK button to save the changes.
Disable Superfetch (SysMain) From Task Manager
Another effortless way to deactivate the Prefetch or Superfetch process is by using the Windows Task Manager app. Here’s how it’s done:
- Press the Ctrl + Shift + Esc buttons altogether to bring the Task Manager on the screen.
- Now, scroll the processes under the Processes Name column header to find Service Host: SysMain process.
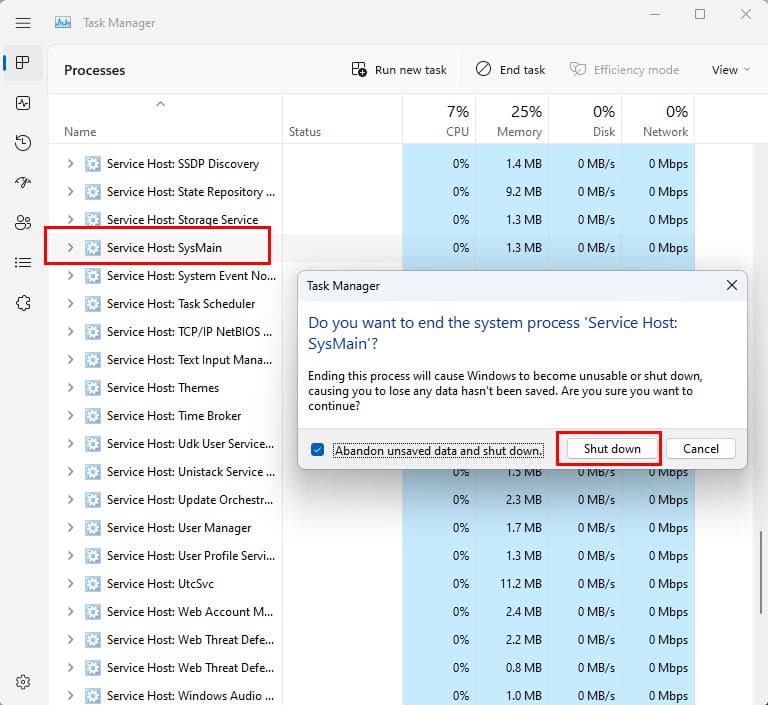
- Right-click the task and then choose End task.
- Check mark the Abandon unsaved data and shutdown check box and then click Shut down to disable the service.
Enable or Disable Superfetch Using the Command Prompt
- Hit Windows + S together to pop up the Windows Search tool.
- Type Command and then click Run as administrator on the right side panel of Windows Search.
- Command Prompt will open with administrative rights.

- Now, copy and paste the following command into Command Prompt and hit Enter:
sc stop “SysMain” & sc config “SysMain” start=disabled
- When you see the following message in the Command Prompt, know that you successfully disabled Prefetch.
[SC] ChangeServiceConfig SUCCESS
- If you’re ready to start Prefetch again, simply run the following code on Command Prompt:
sc config "SysMain" start=auto & sc start "SysMain"
Enable or Disable Superfetch Using the PowerShell
- Right-click the Windows icon on the Taskbar of Windows 11 and select Terminal (Admin) from the context menu.
- Now, copy the following Powershell command and right-click on the Terminal window to paste the code:
Stop-Service -Force -Name "SysMain"; Set-Service -Name "SysMain" -StartupType Disabled
- Now, hit Enter to disable SysMain aka Superfetch, Prefetch, and ReadyBoost.
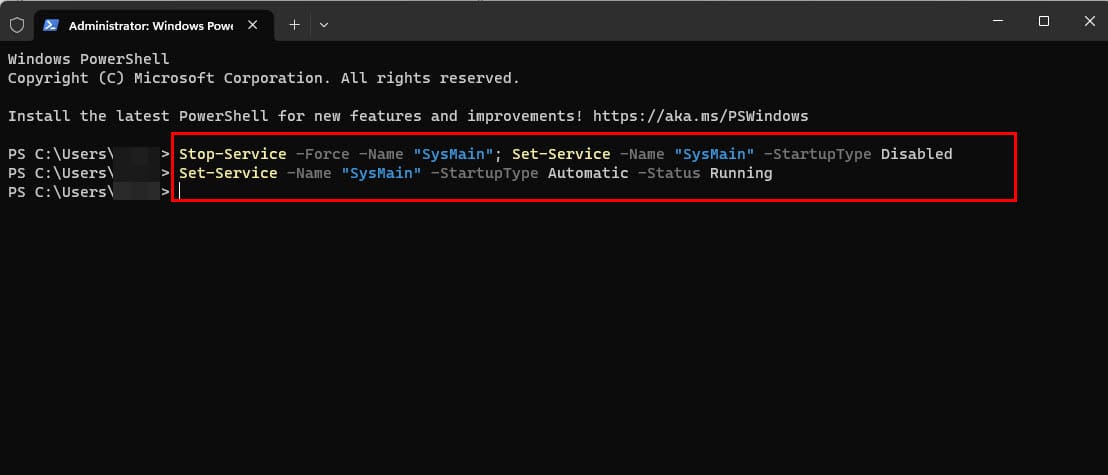
- If you want to start the service again, execute the following command on Powershell:
Set-Service -Name "SysMain" -StartupType Automatic -Status Running
Enable or Disable Prefetch From the Registry Tool
- Hold the Windows Key, while pressing R to bring up the Run dialog box.
- Type Regedit, then press Enter on the keyboard.
- The Registry Editor window appears. Navigate to the following location in the Registry.
- HKEY_LOCAL_MACHINE
- SYSTEM
- CurrentControlSet
- Control
- Session Manager
- MemoryManagement
- PrefetchParameters
- Alternatively, you can copy and paste the following Registry address into the Registry tool:
HKEY_LOCAL_MACHINE\SYSTEM\CurrentControlSet\Control\Session Manager\Memory Management\PrefetchParameters
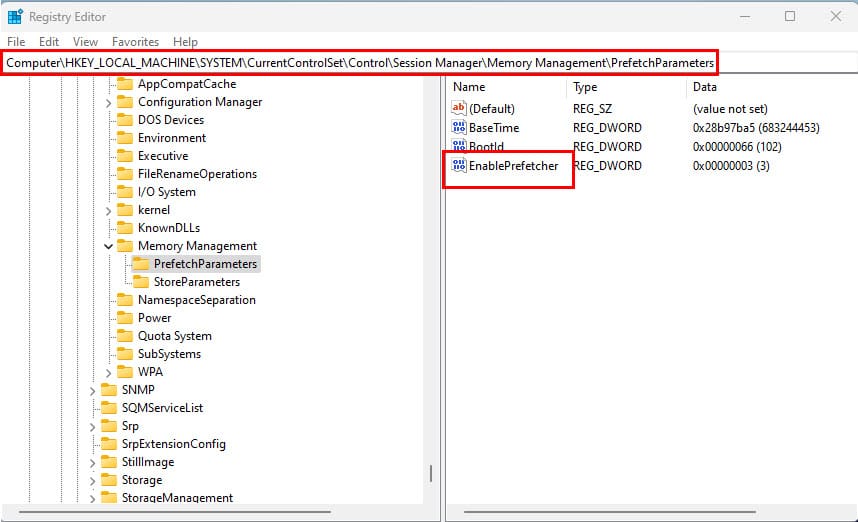
- On the right side, double-click on EnableSuperfetch. If this value doesn’t exist, right-click the PrefetchParameters folder, then choose New > DWORD (32-bit) Value.
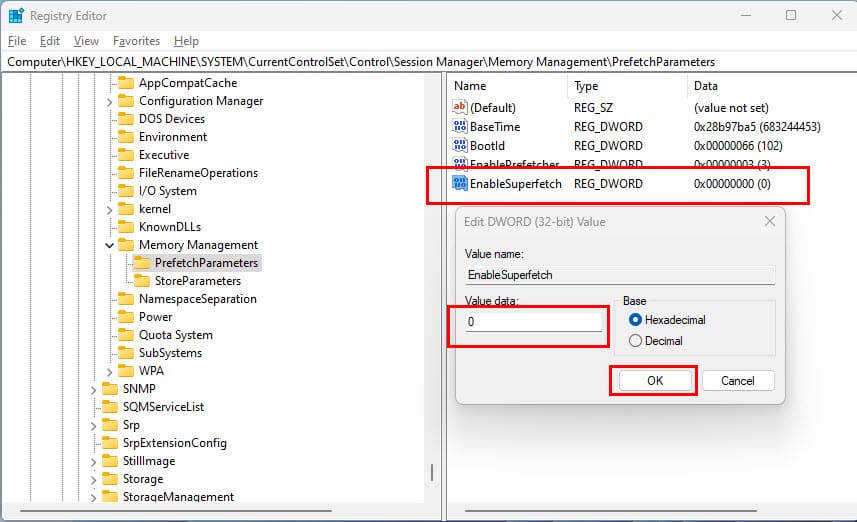
- Give EnableSuperfetch one of the following values:
- 0 – to disable Superfetch
- 1 – to enable prefetching when you launch a program
- 2 – to enable boot prefetching
- 3 – to enable prefetching of everything
- Select OK.
- Close the Registry Editor.
Note: If you disable Superfetch and would like to enable it for certain applications, you can use a special switch in the program shortcut: /prefetch:1
FAQs On Enabling or Disabling Superfetch
Where Is the Prefetch Data Stored?
You’ll find all 128 boot processes or application start-up data in the Prefetch folder. By default, Windows stores the Prefetch folder in the following location on your Windows 11 or 10 installation drive:
This PC > Local Disk (C:) > Windows > Prefetch
Should I Enable Prefetch?
If you’re running your Windows 7 and later operating systems only for mid-level computation like business app use, database maintenance, Microsoft Excel processes, etc., then you should enable Prefetch. In fact, Prefetch is by default functional on all Windows PCs since the Windows XP operating system. Prefetch is highly necessary for PCs running on HDDs.
Should I Turn Prefetch on or Off in SSD?
There’s no necessity for the Prefetch service for SATA and NVMe SSDs since these internal storage media are 20 to 35 times faster than HDDs. Hence, you can disable Prefetch in a Windows PC using an SSD as the primary internal storage.
Enable or Disable Superfetch: Final Words
Now you know how to enable or disable Prefetch, Superfetch, SysMain, etc., on a Windows PC running Windows 11 to Windows 7 operating systems. Choose a method you like and give it a try yourself. If I missed any other methods to turn on and off Prefetch, do mention those in the comment box below.
Next up, how to make Windows faster with Microsoft PC Manager.


If you have a “PROPER” SSD this is actually beneficial to speed by a lot. I bet most of those complaining have a plain old HDD.
Kudos to those who noted that superfetch was renamed to SysMain. I spent considerable time searching Services for “SuperFetch”, which was nowhere to be found. I was unaware of the name change because I am not that deep into the OS management side of this field any longer. More of a Hardware guy now.
Does not work superfetch is contınuenıng to run although I do these operaions and after doing , I HAVE CHECKEd and I saw that I had changed in this article way but not working.
The comments here condemning Superfetch / SysMain are bull. Superfetch only consumes main memory that is not currently used otherwise. If you have enough main memory, its benefits are great, even with an SSD (other than what usual rumors say).
The problem with these blogs purporting to be information is the lack of datestamping. Information is ALWAYS date sensitive: some may become more valuable as they age, but usually information becomes less relevant or even incorrect as it ages.
Someone already remarked 3 months ago that the SuperFetch service got renamed to SysMain (as of Windows 10 build 17763.1), yet this article has not been updated to reflect that change. This article’s author doesn’t read the comments or has abandoned his article (too often the case with these blogs purporting to be references). This outdated information becomes a disservice to users since they may not find a service named SuperFetch.
Yes this was a huge help on my Dell Inspiron Win10 machine. I am not a gamer by any stretch but my laptop was running slow, locking up, etc. I’ve never seen task manager take several minutes to load. When I could finally get it to load, it showed 100% disk capacity and “superfectch” was the only process with a high usage.
Thanks
my pc runs good but when i open a game and plays for a while (it happends the most in open world games) after i play when i close the game my pc is being slow hope it will fix it
the “Superfetch” service has been renamed to “Sysmain” now.
Yes, this article did help.. Why would anyone want a bunch of apps not being used hogging up resources (CPU, RAM, and sometimes even WAN bandwidth) do to an assumption? Keeps re-activating after updates.
Your advice seems to have healed my limping junkpile of a machine. I was running at 95%-100% disk usage randomly for no reason out of the vast blue sky of terrible fate and luck. Thanks to you I can use this clunker in peace for the time being. I hope to whatever vengeful computer gods that dictate our messed up lives that this peace isn’t short lived and I praise your name and your post.
Microsoft’s first OS was MSDOS, the MicroSoft Disk Operating System. Since then they have been obessed with disk related performance and Superfetch is the latest evidence of that obession. Thanks for the solution to switch this irritant off. Here an idea Microsoft, make the OS read only, prefetch every app as part of it’s install and create a profiling suite with a prefetching optimization tool for users to initiate when they choose.
Yesterday after Windows 10 automatically updated, my computer couldn’t boot. It forced me to reset. After that, Windows 10 did NOT allow me to choose default programs! And it ran superfetch and a lot of other programs I didn’t want! I’d say Microsoft team has become very rude to users!
Superfetch is a serious PITA! What sucks is that are some Windows updates, it sometimes will be reset to run automatically, and then my poor laptop is at 100% disk usage which makes it pretty much a paperweight. Then I have to stop the service, disable it again, do a disk check, and reboot. ARG! I hate it with a passion!
Superfecth is hell. Nobody asks it to run, it runs on its own, and then it takes up so much disk capacity as to entirely block usage of the computer. I hate and I hate Windows for inventing it and imposing it onto us users. Windowns is a necessary evil… for want of any better solution.
Thank you my hero,
If you ever need any organs I’m willing to donate any of mine after this fix. I have tried dozens of other help sites but nothing worked, until now.
Thank you! It definitely freed up disk space, now to work on memory… what is cortana doing that is taking up so much memory? She is just a search bar… ? Safe to ditch her too?
Biff.. It’s on the properties page if you follow the above instructions.. “Disable from services”.. about halfway down..
In Windows 10, there is no ” “Startup type” dropdown menu”
Whatever the ‘experts’ try to tell you, disabling Superfetch WILL benefit your computer’s performance if it has limited RAM. I have a Lenovo Ideapad with 2Gb RAM, and disabling Superfetch boosted its performance significantly and freed up 10% of RAM.
If your device has 8GB of RAM that might not make a huge difference and the price to pay might be too big. If it has 2GB RAM it’s well worth giving it a try.
Thank you for the registry instruction. Easy and clear!
Thanks for this! Easy to follow instructions :-)
I’m having a problem. Before, I could open prefetch anytime and not have any problems but now it’s not opening at all. How do I solve this issue?
Thank you. i checked and my superfetch was enabled again.
Keep your eyes open though.. I had it disabled then windows updated and kindly put it back on.. pc slowed down again making me go and look at it again.. only to find it back on..
I have never seen anybody experience any problems after disabling Superfetch.
Will there be any risks to disabling superfetch regarding my PCs well being, or is it OK to disable it completely?
I just found this. I changed superfetch and prefetch to 1 and disk went from constant 90-100% to 0-10% at idle. thanks a bunch for the information.
Great post. Thank you for the help!
Thanks for the awesome post. It was very ez to follow the steps!
Thank you so much!! Superfetch has been the bane of my existence for the last year.
Greetings, Mitch,
You are a gem and a treasure.
Thank you for sharing your expertise and for your kindness.
this seems to have worked. I still see 100% disk usage at startup, and superfetch still runs, but only for a few seconds. total startup time doesn’t seem to last as long either. by the way, in Regedit, Superfetch and Prefetch had the same settings, so I changed each from ‘3’ to ‘1’.
Jonni,
Thanks for this post. I disabled SuperFetch and now my computer is running much better; the way it was originally.
Uh, mine only does it for like 10 seconds and then it goes back to normal.
I have a gaming PC so I don’t know, just got this 3 days ago.
Thanks a ton for this post! It’s super useful and now that I disabled superfetch, my computer is back to running at an optimal speed. It also helps that it was very easy to follow.
Thanks a lot for the help. I stopped the system service and performance returned to normal. I still will have to play around with the registry setting but I’m confident it will turn out O.K.
Can to safe mode to find out super fetch was not enabled try to get back on but stuck on welcome
Thanks! Tried another fix but it turned back on when I restarted. Now I see why.
Typically Microsoft hunk of junk is SuperFetch. Good idea just poorly executed, again.
Wow! Great tip!! Thanks!
worked like a charm…my core 1 and core 0 temperatures went down to optimal levels, video no longer lags..I am such a happy camper.
Like someone said above, you would think Microsoft would have a warning or disclaimer or something so that prefetch does not take or hog up CPU usage.
Core 1 at this writing 38C
Core 0 at > 36 C
On a side note I cleaned my fans using a vacumm (very powerful I might add) and this also cooled my laptop.
running HP Pavillon i5 450M
4GB Ram.
I am very very happy
Dr. M.
I understand now how it works…
I am using both Edge + Chrome and recently got blocked due to Disk permanetly @ 100%
Tried Great Suspender on Chrome but not of much help…
Thank you!
Had similar but was showing it was using 100% disk !! and took forever to respond. usually had to shut down chrome and wait 10 mins before i could reboot.. then be ok for another 2 days before doing it again.. Since stopping it, this pc is running like a dream.. Thanks for the solution.
thank you very much, simple as that, it works!
Thank you Very Much for your clear instructions and for your time and generosity in posting it for everyone to use.
I am unable to disable Superfetch. I followed the directions and tried to set to 0. It came back with an error. I tried to enter hex and decimal as well as directly editing the word by replacing the 3 with a 0. All to to avail.
In the services.msc the startup option is grayed out and I have administrator status.
My disk usage is stuck at 100%
My Lenovo laptop with windows 10 had been very very slow lately, it had almost permanently almost 100% of CPU and disk usage. Today I uninstalled the Lenovo Companion app and the Lenovo System Interface Foundation app (which was using all the CPU). That brought my CPU down a lot, now it never even reaches 50% in normal usage. I also disabled superfetch and it has apparently solved the disk usage wich now very infrequently has shown 100%, normally it has been very low. Thanks for the help! I hope this fix sticks.
i enabled superfetch, set it too 3
my boot speeded up, installations of games speed up … .
overall speed up … .
and i am on windows10pro … .
on an sshd … .
it definitely works … .
even on windows 10 pro … .
VERY NICE!! Thank you. However, I believe there is a piece of instruction missing and a typo at the end of the regedit instructions. Suggested corrections are in square brackets.
On the right side, double-click on “EnableSuperfetch“. If this value doesn’t exist, right-click the “PrefetchParameters” folder, then choose “New” > “DWORD Value“. [Type: EnableSuperfetch and press Enter.]
Give “[EnableSuperfetch]” one of the following values:
How long would you have to wait to load a program anyway. 10 levels of disk and memory look-ahead and read cache and still someone comes up with this (miserable) idea.
At least twice a day Superfetch would bog down my computer to the point where It would not even function. Disk cache would hover around 96 – 100%. Always at 9:30 am and 3:30 pm…..when I need full use! Tried to reschedule tasks….but you know thats nearly impossible. Finally shut off Superfetch – problem totally solved.
You’d think Windows would know better by now – how to build an operating system that you can actually work with. How lazy are these designers?
I got this laptop used and the ram was stuck at 70-90% so I did abled superfetch and that fixed it – but now I feel cheated
It was superfetch for me, thanks so much for the guide!
Great tutorial. Thanks!
Thanks so much!! Seems my Win 10 has finally allowed me to use internet without rebooting all the time. YEA!!
These were shortest most thorough instructions I could find anywhere. I got curious about the process I found in my task manager named ‘Superfetch’ that was eating into my resources. This helped me a lot and I hope that you don’t mind me sending some traffic your way. Thanks