Did you know that you can greatly enhance your desktop or laptop PC’s performance if you put an NVMe SSD into it? That’s right! Don’t know how? Not to worry, I will explain how to install an NVMe SSD on a desktop or laptop computer.
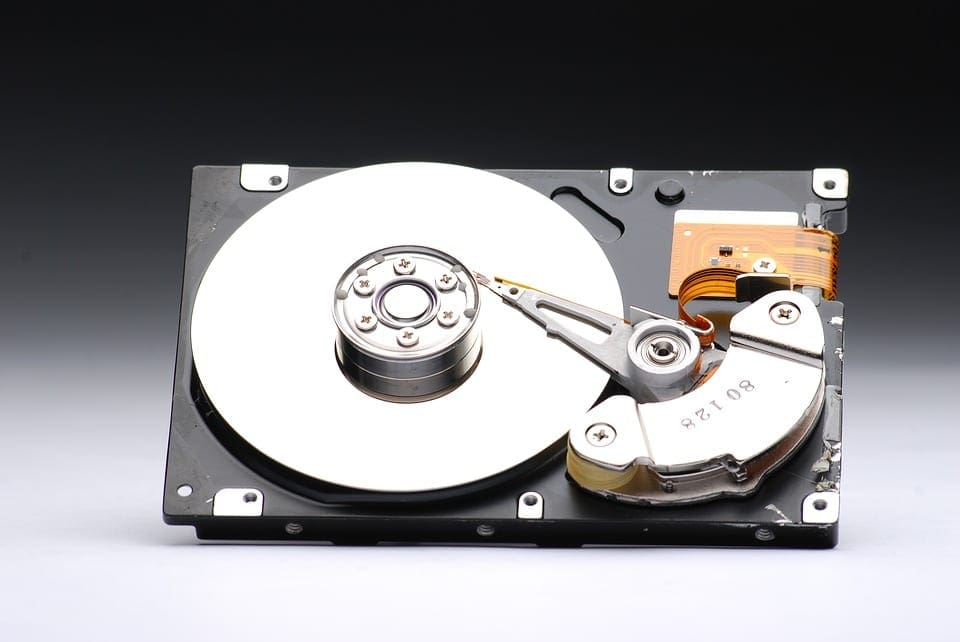
Conventional hard drives are 50 times slower than RAM. Hence, no matter how fast the CPU, graphics processing unit (GPU), or motherboard BUS is, you will experience latency in your computer if you’re still using HDDs in the era of solid-state drives (SSDs).
If your motherboard supports NVMe solid-state drive hard drives, you must move to NVMe to experience blazing-fast performance on your PC. If you’re thinking about the cost of buying one NVMe and installation, it’ll be surprising to know you can get an NVMe SSD for as low as $30 for a 500 GB chip. Wait for the best part!
You don’t need to spend anything to install the chips. It’s straightforward to put internal storage into a desktop or laptop. You don’t need to call the technical support team of your PC manufacturer or take the PC to a local repair shop.
Read on to learn everything you need about installing NVMe SSD on any compatible computer.
Contents
What Is NVMe SSD?

NVMe SSD or M.2 is the short form for a faster logical-device port that modern motherboards contain: Non-Volatile Memory Host Controller Interface Specification (NVMHCIS). It gives the CPU access to internal storage directly through the motherboard BUS without routing the connection through SATA or ATA data cables.
NVMe is 35 times faster than an HDD based on semiconductors rather than magnetic discs. Hence, the CPU, RAM, and motherboard can communicate with the internal storage much faster than conventional HDDs.
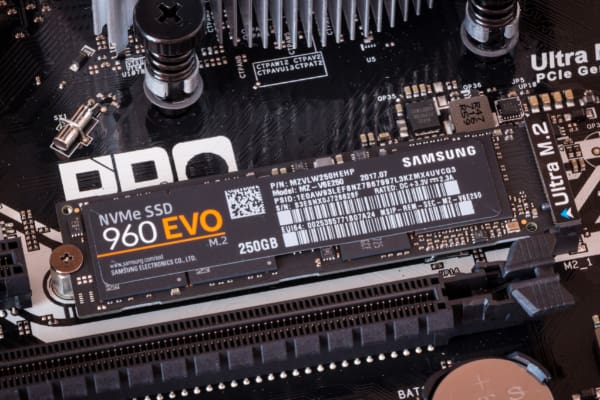
NVMe SSD uses the M.2 PCI Express expansion slot. Hence, you’ll also hear the term M.2 card or chip in place of NVMe, since pronouncing M.2 is faster and easier than the longer alternative.
There are various forms of NVMe SSDs. The variation is due to their need for different kinds of PCIe slots. For example, add-in card or AIC, U.2, U.3, and the latest is M.2.
I’ll be showing you how to install an NVMe SSD into a computer using the latest one, which is M.2 form factor-based. You can see the image below:
How to Buy the Right NVMe SSD for Your PC
Since there are different types of slots for NVME SSDs, you can’t just buy any one of them. You must first ensure that your motherboard supports NVMe SSD. Then, you also must identify the form factor that your motherboard supports. Find below the images for two different types of NVMe SSD form factors prevalent in the market.

The above two SSD chips are the dominant ones. They look pretty similar except for the keys or pin layout. The SATA M.2 consists of the M.2 B+M key. It has two nicks in the gold-plated panel of the SSD that goes inside the M.2 PCIe expansion slot.
Contrarily, the NVMe SSD has just the M.2 M key. It means there is just one nick on the gold-plated panel of the SSD.
Now, it’s essential to know that neither is interchangeable. If your motherboard has an M.2 B+M key-compliant PCIe slot, get SATA M.2 SSD. And, if the motherboard came with the M.2 M key-compatible PCIe expansion slot, get the NVMe SSD.
However, installation for both of these SATA solid-state drives is similar.
Find out the form factor from your motherboard manual or the actual motherboard, and then buy the NVMe solid-state drive that suits your computer.
Which Expansion Slot Is Used by an NVMe-Compliant Device?

An NVMe-compliant motherboard will contain the M.2 M key-compatible PCIe expansion slot. Typically, mid-range motherboards come with two such expansion slots. Some manufacturers may also provide a heatsink for NVMe with the motherboard. However, you’ll need to buy another heatsink if you choose to use a thermal solution for the second NVMe chip.
How to Install an NVMe SSD on a PC
Likely, you’ve just bought an NVMe SSD to upgrade your PC’s internal storage to the next-gen standard internal semiconductor storage with the fastest read and write access. However, the eCommerce or physical shop didn’t care to explain the process for installing NVMe SSD.
You may have contacted your friend, but they only told you it’s pretty simple and all you need to do is open up the CPU case. Then, just plug in the NVMe chip as you do for a RAM or GPU card. However, the process differs from installing any other hardware accessory into a desktop or laptop computer.
Here’s how to install an NVMe SSD on a PC (desktop computer):
Preparing the CPU Case Before Installing NVMe SSD
Considering that you’re mother contains M.2 M key-compatible PCIe expansion slot, and you’ve bought a suitable SSD chip already, here’s how you should proceed:
- Shut down the desktop.
- Disconnect all cables from the CPU case.
- Lay the computer cabinet on a table on its right-side cover when the case’s front is facing you.
- Now, you should be able to open up the left-side cover by unscrewing the screws that lock the CPU case cover to the chassis.
- You’ll also need a tiny screwdriver to fasten the NVMe SSD to the motherboard breadboard or circuit board.
- It’s good to perform all the steps after wearing a static wrist strap band.
- You need to wear the band on your wrist and connect the alligator clip to any metal surface with no paint on it.
- If you’re not using a static wristband, frequently touch any bare metal surface while performing the entire NVMe SSD installation process.
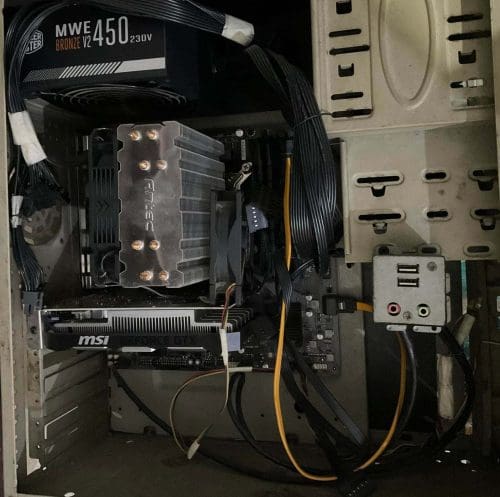
- Locate the M.2 PCIe slot on your motherboard. If there is any other hardware in the way, you must remove them before installing NVMe SSD.
- Usually, you’ll find one M.2 slot just below the graphics card. The other one should be near the southbridge chip, either the motherboard’s lower right corner or lower left corner.
- Take help from the schematic diagram of your motherboard to pinpoint the location of the PCIe M.2 expansion slot.
- If the motherboard has only one M.2 slot, and that’s also beneath the graphics card slot, you need to remove the GPU. Find here how to remove a GPU.
- Once you’ve figured out where to put the NVMe SSD chip, you can now prepare the SSD for installation.
Preparing the SSD Chip Before Installing NVMe SSD
Most NVMe chips ship with two layers of packaging. The outer packaging is made of plastic laminated paper, and the inner package is transparent plastic.
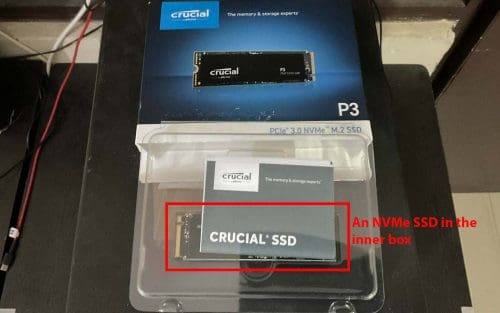
Open the other box. Carefully pull the plastic box out and put it on the table. You should see the chip in front of you. Most chips also contain a small screw inside the motherboard and the NVMe SSD chip.
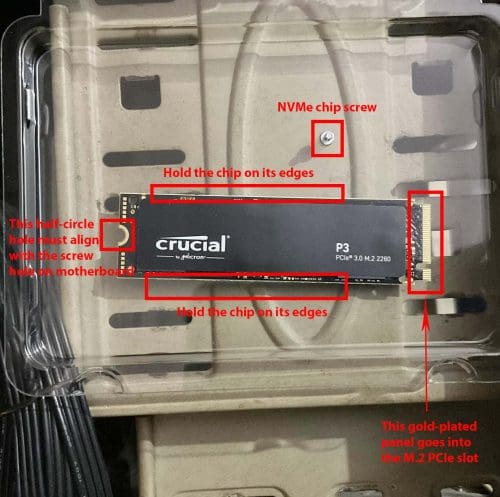
Delicately open the transparent plastic cover. At any cost, don’t hold the chip with its gold-plated keys or panel. Doing so may corrupt the internal storage. Also, try not to touch anywhere on the NVMe SSD’s breadboard surface. You must hold the card on its edges.
Be mindful of the small screw, as it’s indispensable for the installation process. Ensure you get a compatible screwdriver for this tiny screw.
Installing NVMe SSD on Motherboard
- Unscrew any heatsink covering the M.2 PCIe expansion slot on the motherboard.
- Put the heatsink aside for now.
- Carefully hold the NVMe chip on its edges so that its M.2 M keys or the gold-plated panel’s notch align with the motherboard’s M.2 slot’s notch.
- Slightly push the gold-plated panel inside the M.2 slot.
- When you feel that the M.2 M keys went inside the PCIe slot fully, let go of the chip.
- As soon as you release the chip, it’ll shift to an upright angled position.
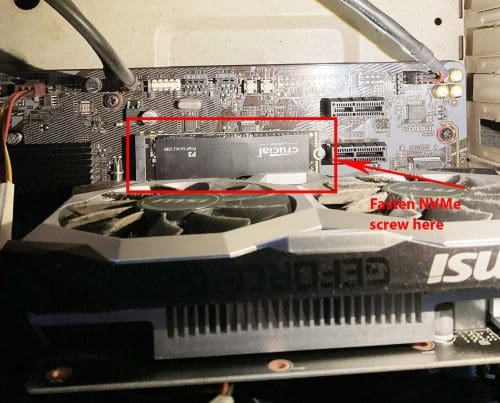
- Now, use your index finger to delicately push the half-circle hole of the NVMe SSD chip down and align the hole with the screw slot on the PCIe M.2 expansion slot.
- Place the screw inside the hole and fasten it carefully using a screwdriver. If you’re installing a heatsink for NVMe SSD, don’t forget to place it on the chip before you fasten the screw.
If you’re installing NVMe SSD in an HDD-based laptop with an M.2 PCIe slot, the process is similar to the above. You just need to open up the laptop on its back. Ensure you disconnect the charger cable before opening the laptop’s bottom cover.
Usually, you’ll find the NVMe M.2 slot at any edge of the laptop motherboard. Don’t touch anything else on the laptop besides installing the NVMe SSD chip.
Some laptops may come with an M.2 PCIe heatsink. If you see it on your PC, unscrew it, install the M.2 SSD and then put the heatsink over it. If your laptop didn’t come with a heatsink for the M.2 slot, you probably don’t need it.
NVMe M.2 slot heatsinks are not mandatory. However, if the chip gets too hot, it’ll throttle read and write speed to reach a more tolerable temperature level. You’ll just see negligible latency when copying bigger files. It won’t affect other read/write operations of the PC.
How to Install an NVMe SSD in the BIOS
Most motherboards will automatically accept and show the storage space inside a newly-installed NVMe solid-state drive. However, if it doesn’t follow these steps:
- Shut down the PC.
- Keep pressing F2 and Delete simultaneously after pressing the power on button.
- You should see the BIOS or UEFI menu in front of you.

- Go to Advanced and then access the NVMe Configuration utility.

- If you see any Disabled option, select it and use the left or right navigational keys to enable the NVMe SSD chip.
- Now, you should see the NVMe serial number and its volume, like 250 GB, 500 GB, 1 TB, etc.
How to Install an NVMe SSD in Windows 11
Perform these steps to format the NVMe SSD drive on Windows 11 or 10 PC:
- Press Windows + S together to open Windows Search.
- Type Format.
- You should see Create and format hard disk partitions under the Best match section. Click on it.
- Windows Disk Management utility will open.
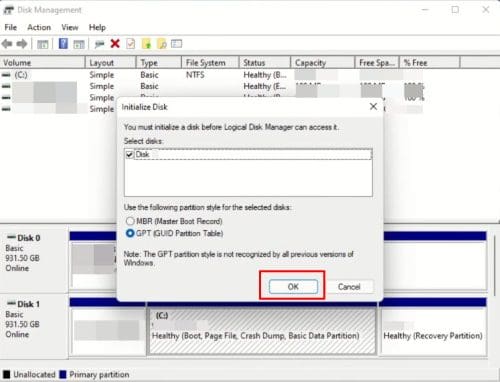
- You’ll get the Initialize Disk popup.
- Select GPT as the partition table and click OK.
- You should now see the disk manager’s hard drive as an online drive.
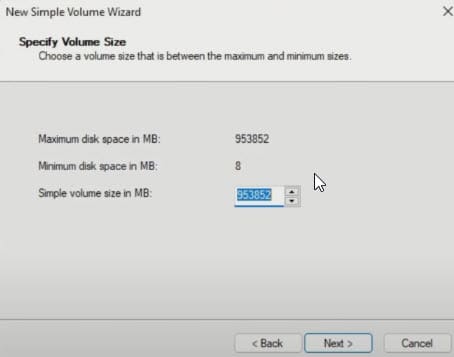
- Right-click the black ribbon and choose New Simple Volume on the context menu.

- Follow the onscreen guidance of the New Simple Volume wizard to complete the installation of NVMe SSD.
Conclusion
So, now you know how to install an NVMe SSD on a laptop or desktop. After formatting the M.2 SSD, your task is to reinstall Windows 11 or 10 on this drive to experience blazing-fast computing.
Learn more about SATA Vs NVMe SSDs here. If you didn’t buy an M.2 SSD yet, check out the best NVMe SSDs here.