
Many Chromebook users complained they were unable to delete images from their laptops. Therefore, Restarting the device rarely helps. Sometimes, the “Delete” option is greyed out and unselectable. If you’re struggling to remove stubborn images from your ChromeOS laptop, pursue the troubleshooting steps below.
Contents
Why Can’t I Delete Images from My Chromebook?
Delete Images from the Folder Where They’re Saved
You need to delete the stubborn images outside of the Images folder. In other words, you need to go straight to the actual folder where your images are saved. For example, instead of browsing the Images folder, go to the Downloads folder.
Go to Files, and under My Files, click on Downloads.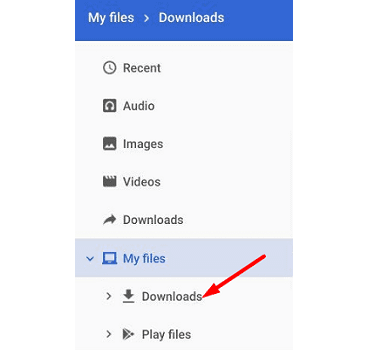
Or maybe you saved your images in the Documents folder. The name of the folder doesn’t really matter. The idea is to delete the pictures from the folder where you initially downloaded them into. Simply select the images you want to remove, and the “Delete” option should be clickable.
Essential things to keep in mind:
- Deleting images and other files from your Downloads folder is permanent. There’s no way you can undo the action.
- Images and files available in the Recent, Images, Videos, and Audio folders are read-only on ChromeOS. That’s why you can’t delete them directly from those folders.
⇒ Quick Tip: To better organize and navigate your folders, you can install a file explorer tool from the Play Store.
Delete Images Using Android Management
Alternatively, you can use Android Management to remove stubborn images if you also have an Android phone.
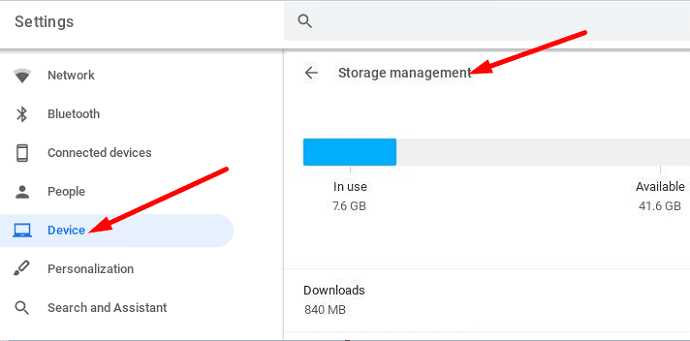
- Go to Settings and scroll down to Device.
- Then select Storage Management.
 Go to Android Management.
- Select the files you want to delete. You can also filter them based on the file type.
- After that, select the files and storage location, and select Recent.
- Simply delete the files.
- If your files have been successfully deleted, they should no longer appear under the “Read Only” tab.
 Go to Android Management.
Conclusion
To delete images and other types of files from your Chromebook, you need to remove them from the folder where you downloaded them into. The files and images listed under the Recent and Images folders are read-only. That’s why the “Delete” button is greyed out and unclickable. Did this quick guide answer your questions? Let us know in the comments below.


Please help! Something in Shared with me under Google Drive is impossible to delete. It’s disgusting and I want it GONE!
useless. How do I delete the files in the downloads folder
I have hundreds of WhatsApp images on my Chromebook. I have deleted the WhatsApp app, but the images remain. How do I delete these? The instructions above do not work.
“Recent” files aren’t really files – it’s just a list of the files you accessed on your Chromebook in the last 60 days.
I think part of the confusion is that historically – “Read-Only” is a file attribute. On Chromebook, “Read-Only” means you cannot directly remove items from the list while you’re on that list; you have to remove the referred file from your Chromebook to amend the list.
If you take any photos or videos with the Chromebook Camera app, those files will appear in the Read-only section in Images and Videos in the Files app. Simply delete or move them from the My files\Camera folder in the Files app to make them disappear from the Read-Only section.
The files don’t really have a read-only flag – they are only effectively read-only in the context of the displayed Chromebook file system when they appear listed as Images and Videos in the Files app.
If you downloaded any audio, images, or videos to Google Drive while on your Chromebook, that will make those files appear as Read-Only. Find out where they are in Google Drive, and delete or move them them from there. They will no longer show up as Read-Only files.
Same as comment above. In recent folder, can’t delete so no use.
The images are nowhere else but my Recent folder, which I can’t delete the images from. So this article did not help me whatsoever.