Twitch chat is one of the core features of streaming on Twitch. Chat lets you interact with your friends, fans, and viewers in near-real-time and lets them chat amongst themselves. This communication with both the streamer and other viewers helps to build up a sense of community that is a key part of the success of many streamers.
One of the difficulties with live chat streams though, especially when combined with a low or non-existent bar of entry, is keeping things civil. In any chat room, no matter how much you try to foster a positive community, you will end up with some people that will try to ruin things for everyone.
To help manage your chat when you’re streaming, you can appoint other trusted users as moderators. These moderators have administrative powers to delete messages from chat and to ban users temporarily or permanently. If your chat room is busy, though, it can be really difficult for your moderators to keep up, even with the “Non-Mod Chat Delay” enabled.
Tip: “Non-Mod Chat Delay” is a setting that allows you to delay chat messages from appearing for users that are not moderators. This is designed to give the moderators the time to be able to review messages and decide if they need to be deleted before other users can see them.
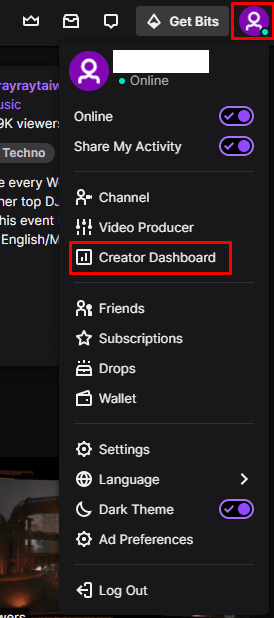
To help your moderators out, Twitch offers an “AutoMod” feature that applies configurable word and phrase rulesets that can hold potentially offending messages pending review by a moderator. You can enable AutoMod in your chat through the creator dashboard. To open the dashboard, click on your profile picture in the top-right corner, then click on “Creator Dashboard”.
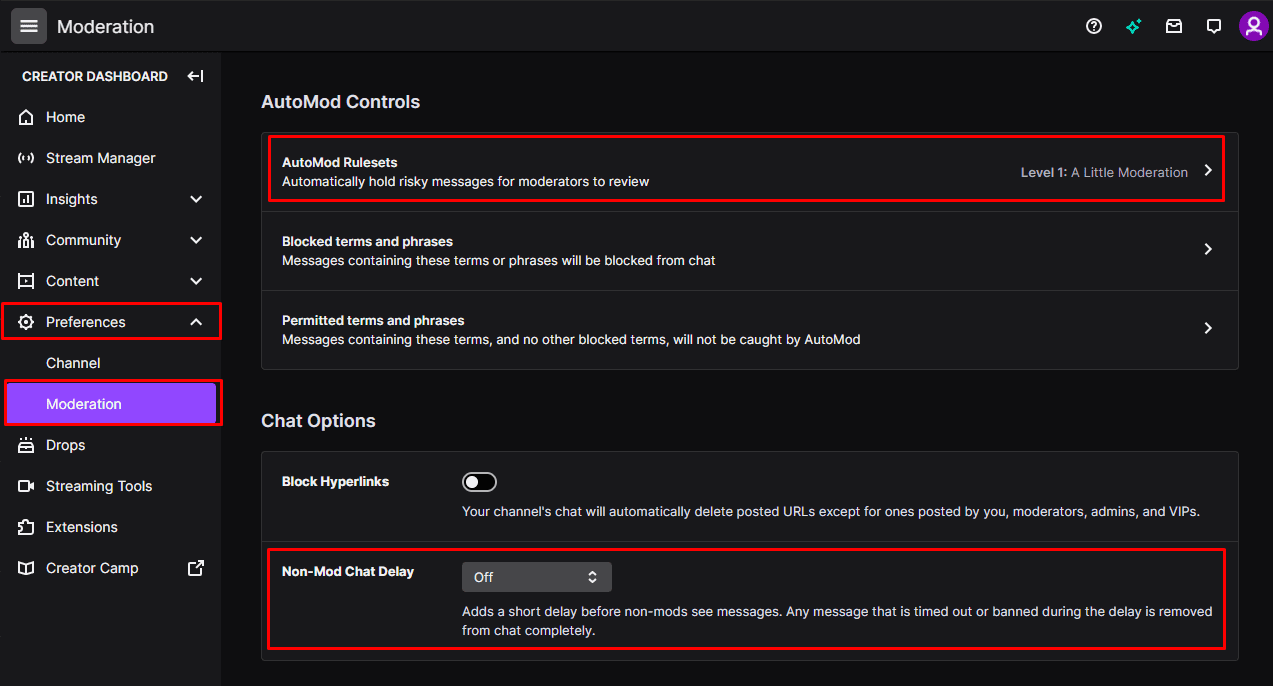
Once in the creator dashboard, expand the “Preferences” category in the left column, then click on “Moderation”. In the “Chat options” section you can find the “Non-Mod Chat Delay” setting, which allows you to apply up to a six-second delay to the chat for non-moderators. To configure AutoMod, click on the top-most setting, “AutoMod Rulesets”.
How to configure AutoMod
In the AutoMod settings, you can adjust the “Your AutoMod Setting” slider to select preset moderation levels. As long as this slider is not set to “Off”, you can then adjust the various categories and levels of moderation to your personal preferences. The categories that you can configure are Discrimination, Sexual content, Hostility, and Profanity. For each of these categories, you can choose between four levels of filtering, or you can disable the filter entirely. By default, AutoMod is set to “Level 1” which only applies the second tier of discrimination filtering. Once you’ve configured the settings the way you want them, be sure to click “Save” in the bottom-left corner to save your changes.
AutoMod will hold and flag messages that contain filtered content for moderators to review. Moderators can allow the message, or choose to block it, at which point the message will be posted to the chat for everyone to see, or not respectively.