• Skip to main content
  • Skip to primary sidebar

Technipages

Tutorials and fixes for smartphone, gadget, and computer problems

  • Topics
    • Android
    • Browsers
    • Gaming
    • Hardware
    • Internet
    • iPhone
    • Linux
    • macOS
    • Office
    • Reviews
    • Software
    • Windows
    • Definitions
  • Product Reviews
  • Downloads
  • About
Slack: How To Configure How People Can Join a Workspace

Slack: How To Configure How People Can Join a Workspace

February 4, 2021 by Mel Hawthorne Leave a Comment

Users are the lifeblood of any Slack workspace. Obviously, without any users, there’s no one to post or read any messages. To be able to add people to your workspace you need to invite them. By default, everyone has to either be specifically sent an email invitation to join or have an invitation link shared with them. This means that each user needs to be specifically invited by someone to be able to join the workspace.

For businesses needing to onboard every new employee, it’s not necessarily ideal to require each new employee to be specifically invited to the workspace. Thankfully, Slack offers an alternative method that allows you to add domain names to an allow list. If anyone with an email address from an explicitly allowed domain tries to sign into Slack, they will have the option to connect straight to your workspace, even if they’ve never been individually invited.

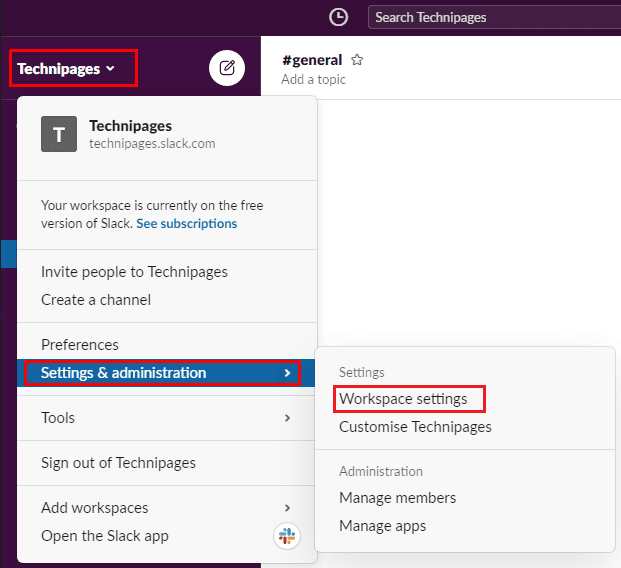
To be able to configure this alternative way of allowing people to join the workspace, you need to browse to the workspace settings and permissions page. To get there, you first need to click on the workspace name in the top-right corner. Next, in the dropdown menu, select “Settings & administration”, then “Workspace settings” to open the workspace settings in a new tab.

To get to the workspace customisation settings, click on the workspace name in the sidebar, then select “Settings & administration” and “Workspace settings”.

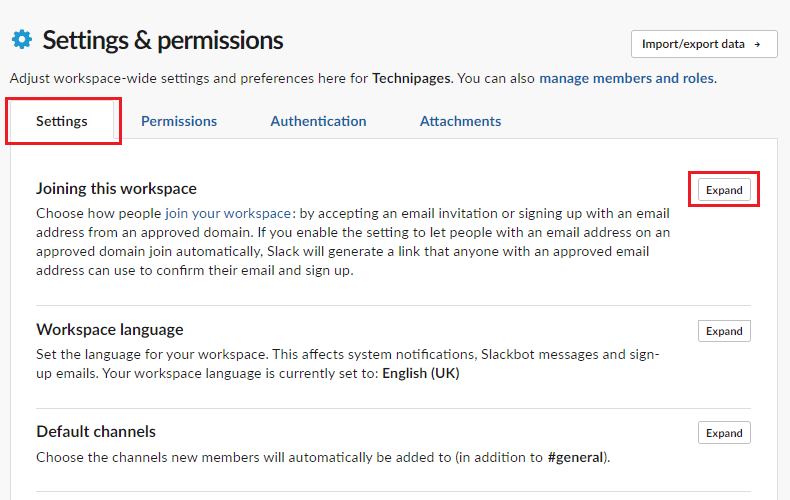
In the default “Settings” tab, click on the “Expand” button for the “Joining this workspace” settings.

Click “Expand” next to “Joining this workspace” in the default “Settings” tab.

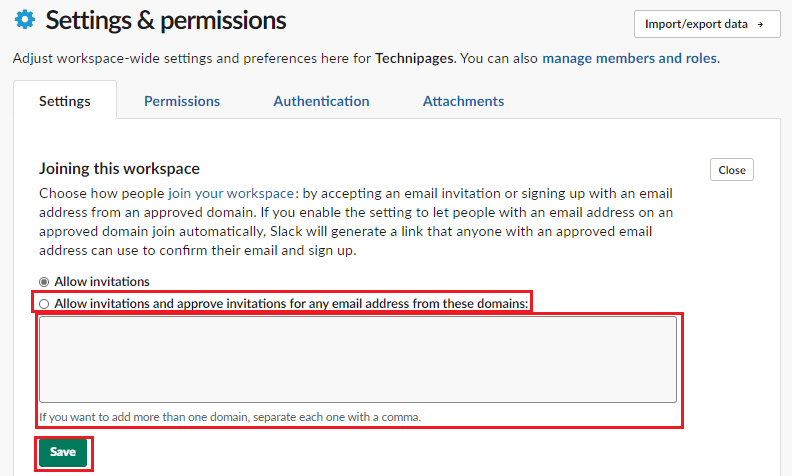
To allow users with email addresses from specified domain names to join the workspace without being invited, click the “Allow invitations and approve invitations for any email address from these domains” radio button. Once you’ve selected that option you can enter one or more domain names for which you want users to be automatically accepted. For example, you’d enter the domain “technipages.com” to allow all Technipages email addresses to join. Click “Save” at the bottom-left to apply the change.

Tip: To add multiple domains to the allow list, separate them with commas.

Click the “Allow invitations and approve invitations for any email address from these domains” radio button, then list the domains you want to be automatically approved, separated by commas.

Requiring each user to be explicitly invited to a workspace can be difficult to manage for a company or community workspace. By following the steps in this guide, you can configure your workspace so that anyone with an approved email address domain name can join without needing to be specifically invited.

You Might Also Like

  • Slack: How To Configure Who Can See the Email Addresses of Workspace Members
    Slack: How To Configure Who Can See the Email Addresses of…
  • Slack: How to Configure Who Can Purchase Paid Subscriptions for Your Workspace
    Slack: How to Configure Who Can Purchase Paid Subscriptions…
  • Slack: How to Configure the Slack Call Settings for Your Workspace
    Slack: How to Configure the Slack Call Settings for Your…
  • Slack: How To Configure Which Channels Users Will Join by Default
    Slack: How To Configure Which Channels Users Will Join by…
  • Slack: How To Configure the Default “One-Click Reactions” in Your Workspace
    Slack: How To Configure the Default “One-Click Reactions” in…
  • Slack: How To Configure Automatic Slackbot Responses for Your Workspace
    Slack: How To Configure Automatic Slackbot Responses for…

Filed Under: Internet, Software

Reader Interactions

Did this help? Let us know!

Your email address will not be published. Required fields are marked *

This site uses Akismet to reduce spam. Learn how your comment data is processed.

Primary Sidebar

Recent Posts

  • How to Send HD Pictures and Videos on WhatsApp
  • How to Share Files Using Google Nearby Share
  • Android Battery Will Not Charge Fix
  • Turning on Triple Touch Zoom on Android
  • How to Connect Outlook 2023 to Gmail
  • Netflix: Change Password
  • Step-by-Step Guide: How to Use WhatsApp on Your Computer
  • Android: Enable or Disable Background Data

Who’s Behind Technipages?

Baby and Daddy My name is Mitch Bartlett. I've been working in technology for over 20 years in a wide range of tech jobs from Tech Support to Software Testing. I started this site as a technical guide for myself and it has grown into what I hope is a useful reference for all.

You May Also Like

  • Join
  • Need a Good Sim Card for The Usa? Here's 8 You Can Buy Right…

© Copyright 2023 Guiding Tech Media · All Rights Reserved · Privacy