

Formatting a USB drive is one of those things that most of us do so rarely, we forget how to do it every time. Fortunately, macOS has simple built-in tools that make it super easy. In this article, we’ll show you how to format a USB drive for use with Windows, Time Machine compatibility, or simply to erase it.
Contents
Using Disk Utility To Format A USB Drive
The simplest way to format a USB on macOS is through the Disk Utility. First, plug your USB drive into your Mac. Depending on which Mac you’re using, you may need to use a flash drive that has a USB C socket or an adapter from USB A to USB C.
Once your USB drive is plugged into your Mac, open Finder. You should see the drive in the sidebar.

Make sure that there are no files on the drive that you wish to keep because the formatting process will erase everything on the drive.
Next, press command + spacebar to pull up Spotlight, type “Disk Utility”, and hit return. This will open the Disk Utility app.

In the sidebar of Disk Utility, click the USB drive you want to format and then click Erase in the toolbar at the top of the window.

A dropdown menu should appear asking you to rename your drive. You can name it anything you like, or simply leave the name the same
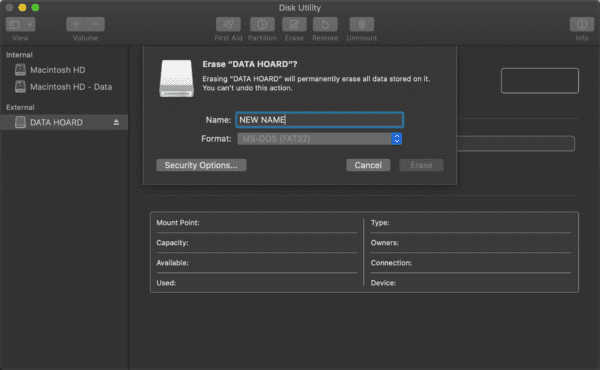
Next, choose the format that you’re going to reformat the drive to. You’ll see the drive’s current format already selected, like so:
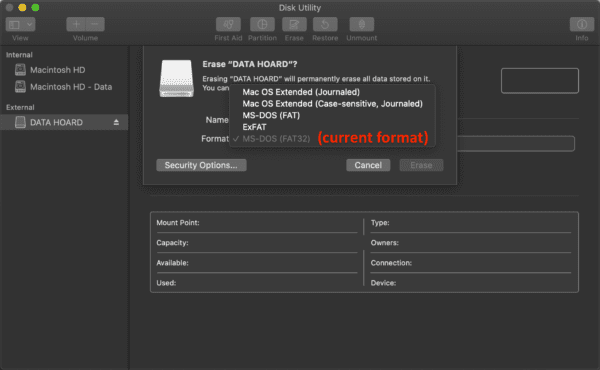
If you’re not sure which format to choose, here are some pointers:
- APFS (Apple File System): This is a relatively new drive format from Apple that is now macOS’s default. It’s secure, simple, and reliable. However, it’s not readable by a non-Apple machine (meaning you can’t plug the drive into a Windows or Linux computer) and Macs running software older than High Sierra won’t be able to read the drive. If none of these things affects you, choose this format.
- Mac OS Extended (Journaled): This was the default Apple drive format before APFS. It’s more or less the same as APFS, just a bit older. You can’t move files to a drive using this format on Windows computers either, but you can view the files on it on a Windows computer, which is a small point for compatibility.
- Mac OS Extended (Case-sensitive, Journaled): This is the same as Mac OS Extended (Journaled), with the exception that you can give your drive a case-sensitive name (“Flash Drive”) instead of an all-uppercase name (“FLASH DRIVE”).
- MS-DOT (FAT): This file format comes with a big benefit and a big drawback. It’s compatible with Mac, Windows, and Linux, making it a great option if you need to move files between the three operating systems. However, MS-DOT (FAT) only allows files that are 4GB or less. And, since it’s a little older, it has no security features.
- ExFAT: The same as MS-DOT (FAT) except that it supports files over 4GB in size.
- NTFS: This is the Windows equivalent to APFS; it’s Windows’s default drive format. A Mac computer can read files on an NTFS drive, but it can not write files to that drive. This is a good option if you’re formatting the drive for a Windows computer.
Finally, there’s Security Options…:

This brings up a slider where you can choose how deleted the files you erase from your drive really are. On the least secure option, a sophisticated program would be able to recover the deleted files, and on the most secure option, it would be more or less impossible for anybody to recover the files. If you’re not in a rush, the most secure option is obviously best, though you should be safe on the least secure setting, unless you have particularly sensitive data on the drive.
All that’s left to do is press erase! Once you do this, Disk Utility will erase all of the data on your drive and format it to your format of choice. How long this takes will depend on how many files you have on the drive, how much storage the drive holds, and which security settings you chose.
And that’s it!
FAQs
What happens when you format a USB drive?
When you format a USB drive on macOS, the computer wipes all of the data off of the drive, making it a blank slate of computer memory. It then configures this memory to whatever format you choose.
Will formatting a USB drive delete my files?
Yes, formatting a USB drive will delete all of your files on that drive (though not the files on the rest of your computer) so make sure you have them backed up somewhere if they are valuable to you. And if you don’t want those files to be saved, choosing the highest security settings when formatting the drive will ensure the erased files are unrecoverable after formatting.
Why would you format a USB drive on macOS?
There are a few reasons to format a USB drive on macOS. First, to prepare the drive for Time Machine; macOS should handle this for you. Second, to make the drive compatible with Windows or Linux devices, as all three operating systems use slightly different USB formats. And third, to erase all of the data on a USB drive.
How do I format a USB drive for Time Machine?
Most USB drives should automatically bring up a prompt for Time Machine the first time you plug them in, assuming they are blank. Otherwise, you can format a USB drive for Time Machine by opening Disk Utility, selecting the drive you want to format, clicking Erase, and choosing the Mac OS Extended (Journaled) format.
Once formatted, open System Preferences, click Time Machine, click Select Disk…, and choose your USB drive from the available options.


i’m trying to copy audio files from my mac Quicksilver G4 (it’s running MacOs 9.0.2)
to an external hard drive or thumb flash drive..