Don’t know how to schedule an email in Outlook? Read on to learn the step-by-step methods for scheduling an email in Outlook.
How many times has it happened to you that you sent an email and regretted not putting more time into writing it?
Also, how many times did your email get lost in the Inbox of the recipient due to a time zone mismatch?
All these problems can be fixed with one feature: scheduling an email. If you’re an Outlook user, let’s learn how to schedule an email in Outlook.
Contents
- 1 Why Do You Need to Schedule an Email in Outlook?
- 2 Can Outlook Schedule Emails?
- 3 Scheduling an Email in Outlook Web
- 4 Scheduling an Email in Outlook App on Windows
- 5 Scheduling Sending an Email in Outlook on Mac
- 6 Scheduling an Email in Outlook on iOS/iPadOS
- 7 Scheduling an Email in Outlook on Android
- 8 Conclusion
Why Do You Need to Schedule an Email in Outlook?
Outlook email scheduling is needed for various reasons. First, you can write an email at your convenient time and schedule that for the best time for the recipient.
If you suddenly remember to write an email, you can do that immediately and schedule it for later instead of setting up a reminder for that task.
Scheduling an email also buys you some time in case you want to change your mind later.
If you’re writing an email describing dissatisfaction with some project or service, email scheduling is the best option. If things improve before the scheduled time, you can delete that email.
Sometimes, we immediately make a decision but want the other party to think that we took our time to believe and wrote the decision in the email.
In this case, email scheduling will help you finish emailing immediately and make the recipient think you sent it after some hours or days.
Can Outlook Schedule Emails?
Since most people are aware of Gmail email scheduling feature, they also want to know, can I schedule emails in Outlook?
The answer is yes. You can schedule Outlook emails for later on the web app, Windows, Mac, Android, and iOS.
Scheduling an Email in Outlook Web
While using the web version of Outlook email, this is how you can schedule Outlook emails.
- Access your Outlook account from the web.
- Click on the New Email button to write a new email.
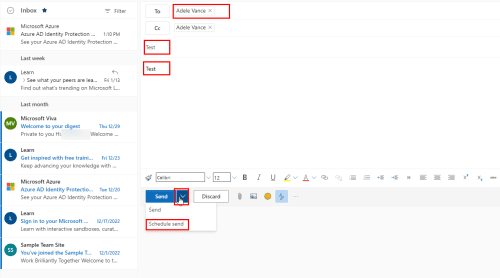
- Compose the email and look below for the Send button.
- Beside it, you’ll see a down arrow. Click on that.
- Choose the Schedule Send option.
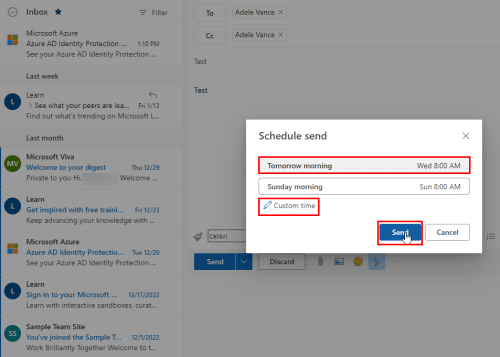
- A new window will pop up showing to predefined date and time.
- You can select any of those or click on custom time.
- Choose any date from the calendar view and preferred time slot.
- Click on the Send button to confirm the scheduled date and time.
Since the email hasn’t been sent, you’ll not find these in your Sent Items. The email will be in Drafts.
When you open it, you can see its scheduled date and time mentioned above the recipient address.
Scheduling an Email in Outlook App on Windows
As a Windows user, you can also schedule your Outlook email on the Outlook app. However, the steps are different from the above method.
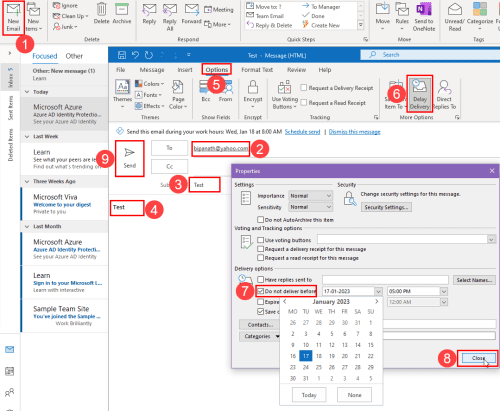
- Open the Outlook app on your Windows PC and click the New Email button.
- Put a subject, compose the email and add the recipient’s address.
- Choose the Options tab to schedule the email instead of sending it immediately.
- Choose Delay Delivery to open the Properties window.
- There, check the box beside Do not deliver before.
- Also, choose the date and time from the dropdown menu.
- Click Close to get back to the email window.
- Click on Send button.
The email has been scheduled. Visit your Outbox folder to edit or cancel this email.
Scheduling Sending an Email in Outlook on Mac
If you use Outlook for Mac for email communication, you can effortlessly schedule an Outlook email. The following method suits 2016, 2019, and 2021 versions of Outlook for Mac.
- Open Outlook for Mac app.
- Compose the email, add recipients, and click the dropdown arrow beside Send button.
- Select Schedule send, and choose the date and time.
- Click OK to complete scheduling.
- The email will stay in the Drafts folder till it gets sent.
Scheduling an Email in Outlook on iOS/iPadOS
You’ll be disappointed if you’re expecting to use the email scheduling feature on the Outlook app on your iPhone or iPad. Unfortunately, Microsoft is yet to offer an email scheduling feature on its iOS Outlook app.
But, using the built-in Mail app on iPhone or iPad that runs on iOS16, you can schedule an email in Outlook. Follow these steps to do that.
- Make sure your Outlook email is added to the Mail app.
- Open the Mail app and create a draft of an email.
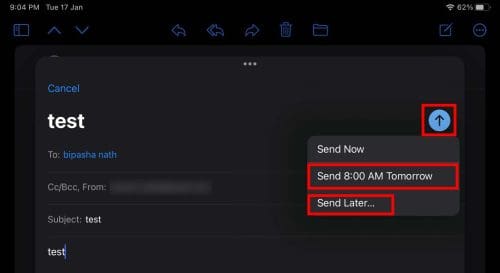
- When done, long-press the Send icon (the blue arrow) on top.
- Besides Send Now, it’ll show you two options for today and tomorrow.
- If you don’t like these quick options, choose Send Later.
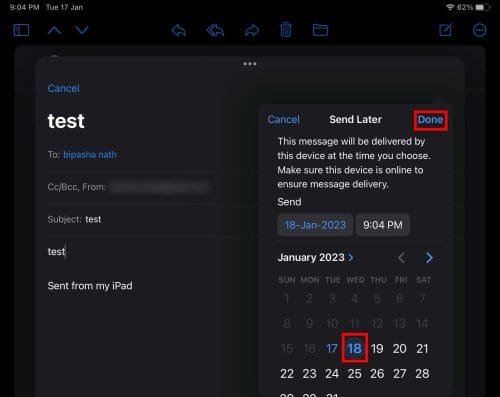
- From the calendar, choose a date and time.
- Tap Done to schedule the email.
For this method to work, your iPhone or iPad device should be turned on at the scheduled time.
Scheduling an Email in Outlook on Android
Even on Android smartphones, Outlook doesn’t offer an email scheduling feature. But the good news is you can add your Outlook email account to the Gmail app and use this feature.
Nevertheless, you need to add your Outlook email to the Gmail account from a computer. Once added, use the native email scheduling feature of the Gmail Android app.
- Now, open the Gmail app and tap on Compose button.
- Select your Outlook email from the dropdown menu of the From field.
- After drafting the email, tap the three dots on the top panel.
- Choose Schedule send.
- You can select any predefined scheduling option or tap Pick date & time.
- Choose your preferred date and time and tap Send.
- The email will get stored in the Scheduled folder. Once sent, it’ll go to Sent Items.
Conclusion
If you’re wondering if you can outlook schedule emails, the answer is yes. The next question in your mind is how to schedule an email in Outlook.
In this article, we discussed how to schedule email sending in Outlook. We mentioned different steps for various devices so that you can perform this task efficiently.
If you have trouble executing these steps, let us know in the comment. Also, don’t forget to check out the solutions to issues that cannot send emails to contact lists.