Autofill is a godsend to many of us… yet can also be a serious privacy concern for others. Whatever your preferences are, they are yours alone and you are not “wrong” for making choices the way you do. I am not here to tell you whether you should or shouldn’t save your addresses and payment information to Chrome. This article is only going to help you understand how to add, edit or completely disable Autofill data in your Google Chrome browser.
Note: This article is going to explain how to do these things via a desktop or laptop.
Contents
Editing Autofill Addresses and Payment Information in Google Chrome
Select ![]() > “Settings“, then go to the “Autofill” section.
> “Settings“, then go to the “Autofill” section.
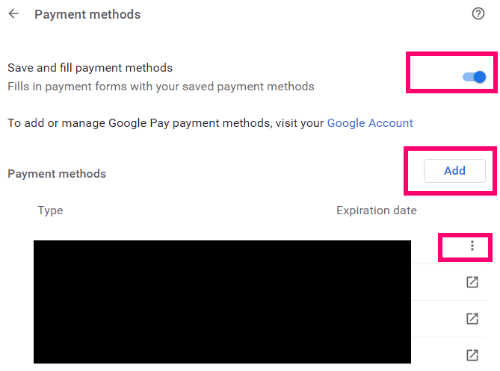
Under ”Payment Methods”, look at ”Save and Fill Payment Methods”. You can turn this off by clicking the blue switch, or edit the cards or bank accounts that are attached to the Autofill. You can even add a new one by selecting the ”Add” button.
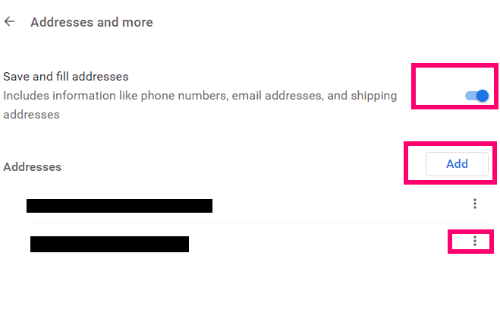
Once you have either edited or turned off Payment Autofill, go back to the ”Autofill” link on the left side of the screen. Now, choose the ”Addresses and More” option. Once again, you can turn Autofill off here, meaning Chrome will no longer automatically fill in your address for you on any websites. If you choose to turn it off, the addresses are not removed: you can turn it on again later.
However, you can easily edit or remove the addresses if you wish. Select ![]() to the right of the address and choose ”Remove”.
to the right of the address and choose ”Remove”.
Turn Off Password Autofill in Google Chrome
Don’t want Chrome to save passwords for you anymore or sign you into sites automatically? Let’s turn that off now, as well. While you still have that last page open, click ”Autofill” on the left again. This time, click on ”Passwords”. Here, you can turn off the options to ”Offer to Save Passwords” and ”Auto Sign-In”. These can both be done… but independently of each other. Or, you can choose one or the other.

If you have chosen to turn off Autofill for all options, you might want to do the next step, as well.
Permanently Remove All Previous Autofill Data From Chrome
If you have just turned off the Autofill options on Google Chrome – even if you deleted payment methods and addresses – you need to clear them from your history. To do this, go up to the top-right of the Chrome page and click the three dots next to your profile photo. Then, hover over ”More Tools” and click on ”Clear Browsing Data”.
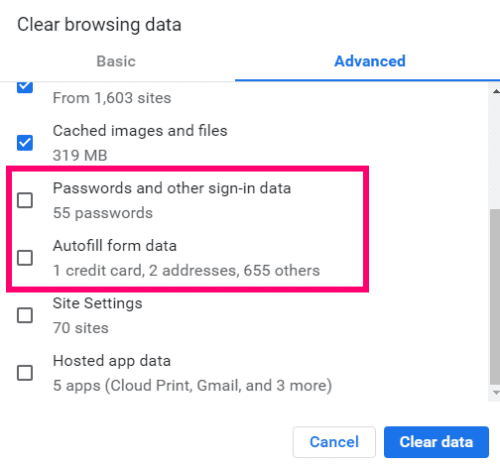
The usual suspects are already checked for you, such as browser history and cache. If you click the ”Advanced” tab and scroll to the bottom, you can check the boxes to delete all passwords, sign-in data and Autofill information. Be sure to choose your time-frame at the top… in this instance, you will likely want to choose ”All Time” from the drop-down menu. Once you have made your choices, select the ”Clear” button – and all of that previously stored information is gone.
At any time you decide you wish to turn Autofill back on for any of these items, simply go back in the way I described above and toggle the buttons back to the ”On” position. Add your current address and/or payment information as needed.
What other privacy or Chrome questions can I help you with? Are you still trying to decide whether or not you love Autofill? Let me know in the comments why or why not!
Happy surfing!