
When adding images to a Word document you have to choose how you want them to interact with the text in the document. By default, images are “In Line with Text” which means that the image is considered to be placed at a specific place in a line of text. Depending on the size of the image, this may end up looking quite awkward and wasting a lot of space. This is because text can only be above, below, or on the same line as the bottom of the image, no text can otherwise be next to it.
To change the word wrapping of a specific image, right-click on it, click or hover your mouse over “Wrap Text” in the drop-down menu, then select your preferred word wrapping option for that image.
Tip: You see how the text will wrap around the image by just hovering your mouse over each of the options. The effect will review in the document, although it will mostly depend on their already being text there to wrap around the image.
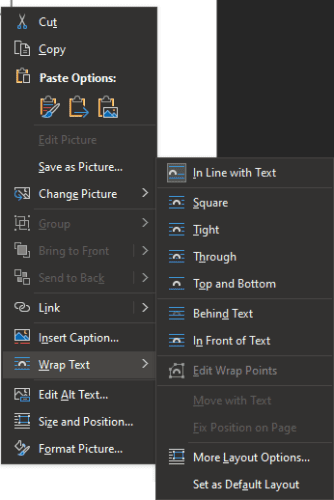
The word wrapping options are: “In Line with Text”, “Square”, “Tight”, “Through”, “Top and Bottom”, “Behind Text”, and “In Front of Text”. “In-Line with Text” is the default setting, and as described above, places the image at a specific point on a specific line.
“Square” allows text to completely wrap around the image, above, below, to the left and right. “Tight” is very similar to “Square” for rectangular images, however, for images in other shapes, “Tight” will wrap text following the shape of the image.
“Top and Bottom” allows text to be wrapped above and below the image, but no text can appear on either side. “Behind Text” overlays text over the image, conversely “In Front of Text” overlays the image on the text, obscuring it.
“Through” is similar to “Tight” however, if you also make use of the “Edit wrap points” functionality on the same menu, you can have the text wrap into whitespace inside an image.
Tip: “Edit Wrap Points” allows you to specify the outline of the image to which the text should wrap. It’s only available for certain types of word wrapping.
If you prefer a certain type of word wrapping and want to set it to be the default, you can do so by clicking “Set as Default Layout” at the bottom of the same menu.


I want to remove ALL text wrapping from an image. Did I miss something?
PattyBeth
Hello,
Thanks for your post – I was so excited to see there was a way to set a new default for image wrapping. Unfortunately, however, I’m using Word 365 for Mac (v 16.48) and that option is not available! The entire menu looks just as you have posted, except I’m missing the final line below “More layout options”, which should be “Set as default layout.” Any help to find it would be greatly appreciated!
Thank you.
Sincerely, Kevin