

Suppose your Excel columns contain a lot of characters. In that case, you can manually adjust their width by dragging the border of the column header. But doing that constantly can become a time-consuming task. Let’s see how you can automatically adjust column width in Excel.
Contents
How to Make Excel Columns Expand to Fit Text Automatically
You can use the AutoFit feature to automatically adjust the column width in Excel.
- First, select the column for which you want to enable this feature.
- Then click on the Home tab.
- Click Format in the Cells group.
- Under Cell Size, select AutoFit Column Width.

Excel will now automatically change the column width to accommodate text. There’s also a shortcut that you can use to get the job done. Simply select the column that you want to autofit, and then press the ALT, H, O, and I keys one after the other.
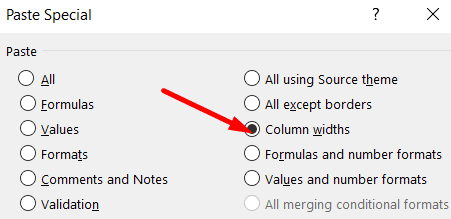
If you want to copy that width to another column, you can use the Paste Special option.
- Copy any cell from the column that has the right width. Simply select the cell and then use the Ctrl + C shortcut.
- Then right-click on a cell in the target column and select Paste Special.
- Make sure to check the Column widths option.

- Hit OK.
What If AutoFit Is Not Working?
If your column contains merged cells, you can’t use the AutoFit option. The same is valid if the Wrap Text option is selected. The only thing you can do is manually adjust the column width.
Conclusion
To automatically adjust column width in Excel, select your column, click on Format, and select the AutoFit Column Width option. Alternatively, you can also use the ALT, H, O, and I shortcut. Remember that the AutoFit option won’t work if your column contains merged cells or wrapped text.
Did you manage to adjust column width in Excel? Let us know in the comments below, and don’t forget to share this quick guide on social media as well.


This is not “automatic”. This requires manual activation of the function each time a user wants to have the column re-size itself to fit contents by width. Re-title this “How to use the built-in AutoFit Column Width function.”