

When you try to access a particular web page, launch a web app, install the latest updates, or do anything that requires an Internet connection, you may sometimes get a strange error. That error may say the device or resource you’re trying to access is not responding. Let’s see how you can solve this problem.
Fix: Your Computer Appears to Be Correctly Configured, but the Device or Resource Is Not Responding
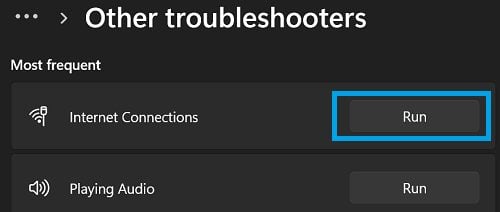
Run the Network Troubleshooter
Run the built-in Network Troubleshooter and check if the tool can detect and repair your network problems.
- Go to Settings.
- Click on System.
- Select Troubleshoot.
- Scroll down to Other troubleshooters.
- Then, select and run the troubleshooters for Internet Connections and Incoming Connections.
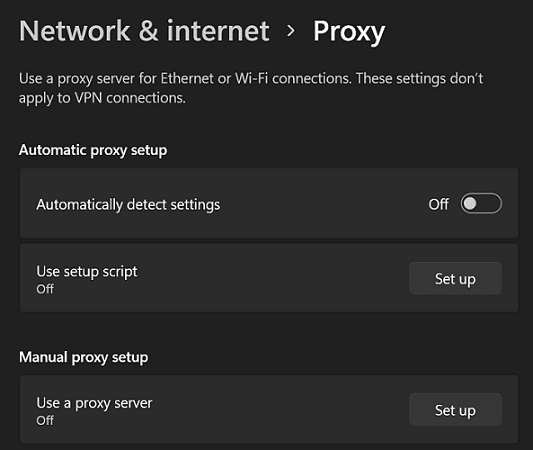
Disable Browser Proxy Settings
Disable your browser proxy server settings, and check if this solution solves the problem.
- Go to Settings.
- Select Network & Internet.
- Scroll down to Proxy.
- Disable Manual and Automatic proxy setup.

- Restart your browser, and check if the error persists.
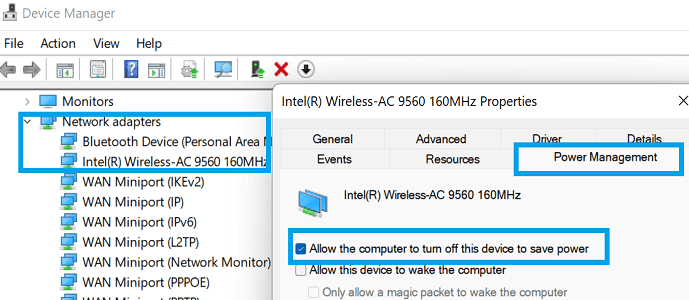
Disable the Power Saver for Your Network Adapter
- Open the Device Manager.
- Expand Network adapters.
- Then, right-click on your current network adapter.
- Select Properties.
- Click on the Power Management tab.
- Clear the power saver checkbox to prevent your PC from turning off the network adapter.

- Save the settings, and try again.
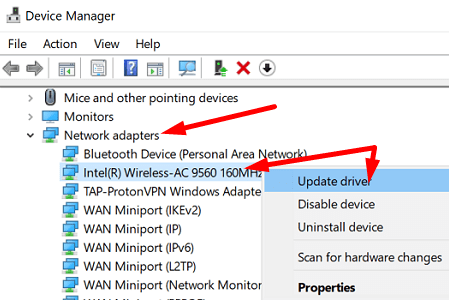
Update Your Network Drivers
- Go back to the Device Manager.
- Right-click on your Network adapter.
- Select Update driver.

- If the issue persists, right-click again on your Network adapter.
- Select Uninstall device.
- Restart your computer to reinstall the network driver.
Flush Your DNS
Flush your DNS to refresh your network connection.
- Launch Command Prompt as an administrator.
- Run the following commands one by one:
ipconfig /flushdnsipconfig /registerdnsnetsh winsock resetnetsh int ip resetipconfig /renew
- Exit Command Prompt.
- Restart your computer, and check the results.
If the issue persists, unplug your router and leave it unplugged for one minute. Then, plug the device back in, and check your connection.
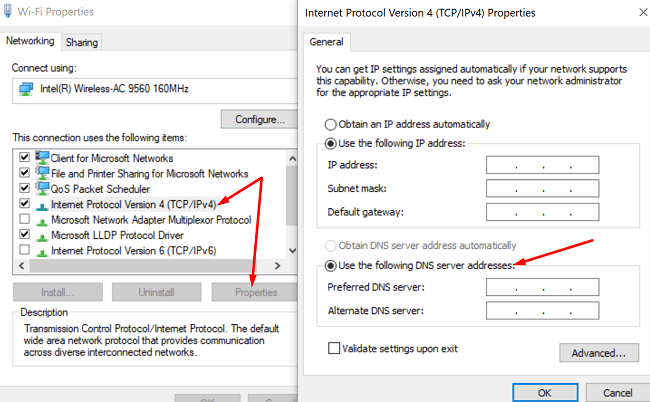
Change Your DNS Settings
Change your DNS server settings and switch to Google’s standard DNS addresses.
- Go to Control Panel.
- Select Network and Internet.
- Then, select Network and Sharing Center.
- Click on Change adapter settings.
- Select your connection.
- Click on the Networking tab.
- Go to Advanced.
- Select the DNS tab.
- Then, select Use the following DNS server addresses.
- Set DNS server 8.8.8.8 as your preferred network.
- Set DNS server 8.8.4.4 as your alternate DNS network.

- Save the settings, and check if you’re still getting the same error.
Conclusion
If your computer is configured correctly, but the device or resource is not responding, run the Network troubleshooter. Then, disable your browser proxy settings, and turn off the power saver for your network adapter. Additionally, update or reinstall your network driver. If the issue persists, flush your DNS, and change your DNS settings to use Google’s standard DNS server addresses.
Did you manage to solve the problem? Hit the comments below and let us know which solution worked for you.

works updating the network card but after restart all was back. works also with changing the DNS from auto to 8.8.8.8/8.8.8.4
If your computer is configured correctly, but the device or resource is not responding, run the Network troubleshooter. Then, disable your browser proxy settings, and turn off the power saver for your network adapter. Additionally, update or reinstall your network driver.
Thanks so kindly for your guidance. I got my problem fixed after the 2nd attempt.
This actually worked! Thank you so much!
THANK YOU SO MUCH THIS WAS A LIFESAVER!!!! i have been looking for solutions for hours on end, slowly losing my mind to try and find solutions and this page helped a TON. thank you so so much