Skype for Business may sometimes fail to send attachments. When that happens, the file initially seems to load for a few seconds but then the “Error in transfer” message appears on the screen. Let’s dive in and see what you can do about this problem.
Contents
How to Fix Skype for Business File Transfer Failed
Check the File Name Extension
Keep in mind that Skype for Business prevents users from sending files with certain filename extensions. More specifically, the following extensions are not supported: ade, adp, app, asp, bas, bat, cer, chm, cmd, com, cpl, crt, csh, exe, fxp, grp, hlp, hta, inf, ins, isp, its, js, jse, ksh, lnk, mad, maf, mag, mam, maq, mar, mas, mat, mau, mav, maw, mda, mdb, mde, mdt, mdw, mdz, msc, msi, msp, mst, ocx, ops, pcd, pif, pl, pnp, prf, prg, pst, reg, scf, scr, sct, shb, shs, tmp, url, vb, vbe, vbs, vsd, vsmacros, vss, vst, vsw, ws, wsc, wsf, wsh.
In other words, if you’re trying to send a file that has one of the filename extensions listed above, don’t be surprised if you can’t send them via instant messaging. Try to convert that file to a different format or manually edit the filename extension.
Contact Your IT Admin
If your IT admin has disabled the file transfer option on your user account, you won’t be able to send files via IM. Contact your admin and ask them to check the file transfer settings for your account.
Additionally, there’s also the possibility that the recipient doesn’t have the necessary permission to receive files from other users. In this case, the recipient should contact their admin for further assistance.
Clear the Skype for Business cache
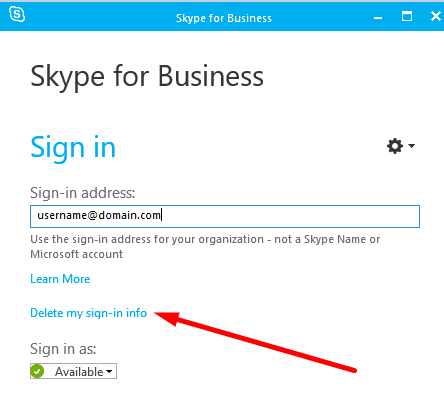
- Exit Skype for Business completely.
- Then click on Delete my sign-in info to remove any sign-in information.

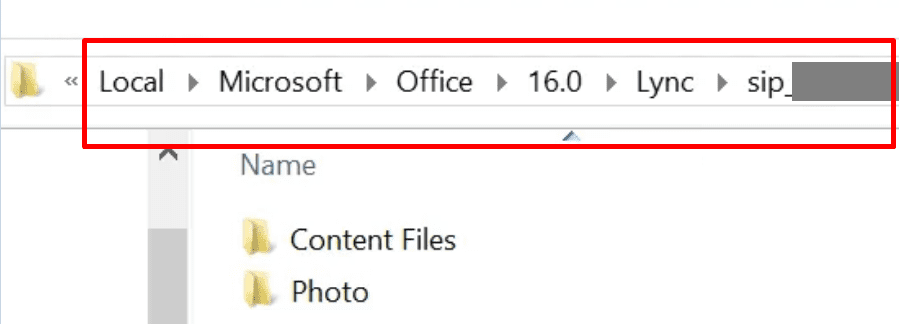
- Go to Users\UserName\AppData\Local\Microsoft\Office\16.0\ Lync.
- Go ahead and delete the sip_profileName folder.

- Then delete all the files from the Tracing folder. However, don’t delete the folder itself, you need to keep it.
- Launch Command Prompt and run the ipconfig /flushdns command.
Change the MaxUserPort Value
A number of users solved this error by changing the MaxUserPort value.
- Type regedit in the Windows Search bar and open the Registry Editor.
- Then navigate to HKEY_LOCAL_MACHINE\SYSTEM\CurrentControlSet\Services\Tcpip\Parameters.
- Click on Parameters without expanding the list.
- Locate the MaxUserPort parameter and check if it’s already defined.
- If it’s not, create a new DWORD key and name it MaxUserPort.
- Right-click on it and select Modify.
- Select Decimal and then set its value to 5000.

- Apply the changes and check the results.

Conclusion
If you can’t send files on Skype for Business, make sure the app supports the filename extension of the file you’re trying to send. Then, clear the app cache, and ask your IT admin to check your account’s file transfer settings.
Do let us know how the troubleshooting process went for you. Feel free to use the comments below.