

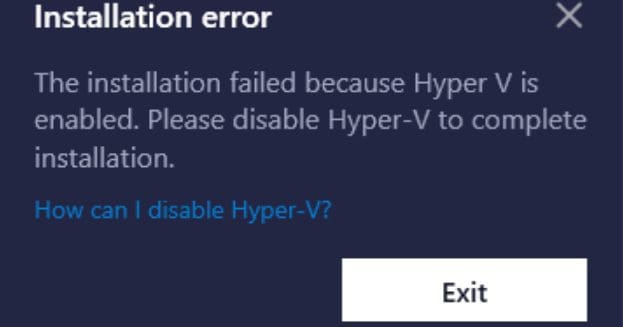
When you try to install BlueStacks or update your BlueStacks version, you may sometimes get an error message that says, “The installation failed because Hyper V is enabled.” You’re then asked to disable Hyper-V to complete the installation process. Let’s see how you can quickly do that and solve the problem.
Contents
Fix: BlueStacks Won’t Install, Hyper V Is Enabled
Disable Hyper V
First things first, disable Hyper V and try to install BlueStacks again.
- Click on the Windows Search icon.
- Select Turn Windows features on or off.
- Untick the Hyper V checkbox to disable this feature.

- Save the changes and check if you can install BlueStacks.

If the issue persists, go back to Turn Windows features on or off and disable the following features: Windows Hypervisor Platform, Windows Sandbox, Virtual Machine Platform, and Windows Subsystem for Linux.
Force-Stop All Hyper V Services
If you’re still getting the same error, open the Services App and turn off all the Hyper V services still running in the background.
- Click on the Windows Search icon.
- Type services and double-click on the Services App.
- Locate all the Hyper V services.

- Then, right-click on each service and select Stop.
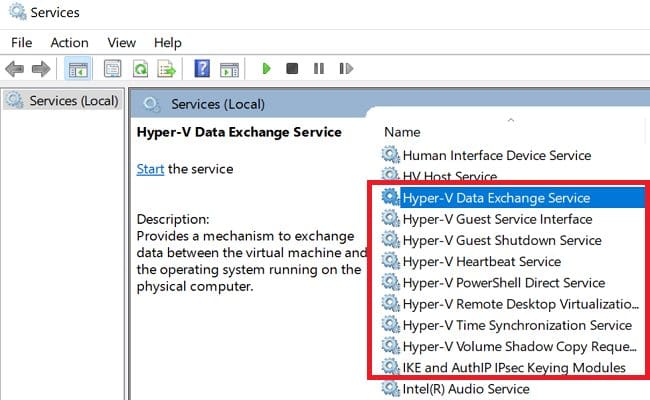
Depending on your current configuration, you may need to stop the following services:
Hyper-V Data Exchange ServiceHyper-V Guest Service InterfaceHyper-V PowerShell Direct ServiceHyper-V Time Synchronization ServiceOther Hyper-V services
Install the Latest OS and Driver Updates
Be sure to update your OS and drivers to the latest version. Go to Settings, select Windows Update, and hit the Check for updates button.
Outdated graphics drivers often cause various errors and glitches on your computer. Launch the Device Manager, and expand the list of Display Drivers. Right-click on your graphics driver and select Update driver.

If there’s an exclamation mark next to other drivers, repeat the steps above to update them.
Repair System Files
Corrupted system files may sometimes prevent you from installing new programs or changing your settings. Launch Command Prompt with admin rights, and run DISM and SFC to repair your files.
Use the commands below to get the job done: DISM.exe /Online /Cleanup-Image /Restorehealth and sfc /scannow. Restart your machine and try again.
After following all the steps above, contact BlueStacks Support if the issue persists.
Conclusion
If BlueStacks won’t install because Hyper V is enabled, disable the service. Additionally, launch the Services app and force-stop all the Hyper V services running in the background. Then, update your OS and driver to the latest version. You can also run DISM and SFC to repair faulty system files.
Did you manage to disable Hyper V and install or update BlueStacks? Let us know in the comments below.


You need to activate virtualization from BIOs
Don’t have Hyper-V enabled at all. (Windows 10) But still facing problems in starting Bluestacks.
Unable to use hardware-assisted-virtualization when Hyper-V is enabled. Please disable Hyper-v.
LOL. There’s nothing to disable if it’s already disabled. Strange.