Your computer case is an often-overlooked component in a PC build. A good choice can offer excellent airflow, flexible cooling options, plenty of space, and decent connectivity. A weak choice may starve your components of cool fresh air. And may limit your options in layout, hardware, and connectivity. While having good front panel connectivity is important, it’s not necessarily the be-all and end-all. That’s because all computers have extra connectivity that your choice of a case isn’t limited.
Motherboards are designed to be mounted so that their rear I/O panel is accessible through a standard gap left in the back of the case. Here you’ll often find a broad range of connectivity. The same connectivity options you have will depend on your choice of motherboard. All new motherboards, however, will come with one specific custom piece of hardware, the I/O plate.
The I/O Plate
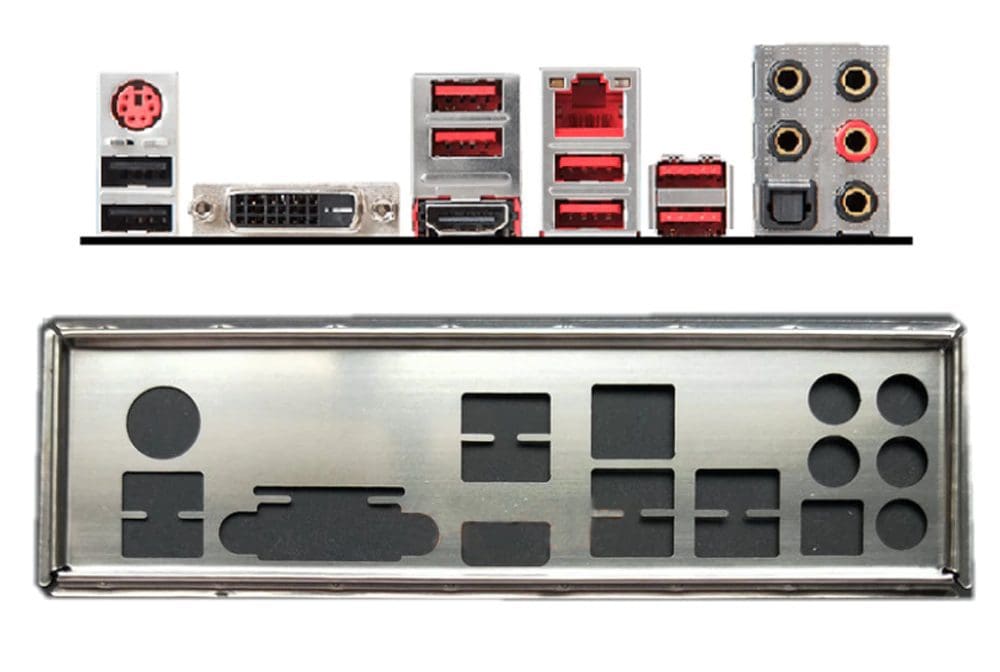
The I/O plate, sometimes called the I/O shield, is a small rectangular sheet of metal designed to fill the gap in the case left for the rear I/O. Critically, it also has holes punched out of it that precisely fit the ports your motherboard offers on the rear I/O panel. The I/O plate serves two primary purposes. Firstly, it helps seal the left gap for the rear I/O.
This helps to prevent dust and other things from getting inside your computer case, getting it dirty and reducing the cooling efficiency. Its secondary function is basically aesthetic. A large gap at the back of your computer doesn’t look great. Covering it up helps it look neater. To the point where people that haven’t built their own computer might not even realize it’s not an integrated part of the motherboard or case.
Note: “I/O” is short for Input/Output and refers to connectivity hardware. In this case, the rear I/O panel is the collection of USB ports, ethernet ports, and potentially an HDMI port that your motherboard directly offers. On standard motherboard layouts, they are always located on the top of the left edge of the motherboard.
In many cases, the I/O plate is a thin-cut metal sheet. Some motherboards, however, may instead offer silver plastic I/O plates. Sometimes, the I/O plate may also have a thin foam layer. This provides some simple vibrational dampening. Some motherboard manufacturers will print small labels next to some or all ports. These will often indicate which USB ports are high-speed or designed for BIOS flashing, for example.
How to Install an I/O Plate
First things first, it is critical to ensure that your I/O plate fits your motherboard. All new motherboards should come with a matching I/O plate from the manufacturer. However, if you buy a motherboard second-hand, you may find the I/O plate missing. Depending on your motherboard, you may be able to find its I/O plate or at least a compatible one online. You may also be able to request one from the motherboard manufacturer. Or potentially even the second-hand seller of the motherboard.
If you can’t find a compatible I/O plate, you may want to look into configurable ones. For example, there is a mesh I/O plate that you can cut relatively easy to shape, though it can be fiddly and time-consuming. This solution isn’t perfect but would help prevent some dust from getting into your case.
The correct time to fit the I/O plate is at the start of your PC build. It needs to be between your case and motherboard. This generally means mounting it there before you screw the motherboard into the case. Your motherboard user/installation guide should have the exact instructions for your model.
If you’re in a situation where you’re trying to retrofit an I/O plate, you don’t really have many great options. If your I/O plate is remarkably flexible, you may be able to wedge it into the proper position without even opening the case.
Realistically, however, you’ll probably need to unmount the motherboard to be able to insert the I/O plate. You may be able to do so by just loosening most of the mounting screws rather than removing the whole thing. Unfortunately, other PC components such as the CPU cooler and GPU block access to the motherboard mounting screws making access to them reasonably complicated.
Conclusion
The I/O plate – also called the I/O shield – is a cover for the rear I/O gap left in PC cases that have holes punched out to be compatible with your motherboard model. It’s designed primarily to prevent dust from getting into the case via the rear I/O cut-out.
Every motherboard should come with one. You may be able to find replacements online if you don’t have a compatible I/O plate, though, be very careful to check that it’s compatible with your motherboard. The I/O plate needs to be installed between the motherboard and the case, meaning it needs to be applied as you mount the motherboard to the case.
Retrofitting an I/O plate in a completed computer build is likely to be relatively tricky, potentially involving disassembling a good part of the computer. Don’t forget to leave your thoughts in the comments below.