• Skip to main content
  • Skip to primary sidebar

Technipages

Smart phone, gadget and computer tutorials

  • Topics
    • Android
    • Gaming
    • Hardware
    • Internet
    • iOS
    • MacOS
    • Office
    • Software
    • Windows
    • Definitions
  • Product Reviews
  • Downloads
  • About
Samsung Galaxy S21 Plus: How to Connect or Leave a WiFi Network

Samsung Galaxy S21 Plus: How to Connect or Leave a WiFi Network

Posted on February 18, 2021 by Judy Sanhz Leave a Comment

Unless you have an unlimited plan, you’ll need to connect to a WiFi network sooner or later. By doing so, you can save some mobile data, and hopefully, you’ll have enough to get to the end of your billing cycle. You have three options when it comes to connecting to any WiFi network.

You can use Quick Settings, Connection Settings, or by using a QR scanner. The more options you have, the better. That way, you can choose the best path at any given time.

How to Connect to WiFi Network Using Quick Settings

To connect to a WiFi network through Quick Settings, swipe down from the top of your display and enable the WiFi Settings. When it’s on, tap on the word WiFi. Here you’ll see a list of available networks. Tap on the network you want to connect to.

Once you’ve selected a network, you’ll need to enter a password. To ensure that you can see the password you’re entering, make sure the eye icon is not crossed out.

That way, you’ll see every character you enter and not dots. Below the password option, you’ll see additional options. For example, you have the Auto-reconnect option and some advanced options. You can make adjustments to options such as:

  • IP settings
  • Proxy
  • Metered network
  • MAC address type
  • MAC address

How to Connect to a WiFi Network Using the Connection Settings – Galaxy S21

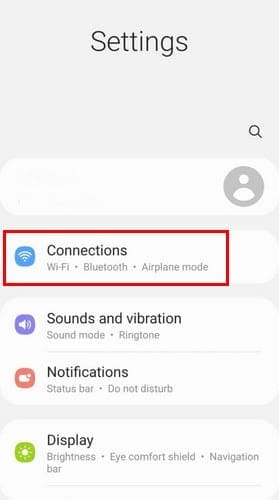
Just in case you’re having trouble connecting with the first method, you can always try the Connection Settings. Go to your phone’s Settings, followed by the Connections option.

Turn on the WiFi settings and tap on the work WiFi. Now, choose the WiFi network you want to connect to and type in the password. Don’t forget to tap on the Connect button.

How to Connect to a WiFi Network Using a QR Code – Galaxy S21

The easiest way to connect to a WiFi network is using a QR Code. To try this method out, swipe down from the top of your display and tap on the QR Code option in Quick Setting. Tap Ok. Point the camera so that it can scan the QR code. When the pop-up message appears, tap on it to connect to the network.

If you don’t see those options, you can also go to Settings > Connections > WiFi. Tap on the QR code icon at the top right and scan the QR code to log onto the network.

Conclusion

The more options you have for something, the better. You’re always doing something different on your phone, and by having more options, you can choose the one that best fits you at the moment.

You Might Also Like

  • How to Connect Samsung Galaxy S8 to TV
    How to Connect Samsung Galaxy S8 to TV
  • How to Connect Samsung Galaxy S5 to TV
    How to Connect Samsung Galaxy S5 to TV
  • Connect Samsung Galaxy S7 to TV
    Connect Samsung Galaxy S7 to TV
  • How to Connect the Samsung Galaxy S10 to Mac or PC
    How to Connect the Samsung Galaxy S10 to Mac or PC
  • Samsung Galaxy Z Fold 2: How to Connect to PC
    Samsung Galaxy Z Fold 2: How to Connect to PC
  • How to Connect Samsung Galaxy Note8 or S8 to Computer
    How to Connect Samsung Galaxy Note8 or S8 to Computer
  • What to Do When You Can't Connect to WiFi - Android
    What to Do When You Can't Connect to WiFi - Android
  • How to Stay Safe When Using a Public WiFi Network
    How to Stay Safe When Using a Public WiFi Network
  • Connect Bluetooth Headphones to Samsung Gear S3
    Connect Bluetooth Headphones to Samsung Gear S3

Filed Under: Android Tagged With: Android 11, Samsung Galaxy S21, Samsung Galaxy S21 Plus

Reader Interactions

Did this help? Let us know! Cancel reply

Your email address will not be published. Required fields are marked *

This site uses Akismet to reduce spam. Learn how your comment data is processed.

Primary Sidebar

Recent Posts

  • Fix Skype Error: Exchange Needs Your Credentials
  • Fix Skype Notifications Not Working on Windows 10
  • Teams in Outlook: We Couldn’t Schedule the Meeting
  • VR Oculus Quest 2: How to Configure a New Room-Scale Boundary
  • VR Oculus Quest 2: How to Adjust Boundary Sensitivity
  • Dropbox: How To Change the Date Format
  • Microsoft Teams: There Was a Problem Saving the Photo
  • VR Oculus Quest 2: How to Set up Oculus Link

Who’s Behind Technipages?

Baby and Daddy My name is Mitch Bartlett. I've been working in technology for over 20 years in a wide range of tech jobs from Tech Support to Software Testing. I started this site as a technical guide for myself and it has grown into what I hope is a useful reference for all.

Follow me on Twitter, or visit my personal blog.

You May Also Like

  • Ring Network
  • Physical Network
  • Class B Network
  • Public Data Network (PDN)
  • Packet-Switching Network
  • Best 7 Upcoming Samsung Phones

© Copyright 2021 Technipages · All Rights Reserved · Privacy