
Nearly all of us these days have hundreds – if not thousands – of digital photos stored on our phones, tablets and computers. Not all of these pictures may be the size we need for printing or sharing purposes. Resizing that many snaps one at a time could take you all day… or several days, even! Thankfully, there are multiple options for batch resizing multiple photos at once! You can use Windows, macOS, or any of a number of free online photo editors.
In this article, I am going to show you how to batch resize using both Windows and Mac as well as two separate free online photo editing programs. Let’s get to it!
Contents
How to Resize Multiple Images at Once in Windows
The best part of doing this is that not only will the actual size of your photos be changed, the file size will be reduced. This saves space on whatever medium you have them stored on.
Performing this is easiest if you have all of the photos you wish to resize in one folder. Right-click on your desktop (or in your Documents or Photos folders) and choose ”New Folder” and give it a name.

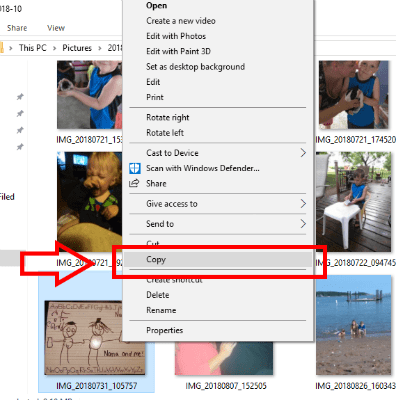
Head into your photos and choose all of the ones you wish to resize. If you are not sure how to select multiple photos at once, never fear! Click the first photo, then hold down your ”CTRL” key and continue single-clicking on each photo you wish to resize. Once you have chosen them all within a specific folder, let go of the CTRL button and right-click on any of the photos and choose ”Copy”.
Now, go back to your desktop and double-click to open the folder you created. Once it is open, right-click anywhere and choose ”Paste” so that the photos you just copied automatically show up there!
If you have photos in other folders you wish to resize in this batch, follow the steps above until everything you need is in your new folder. Now…
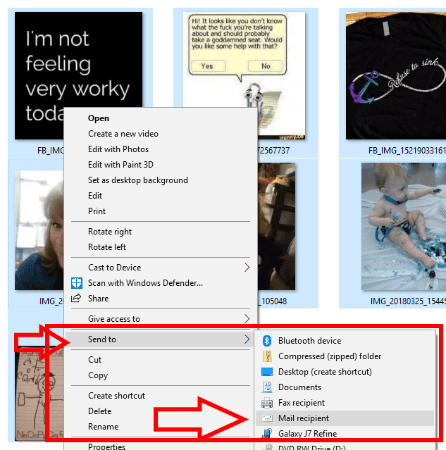
With your new folder open, click on ONE of the photos. Then, hold down the ”CTRL” button and press the ”A” key. This will select all of the photos quickly for you. Now, right click on one photo, choose ”Send To” and then ”Mail Recipient”. Don’t worry – we aren’t actually emailing these!
A little window to attach files will show up now. Choose the size you wish to change the photos to here.
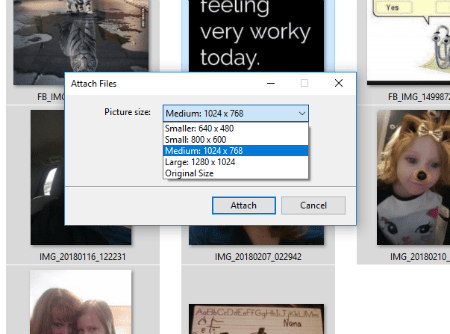
The window will show the quick progress and then a box will likely appear stating there is no program associated to use. That’s okay – we don’t need one! If you do use Outlook or Thunderbird or another email program, ignore it when it opens.
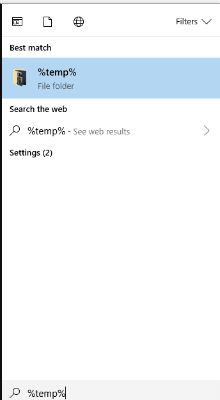
Go to your search box in Windows and type %temp%. You’ll see an option to open up your Temporary folder. Go ahead and click it and voila! Your resized photos are right there!
How to Resize Multiple Images at Once Using Mac
- Select all of the photos that you need to resize.
- Right-click them and choose “Open with Preview”.
- When you are in Preview, click on “Edit” and then choose “Select All”.
- After all the pictures are selected, head up to “Tools” and select “Adjust Size”.
- Select the “Scale Proportionally” box so that your photos are not all wonky looking.
- Enter the dimensions you wish to use for your snaps.
- Hit “Save” and then just close it all out and you are finished!
How to Resize Multiple Images at Once Using PicResize
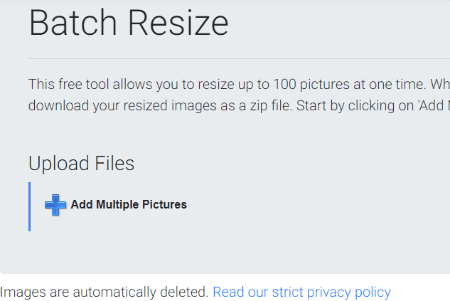
PicResize makes changing the dimensions of multiple photos so simple! Head over to the site and click on either ”Batch Resize” at the top of the page or ”Multiple Photos” on the right.

Now, click on ”Add Multiple Pictures”.
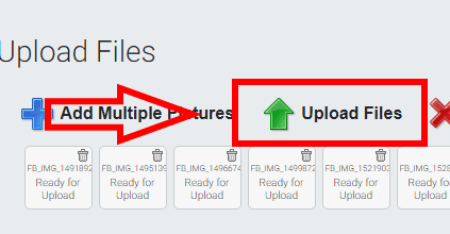
Select all of the photos you need and tap ”Add”. You’ll next see the following box… you will want to click on ”Upload Files”.
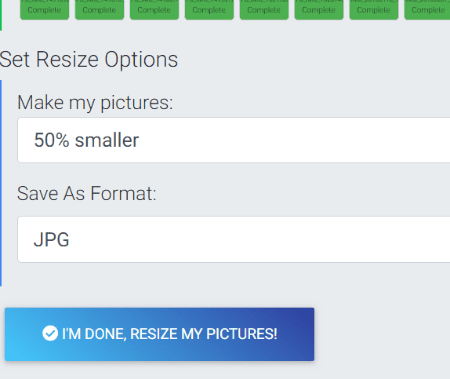
After they have all uploaded (the time this takes depends on the number of pics you are uploading as well as your Internet speed), you will need to choose the size you wish to reduce them to as well as the format of the finished product (such as .JPG or .PNG). As soon as you have made your choices, click on that pretty blue ”I’m Done! Resize My Photos!” button.
You will now see the progress of the resizing going on. IMPORTANT NOTE: on this page, right underneath the progress meter, you will see where it states that all of your photos will be immediately deleted, along with a link to the privacy policy. You do not have to worry about the website having your pictures floating around the interwebs for others to see and use.
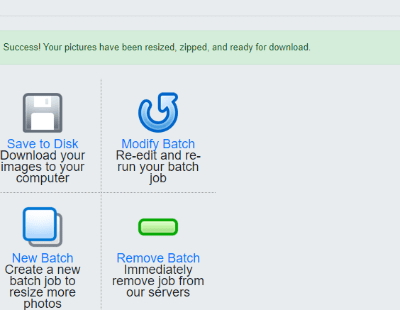
The last step will be a window that opens telling you that all the snaps have been successfully resized. You are now able to download to your computer in a zipped file, re-edit what you just did (to change the file type or size), create a whole new batch and then delete immediately from servers.
You’re all done!
How to Resize Multiple Images at Once Using Bulk Resize
This is another free website that allows you to quickly resize a large amount of pictures, and the last method I will show you today. This one is my personal favorite to use because it is so simple and fast, and does not even upload your pictures to a website or server. The photos are changed right on your computer!
Head over to Bulk Resize, and then you will immediately click the green ”Choose Images” button.

Your picture folder will open, allowing you to select everything you need to. You will then be taken to the following page:

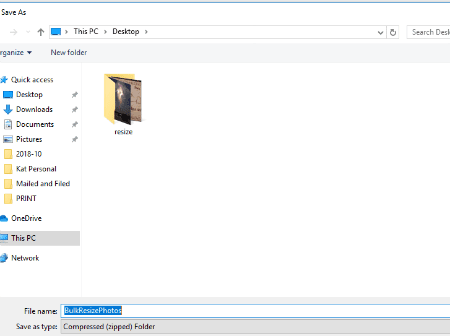
You can choose between several options here. The first is ”Scale”. The lets you simply reduce the photos by whatever percentage you choose. Next up is ”File Size”. This option is honestly only used if you are worried about saving some space on your computer or device. The third option is ”Exact Dimensions”. Keep in mind these dimensions are in pixels, not inches! You can also use one of the last three options if you are more comfortable with manipulating images. However, I highly suggest using either the first or third option here. As soon as you click the go button, your photos are resized and a box will pop up asking you where on your computer to save the finished product, which will be in a zipped folder.
What’s your favorite way to resize photos? What other questions about manipulating pictures do you have for me?
Happy photo taking!


There are going to be other temp items in your folder. To make it clearer, you may want to delete everything you can from the temp folder before performing the steps.
This sadly did not work for me – the instructions end too early!
After the lower-res pictures have been downloaded (?) into ‘%temp%’, where does one then find ‘%temp%’? All I could see when I did a ‘control F’ for ‘%temp%’ was a folder with a loads of useless text files.
Very good idea! , Awesome!
Mate – thanks the creative windows email batch solution was very effective. Cheers
Incredibly helpful. Thank you so much
That worked. Thanks!
Amazing solution, so simple and effective. Thanks!
Normally i never write comments etc but thank you so much! perfect solution without etra trashoftware or unnecessary long texts
Thank you, bless you, angel.
Also, thank you Em phoenix for your elaborated steps.
Smart work better than hard work:-)
This worked once & for all subsequent attempts the photos are not in the temp file. I’m not doing anything different! Where are they going??!!
this didnt work for me-about 1/20th of the photos reduced and then the remaining photos got converted to Text files.
Well I should say thank you
You have just taught me to save so-much-time! Thank you, bless you, angel.
At first when I got a pop-up about the need to create some mail client, I clicked the button (OK or cancel or something…) and then I couldn’t find the resized pictures. But then I tried it again, didn’t shut the pop-up and first switched to Temp to see, and voila, they were there.
Hopefully this helps other people who can’t see them there for the same reason.
I have now found out how to do it – but the quality is bad in the resized picture. I miss Windows photo gallery!
I could not find my pictures in the temp-folder
Hi. thank you for your helpful post. I didn’t know I could change my image size in Windows like this. It’s a good trick but I think doing it online is simpler. I recommend pixellair.com.